
1. Introduction
This manual provides detailed instructions for the proper use, setup, operation, and maintenance of your CDI 3/8 Inch Drive Adjustable Click Torque Wrench, Model 1002MFRMH. This tool is designed for precise torque application within a range of 10-100 ft. lbs (16.9-132.2 Nm). Adhering to these instructions will ensure accurate performance and extend the lifespan of your torque wrench.

Figure 1: CDI 3/8 Inch Drive Adjustable Click Torque Wrench (Model 1002MFRMH)
2. Understanding Torque
Torque is a rotational or turning force. It is measured in units such as foot-pounds (ft. lbs) or Newton-meters (Nm). Applying the correct torque to fasteners is critical for safety, reliability, and performance in various applications, including automotive, machinery, and construction. Under-tightening can lead to loose connections and failure, while over-tightening can damage fasteners, components, or the wrench itself.

Figure 2: Importance and Calculation of Torque
3. Key Features
- Dual Scale: Features easy-to-read laser marked scales for both English (ft. lbs) and Newton Meter (Nm) measurements.
- Adjustable Click Style: Provides a clear audible and tactile 'click' when the preset torque value is reached.
- Positive Lock Ring: A spring-loaded pull-down lock ring ensures the set torque value remains secure during use.
- Quick Release Button: Facilitates secure socket retention and easy removal.
- Knurled Handle: Lightly knurled for a secure, non-slip grip.
- Accuracy: Calibrated to an accuracy of ± 4% CW (Clockwise) and ± 6% CCW (Counter-Clockwise) of the indicated value, from 20% to 100% of full scale.
- Durable Construction: Made from alloy steel for industrial strength and professional use.
- Protective Case: Includes a blow-molded case for safe storage and transport.

Figure 3: Quick Release Button for Socket Retention and Removal

Figure 4: Knurled Grip Handle and Positive Lock Ring

Figure 5: Easy-to-Read Laser Marked Dual Scales
4. Setup
- Initial Inspection: Before each use, inspect the torque wrench for any signs of damage, wear, or corrosion. Ensure the drive head operates smoothly.
- Selecting the Torque Value:
- Pull down the spring-loaded lock ring located at the base of the handle.
- Rotate the handle to adjust the torque setting. The main scale on the wrench body indicates major torque values, while the micrometer scale on the handle provides finer adjustments.
- Always approach the desired torque setting from a lower value to ensure proper spring engagement.
- Align the desired value on the micrometer scale with the main scale line. Release the lock ring to secure the setting.
- Attaching a Socket: Press the quick-release button on the drive head and firmly attach the appropriate socket. Ensure the socket is fully seated and locked into place.

Figure 6: Setting Torque Value on a Micrometer Wrench
5. Operating Instructions
- Positioning: Place the socket onto the fastener. Ensure the wrench is perpendicular to the fastener and that you have a clear, stable grip on the handle.
- Applying Force: Apply a slow, steady, and increasing force to the handle in the desired direction (clockwise or counter-clockwise, as the wrench is dual-directional). Avoid sudden jerking motions.
- The 'Click': Continue applying force until you feel and hear a distinct 'click' from the wrench. This indicates that the preset torque value has been reached.
- Releasing Force: Immediately stop applying force once the 'click' is detected. Do not continue to pull or tighten the fastener beyond the click, as this will over-torque the fastener and compromise accuracy.
- Multiple Fasteners: For applications requiring multiple fasteners, repeat the process for each one.

Figure 7: Applying Force and Detecting the Click
6. Maintenance
- Resetting After Use: After each use, it is crucial to reset the torque wrench to its lowest setting (or near its lowest setting, typically 10 ft. lbs for this model) by unwinding the handle. This relieves tension on the internal spring, preserving its accuracy and extending the wrench's lifespan. Do not store the wrench at a high torque setting.
- Cleaning: Wipe the wrench clean with a soft, dry cloth after each use. Avoid using harsh chemicals or solvents that could damage the finish or internal components.
- Storage: Store the torque wrench in its provided blow-molded case in a clean, dry environment, away from extreme temperatures and humidity.
- Calibration: Torque wrenches are precision instruments and require periodic calibration to maintain accuracy. Refer to the warranty section for details on calibration services.
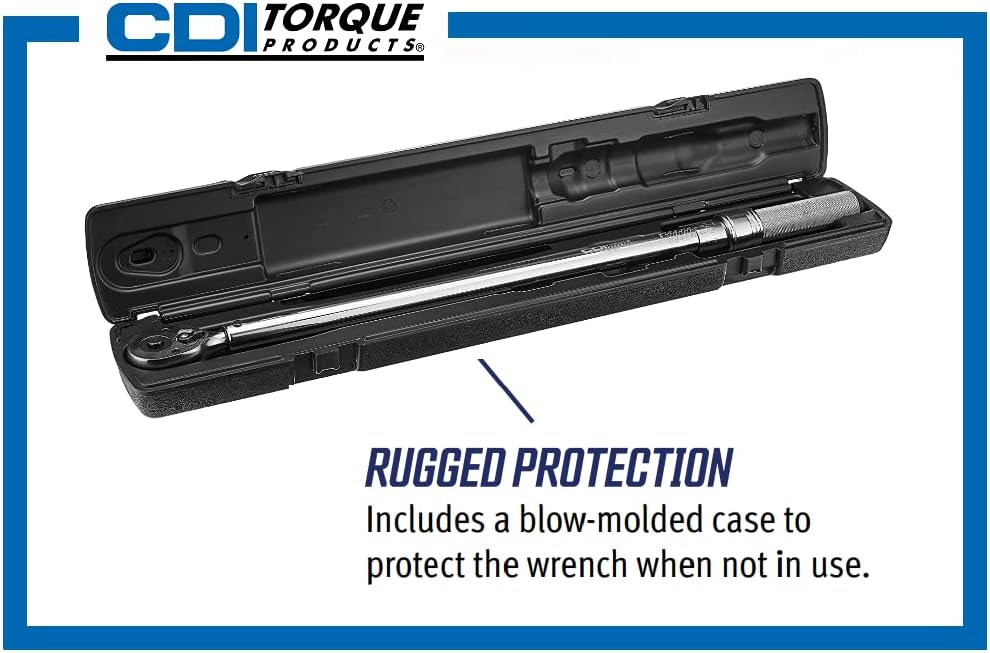
Figure 8: Torque Wrench Stored in Protective Case
7. Troubleshooting
- No Audible/Tactile Click:
- Ensure the torque setting is not below the wrench's minimum range (10 ft. lbs). Very low settings may produce a less pronounced click.
- Verify that the lock ring is fully engaged after setting the torque.
- Apply force smoothly and steadily. Jerking motions can cause you to miss the click.
- If the issue persists, the wrench may require recalibration or service.
- Inaccurate Readings:
- Confirm the torque value was set correctly on both the main and micrometer scales.
- Ensure the wrench was reset to its lowest setting after previous uses.
- Avoid using extensions unless specifically designed for torque wrenches, as they can affect accuracy.
- If accuracy is consistently questionable, professional calibration is recommended.
8. Specifications
| Attribute | Detail |
|---|---|
| Model Number | 1002MFRMH |
| Drive Size | 3/8 Inch |
| English Torque Range | 10-100 ft. lbs |
| Newton Meter Torque Range | 16.9-132.2 Nm |
| Accuracy (CW) | ± 4% of indicated value (20-100% of full scale) |
| Accuracy (CCW) | ± 6% of indicated value (20-100% of full scale) |
| Overall Length | 16 Inches |
| Material | Alloy Steel |
| Finish | Polished Chrome |
| Head Style | Fixed Square |
| Item Weight | 2.55 Pounds |
| Included Components | Certificate of Calibration, Plastic Case for Storage |
9. Warranty and Support
Warranty Information
CDI TORQUE PRODUCTS warrants its torque products against defects in workmanship or materials (excluding calibration) for 12 months from the date of original purchase. CDI TORQUE PRODUCTS also warrants the "initial, out of box calibration" of each new, unused torque product. Repair, replacement, or recalibration will be at the election and expense of CDI TORQUE PRODUCTS, and this constitutes your exclusive remedy in place of all other rights and remedies.
Customer Support
For technical assistance, warranty claims, or calibration services, please contact CDI TORQUE PRODUCTS customer support. Refer to the product packaging or the official CDI Torque Products website for the most current contact information.