1. Introduction
This manual provides instructions for the installation and maintenance of the Sierra International 18-7748 Carburetor Kit. This kit is designed for specific marine engine applications to restore carburetor function.
Compatibility: The Sierra 18-7748 Carburetor Kit is interchangeable with the following carburetor models and part numbers:
- Carter/Weber: 9600, 9662, 9663, 9665, 9666, 9772, 9773, 9774, 9776, 9777, 9780, 9782, 9665S, 9772SA, 9776S, 9776SA, 9776SB, 9779S, 9780S
- Mallory: 9-37639
- Mercruiser: 809064, 8M0120193, 808697
It is specifically designed for: 1987-1997 MCM/MIE/Tow Sports 350 Mag & 5.7L/LX Engines With 9665 & 9781 Weber Carbs, and 1990-1997 MCM/MIE 454 Mag 7.4L & 8.2L Engines.
2. Safety Information
Always prioritize safety when working with fuel systems. Gasoline is highly flammable and its vapors are explosive. Ensure adequate ventilation and work in a well-lit area free from ignition sources.
- Disconnect the battery before beginning any work to prevent accidental engine starting or electrical shorts.
- Wear appropriate personal protective equipment (PPE), including safety glasses and gloves.
- Have a fire extinguisher readily available.
- Dispose of old fuel and parts according to local regulations.
- If you are unsure about any step, consult a qualified marine mechanic.
3. Package Contents
The Sierra International 18-7748 Carburetor Kit includes all necessary components for a comprehensive carburetor rebuild. Please verify all parts are present before beginning installation.
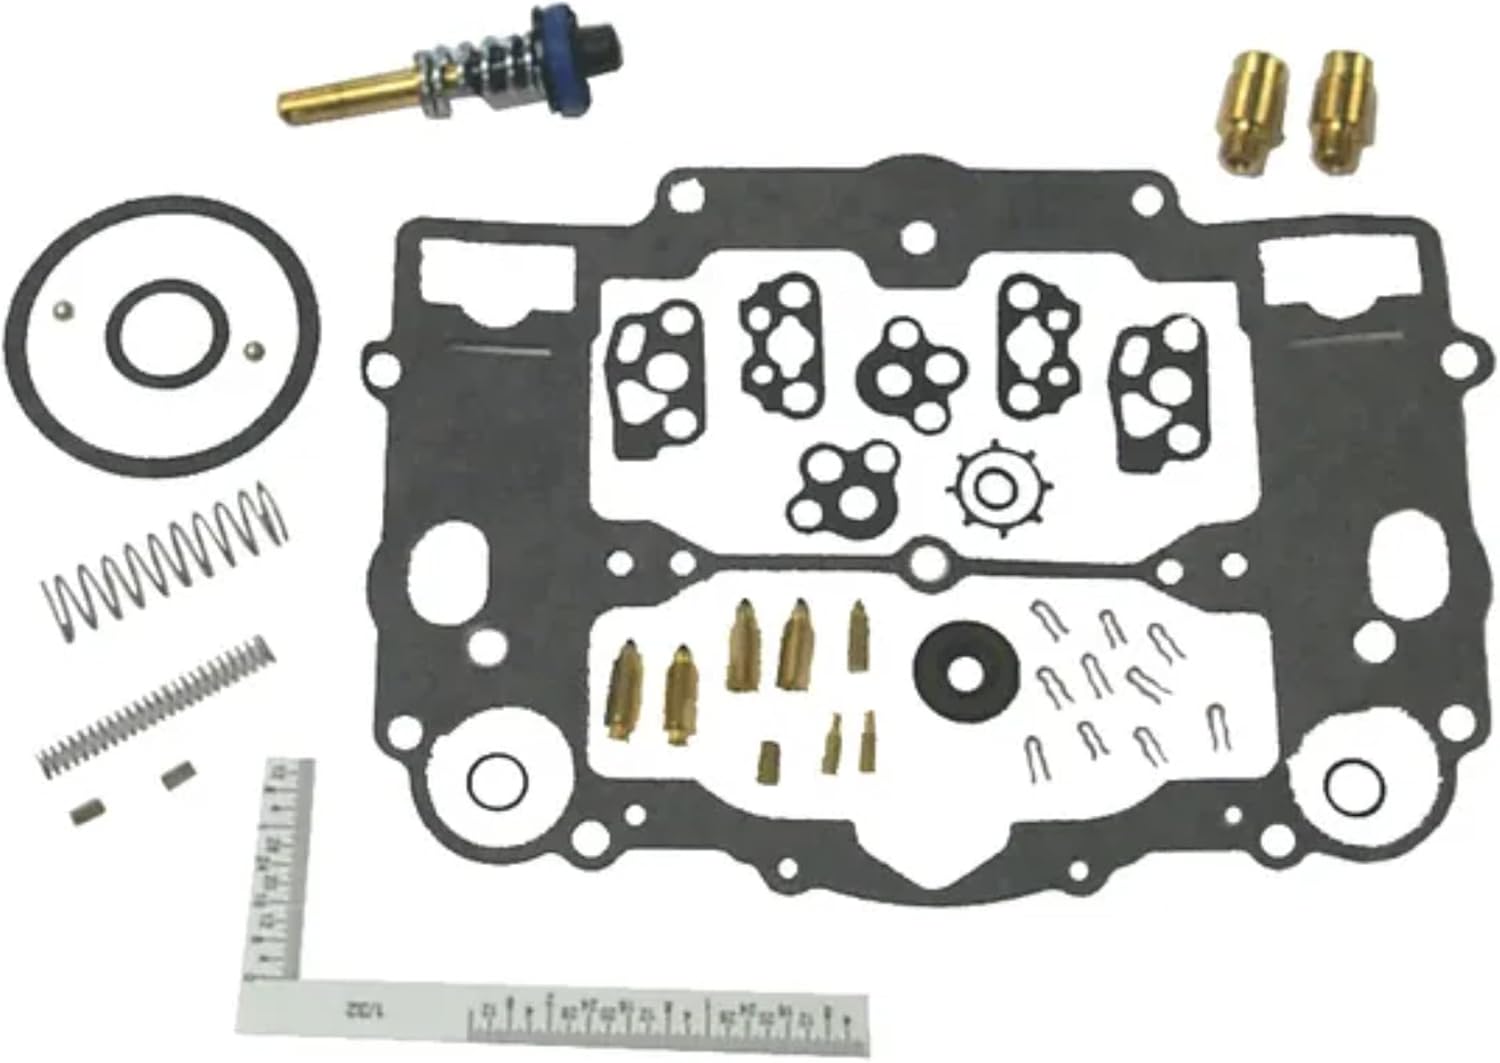
Figure 3.1: The complete Sierra International 18-7748 Carburetor Kit. It includes a main carburetor gasket, several smaller gaskets, various brass jets of different sizes, springs, a needle valve assembly with a blue cap, and other small components necessary for a carburetor rebuild. A small ruler is visible at the bottom for scale.
Kit includes:
- Main carburetor gasket
- Assorted smaller gaskets and O-rings
- Various brass jets
- Springs
- Needle valve assembly
- Other small components for rebuild
4. Setup and Installation
Installation of a carburetor kit requires mechanical aptitude and specific tools. If you are not confident in your ability to perform this procedure, it is recommended to seek professional assistance.
4.1. Preparation
- Ensure the engine is cool and the battery is disconnected.
- Close the fuel supply valve.
- Gather all necessary tools, including screwdrivers, wrenches, pliers, and a clean workspace.
- Have a container ready to catch any spilled fuel.
4.2. Disassembly of Old Carburetor
- Carefully remove the air cleaner assembly.
- Disconnect all fuel lines, vacuum lines, and electrical connections from the carburetor. Label them if necessary for reassembly.
- Remove the carburetor mounting bolts and lift the carburetor from the engine.
- Disassemble the carburetor, noting the position and orientation of all components. Take photographs if helpful.
- Clean all carburetor components thoroughly with a suitable carburetor cleaner. Inspect for wear or damage beyond what the kit replaces.
4.3. Kit Installation and Reassembly
- Replace all old gaskets, O-rings, jets, and the needle valve assembly with the new components from the Sierra 18-7748 kit.
- Ensure all new parts are installed correctly and securely. Refer to your engine's specific service manual for detailed diagrams and torque specifications.
- Reassemble the carburetor, ensuring all linkages move freely.
- Mount the rebuilt carburetor onto the engine, using a new base gasket if provided. Tighten mounting bolts to specifications.
- Reconnect all fuel lines, vacuum lines, and electrical connections.
- Reinstall the air cleaner assembly.
5. Operating (Post-Installation)
After installation, perform the following checks before operating the engine:
- Open the fuel supply valve and check for any fuel leaks around the carburetor and fuel lines.
- Reconnect the battery.
- Start the engine and allow it to warm up.
- Check for proper idle speed and smooth operation. Adjust idle mixture and speed screws as necessary, referring to your engine's service manual for specific procedures.
- Monitor for any unusual noises, smells, or performance issues.
6. Maintenance
Regular maintenance helps ensure the longevity and optimal performance of your carburetor:
- Periodically inspect fuel lines and connections for leaks or deterioration.
- Ensure the fuel filter is clean and replace it as recommended by your engine manufacturer.
- Use fresh, clean fuel. Stale or contaminated fuel can cause carburetor issues.
- If the engine is stored for an extended period, consider using a fuel stabilizer or draining the fuel system to prevent gumming and varnish buildup.
7. Troubleshooting
This section addresses common issues that may arise after carburetor kit installation.
| Problem | Possible Cause | Solution |
|---|---|---|
| Engine will not start or starts with difficulty | Incorrect fuel mixture, clogged fuel line, improper choke operation, vacuum leak. | Check fuel supply, verify choke function, inspect for vacuum leaks, adjust idle mixture. |
| Rough idle or poor engine performance | Improper idle adjustment, vacuum leak, clogged jet, incorrect float level. | Adjust idle speed and mixture, check for vacuum leaks, re-inspect jets and float. |
| Fuel leaks from carburetor | Improperly seated gasket, loose fittings, damaged fuel line, incorrect float level. | Tighten fittings, replace damaged lines, re-check gasket installation and float level. |
For persistent issues, consult your engine's service manual or a qualified marine technician.
8. Specifications
| Feature | Detail |
|---|---|
| Brand | Sierra |
| Model Number | 18-7748 |
| Vehicle Service Type | Scooter (Note: Product description indicates marine engines, this may be a general classification) |
| Flange Type | Bolt On |
| Fuel Type | Gasoline |
| Recommended Uses For Product | Tow (Implies heavy-duty marine use) |
| OEM Part Number (Mercruiser) | 809064 |
| Item Weight | 4.4 ounces |
| Package Dimensions | 7.28 x 6.26 x 1.89 inches |
| UPC | 808282244705 |
9. Warranty and Support
All Sierra parts qualify for and are covered under Sierra's industry-leading customer satisfaction warranty. For specific warranty details or technical support, please refer to the official Sierra International website or contact their customer service department.
Manufacturer: Sierra


