Introduction
This manual provides essential instructions for the safe and efficient operation of your Optoma TX612 XGA DLP Multimedia Projector. Please read this manual thoroughly before using the projector and retain it for future reference. The Optoma TX612 is designed to deliver clear and vibrant images for various presentation environments.
Safety Information
- Do not look directly into the projector lens when the lamp is on. The intense light can damage your eyes.
- Ensure proper ventilation around the projector. Do not block ventilation openings as this can lead to overheating.
- Avoid placing the projector in direct sunlight, near heat sources, or in environments with high humidity or excessive dust.
- Use only the power cord supplied with the projector. Connect to a properly grounded outlet.
- Do not attempt to service this product yourself. Refer all servicing to qualified service personnel.
- Disconnect the power cord from the wall outlet before cleaning or if the projector will not be used for an extended period.
Product Features
- High Brightness: 3500 ANSI lumens for clear, easy-to-read text and vibrant images.
- High Contrast Ratio: 3000:1 contrast ratio enhances image detail.
- Power Saving: Standby VGA and audio pass-through features reduce power consumption.
- Wireless Connectivity: Supports optional wireless dongle for flexible setup.
- Security Features: Control panel lock and password protection to customize security settings.
- Low Maintenance: Filter-free design contributes to a low cost of ownership.
Setup
1. Physical Connections
Connect your video sources and audio devices to the appropriate ports on the rear panel of the projector. Ensure all cables are securely connected.
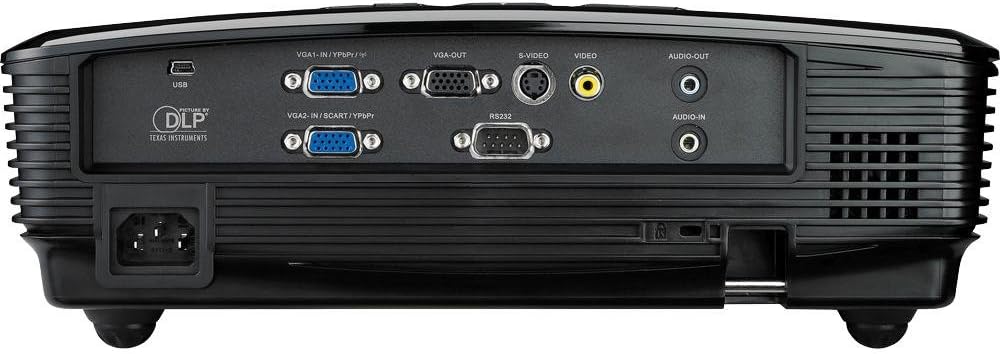
This image displays the rear panel of the Optoma TX612 projector, highlighting various connectivity options including VGA-IN (VGA1-IN/YPbPr, VGA2-IN/SCART/YPbPr), VGA-OUT, S-VIDEO, VIDEO, AUDIO-OUT, AUDIO-IN, RS232, and USB ports, along with the power input.
- VGA-IN (VGA1-IN/YPbPr, VGA2-IN/SCART/YPbPr): Connect to a computer or other VGA-compatible device.
- VIDEO: Connect to composite video sources.
- S-VIDEO: Connect to S-Video sources.
- AUDIO-IN: Connect audio cables from your source device.
- AUDIO-OUT: Connect to external speakers if desired.
- USB: For service or optional wireless dongle.
- RS232: For projector control via a computer or control system.
- Power Input: Connect the supplied power cord here.
2. Power On/Off
- To Power On: Connect the power cord and press the Power button on the control panel or remote control. The power indicator light will turn on.
- To Power Off: Press the Power button twice. The projector will enter a cooling down cycle before completely shutting off. Do not unplug the projector during the cooling cycle.
3. Image Adjustment
Adjust the projected image using the lens rings and control panel buttons.

This image shows the top of the Optoma TX612 projector, featuring the control panel with buttons for power, source selection, re-sync, and navigation. Also visible are the focus and zoom rings for lens adjustment.
- Focus Ring: Rotate the FOCUS ring around the lens until the image is sharp and clear.
- Zoom Ring: Rotate the ZOOM ring to adjust the size of the projected image.
- Keystone Correction: Use the menu options to correct trapezoidal distortion if the projector is not perfectly perpendicular to the screen.
Operating the Projector
1. Input Source Selection
Press the SOURCE button on the control panel or remote control to cycle through available input sources (VGA1, VGA2, Video, S-Video, etc.) until your desired source is displayed.
2. Menu Navigation
Press the MENU button to access the On-Screen Display (OSD) menu. Use the arrow buttons to navigate through options and the ENTER button to select. Press MENU again to exit.
- Image Settings: Adjust brightness, contrast, color, tint, and sharpness.
- Display Settings: Configure aspect ratio, keystone correction, and projection mode.
- Setup Settings: Manage language, auto power off, and security features.
Maintenance
- Lamp Replacement: The projector lamp has a finite lifespan. When the lamp indicator lights up or the image becomes dim, the lamp may need replacement. Refer to the full service manual for detailed lamp replacement instructions or contact qualified service personnel.
- Cleaning the Lens: Use a soft, lint-free cloth specifically designed for optical lenses. Do not use abrasive cleaners or solvents.
- Cleaning the Projector Casing: Wipe the casing with a soft, damp cloth. Avoid using harsh chemicals.
- Filter-Free Design: The Optoma TX612 features a filter-free design, reducing the need for regular filter cleaning.
Troubleshooting
| Problem | Possible Solution |
|---|---|
| No image displayed |
|
| Image is blurry |
|
| Image is distorted (trapezoid shape) |
|
| No audio |
|
Specifications
| Feature | Detail |
|---|---|
| Model Number | TX612 |
| Display Resolution | 1024 x 768 (XGA) |
| Brightness | 3500 ANSI Lumens |
| Contrast Ratio | 3000:1 |
| Connectivity Technology | Wireless (with optional dongle) |
| Special Feature | Integrated speakers |
| Product Dimensions | 9.21 x 12.76 x 3.82 inches |
| Item Weight | 10 pounds |
| Manufacturer | Optoma |
| Language | English |
Warranty and Support
For detailed warranty information, technical support, or service inquiries, please refer to the warranty card included with your product or visit the official Optoma website. Keep your purchase receipt as proof of purchase for warranty claims.
Online Resources: For the latest drivers, firmware updates, and additional support documentation, please visit www.optoma.com.


