
Makita HM1213C
Makita HM1213C 23 lb. AVT Demolition Hammer Instruction Manual
Model: HM1213C | Brand: Makita
Introduction
This manual provides essential information for the safe and effective operation, maintenance, and troubleshooting of your Makita HM1213C 23 lb. AVT Demolition Hammer. Please read and understand all instructions before use to ensure optimal performance and user safety.
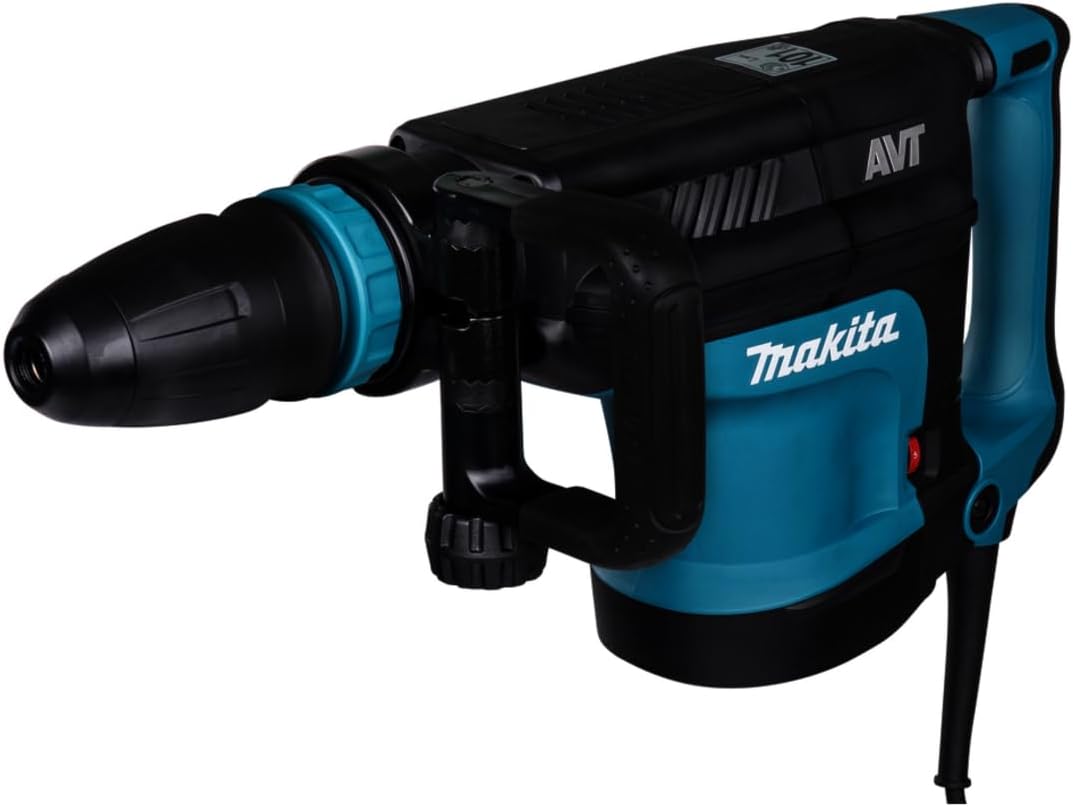
Figure 1: Makita HM1213C Demolition Hammer. This image shows the overall design of the tool, highlighting its robust construction and ergonomic handles.
Safety Information
Always observe basic safety precautions to reduce the risk of fire, electric shock, and personal injury. Keep this manual for future reference.
- Wear appropriate personal protective equipment (PPE) including safety glasses, hearing protection, and gloves.
- Ensure the work area is clear of obstructions and well-lit.
- Verify the power source matches the tool's voltage requirements (120V, not 240V as sometimes misstated).
- Keep bystanders and children away from the operating area.
- Do not operate the tool in explosive atmospheres, such as in the presence of flammable liquids, gases, or dust.
Product Overview
The Makita HM1213C is a powerful demolition hammer designed for demanding applications. Key features include Anti-Vibration Technology (AVT), constant speed control, and a variable speed dial.

Figure 2: Labeled diagram of the Makita HM1213C. This diagram illustrates various components such as the SDS-MAX chuck, side handle, main handle, power cord, and control switches.
- SDS-MAX Chuck: For quick and secure bit changes.
- Side Handle: Adjustable 360° for optimal control and comfort.
- Anti-Vibration Technology (AVT): Reduces vibration for increased user comfort and productivity.
- Variable Speed Dial and Trigger: Allows matching the impact rate to the application.
- L.E.D. Service Light: Indicates when carbon brushes require replacement.
- L.E.D. Power Light: Illuminates to indicate switch failure or cord damage.
Setup
1. Unpacking and Inspection
Carefully remove the demolition hammer and all accessories from the packaging. Inspect the tool for any signs of damage. Ensure all included components are present: 12" Bull Point SDS-MAX bit, Hammer Bit Grease, wiping cloth, and tool case.
2. Attaching the Side Handle
Loosen the clamp on the side handle and slide it onto the tool's barrel. Adjust the handle to a comfortable position for your application and tighten the clamp securely.
3. Installing an SDS-MAX Bit
- Clean the bit shank and apply a small amount of hammer bit grease (provided) to prevent premature wear.
- Pull back the tool holder cover and insert the bit into the chuck.
- Rotate the bit slightly until it engages with the locking mechanism.
- Release the tool holder cover. Pull on the bit to ensure it is securely locked in place. A slight amount of play is normal for SDS-MAX systems.
The tool features 12 bit angle settings, allowing the bit to be set at different positions for optimal operator comfort and access to various work angles.
Operating Instructions
1. Power Connection
Connect the tool to a standard 120V AC power outlet. Ensure the power cord is not damaged and is routed safely to avoid tripping hazards.
2. Adjusting Speed
Figure 3: Variable speed control dial. This image shows the dial used to adjust the impact rate of the demolition hammer, allowing users to match the speed to the specific application.
The HM1213C features a variable speed control dial and trigger. Rotate the dial to select the desired impact rate. Lower speeds are suitable for delicate work or starting holes, while higher speeds are for maximum demolition power. The constant speed control automatically applies additional power to the motor to maintain speed under load.
3. Starting and Stopping
To start the tool, press the power trigger. The soft start feature suppresses start-up reaction for more precision. For continuous operation, engage the lock-on button. To stop, release the trigger or press the lock-on button again if engaged.
4. Demolition Operation

Figure 4: Demolition hammer in action. This image depicts the Makita HM1213C being used to break up concrete, demonstrating its application in heavy-duty tasks.
Hold the tool firmly with both hands, utilizing the main handle and the adjustable side handle. Apply steady, downward pressure. Allow the tool to do the work; excessive force is not necessary and can reduce efficiency and increase user fatigue. The Anti-Vibration Technology (AVT) system, with its internal counterbalance and vibration-absorbing rear handle, significantly reduces felt vibration during operation.
Figure 5: Anti-Vibration Technology (AVT) in action. This image highlights the internal counterbalance system that reduces vibration, improving user comfort and control.
Maintenance
1. Carbon Brush Replacement
Figure 6: LED service light indicator. This image shows the LED light that illuminates approximately 8 hours before the carbon brushes need replacement, ensuring timely maintenance.
The L.E.D. service light will illuminate approximately 8 hours before the carbon brushes need replacement. Replace both carbon brushes simultaneously. Refer to the detailed instructions in the full user guide for the correct procedure or contact an authorized service center.
An automatic brush cut-off feature protects the commutator from damage, extending tool life.
2. Cleaning and Lubrication
Regularly clean the tool's ventilation openings to prevent overheating. Wipe down the exterior with a damp cloth. Apply hammer bit grease to the SDS-MAX bit shanks before each use to ensure smooth operation and reduce wear.
3. Storage
Store the tool in its case in a clean, dry place, out of reach of children and unauthorized users.
Troubleshooting
| Problem | Possible Cause | Solution |
|---|---|---|
| Tool does not start | No power supply; Damaged cord/switch (L.E.D. power light may indicate); Carbon brushes worn out. | Check power connection; Inspect cord/switch (if L.E.D. power light is on, seek service); Replace carbon brushes. |
| Reduced impact power | Worn bit; Insufficient lubrication; Carbon brushes worn out. | Replace bit; Apply hammer bit grease; Replace carbon brushes. |
| Excessive vibration | Improper bit installation; Tool malfunction. | Ensure bit is correctly seated; If problem persists, seek professional service. |
For issues not listed or if solutions do not resolve the problem, contact a Makita authorized service center.
Specifications
| Feature | Detail |
|---|---|
| Model Number | HM1213C |
| Power Source | Corded Electric |
| Voltage | 120 Volts (Note: Product specifications sometimes incorrectly list 240V; actual is 120V for US market) |
| Amperage | 14 Amps |
| Maximum Power | 1510 Watts |
| Impact Energy | 18.8 ft.lbs. |
| Maximum Rotational Speed | 1900 RPM |
| Item Weight | 23.8 Pounds |
| Chuck Type | SDS-MAX |
| Special Features | Anti-Vibration Technology (AVT), Variable Speed, Soft Start, Constant Speed Control |
| Product Dimensions | 12"L x 12"W x 12"H (Approximate) |
Warranty Information
The Makita HM1213C Demolition Hammer is covered by a 1-year limited warranty from the date of purchase. This warranty covers defects in materials and workmanship. For full details regarding warranty terms, conditions, and claim procedures, please refer to the official Makita warranty statement included with your product or visit the official Makita website.
Support and Further Resources
For additional support, detailed diagrams, or service inquiries, please utilize the following resources:
- Official User Guide (PDF): Download PDF
- Makita Official Website: Visit www.makitatools.com for product information, service center locations, and accessories.
- Customer Service: Contact Makita customer service for direct assistance.
Related documentsHM1213C


Ask a question about this manual
Ask about setup, troubleshooting, compatibility, parts, safety, or missing instructions. Manuals+ will review the question and use this page’s manual context to help answer it.