1. Introduction
This manual provides detailed instructions for the installation, operation, and maintenance of your Kingston Brass KB161 American Twin Acrylic Handle 4-Inch Centerset Faucet. Please read all instructions carefully before beginning installation to ensure proper function and to prevent damage.

Image 1.1: Kingston Brass KB161 American Twin Acrylic Handle 4-Inch Centerset Faucet in Polished Chrome finish. This image shows the complete faucet assembly with two clear acrylic handles and a central spout, designed for a 4-inch centerset installation.
2. Safety Information
Always observe the following safety precautions during installation and maintenance:
- Turn off the main water supply before beginning any plumbing work.
- Wear appropriate personal protective equipment, such as safety glasses and gloves.
- If you are unsure about any part of the installation process, consult a qualified plumber.
- Do not overtighten connections, as this can damage the faucet or plumbing.
- Ensure all connections are watertight before restoring water supply.
3. Package Contents
Verify that all components are present before beginning installation:
- Faucet body with spout and handles
- Mounting hardware
- Hot and cold water supply lines (integrated or separate, check packaging)
- Matching pop-up drain assembly
- Installation instructions (this manual)
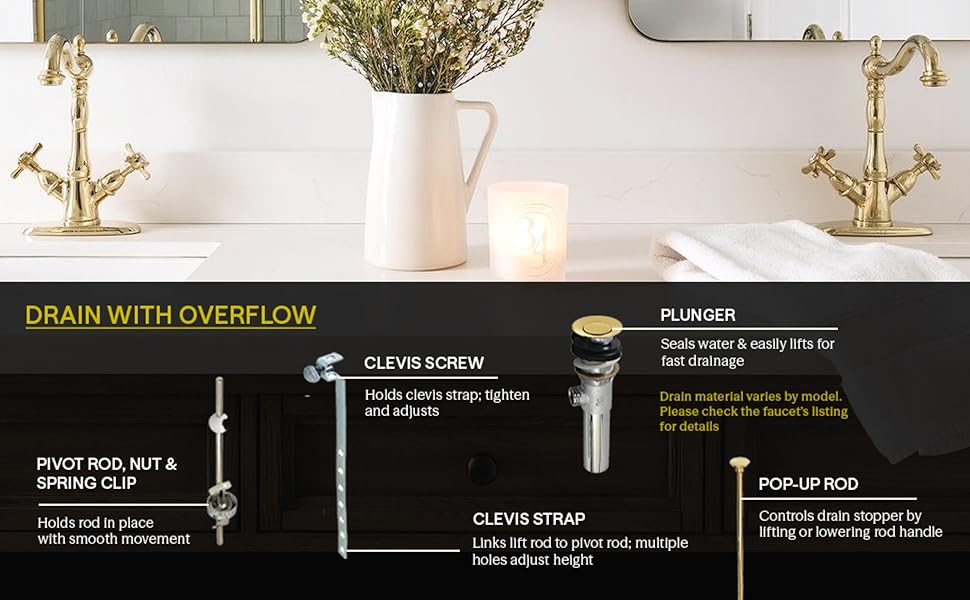
Image 3.1: Diagram illustrating the components of a typical pop-up drain assembly, including the pivot rod, nut, spring clip, clevis screw, clevis strap, plunger, and pop-up rod. This diagram helps identify parts for drain installation.
4. Specifications
| Feature | Specification |
|---|---|
| Model Name | KB161 |
| Brand | Kingston Brass |
| Mounting Type | Deck Mount, 4-Inch Centerset |
| Hole Count | 3 Holes |
| Number of Handles | 2 (Twin Acrylic Handles) |
| Finish Type | Polished Chrome |
| Material | Brass (faucet body), Acrylic (handles) |
| Spout Reach | 3-3/4 inches (9.53 cm) |
| Spout Height | 3-1/8 inches (7.94 cm) |
| Spout Clearance | 1-1/2 inches (3.81 cm) |
| Maximum Flow Rate | 1.2 GPM / 4.5 LPM at 60 PSI |
| Cartridge Type | Duraseal Washerless Cartridge (1/4 turn On/Off) |
| Special Feature | Integrated removable aerator, Pop Up Drain included |
Image 4.1: Technical drawing providing detailed dimensions and installation requirements for the Kingston Brass KB161 faucet. This includes measurements for the faucet body, handles, spout, and mounting shanks, crucial for proper installation.
5. Installation
This faucet is designed for a 3-hole, 4-inch centerset sink application. Refer to Image 4.1 for detailed dimensions.
- Prepare the Sink: Ensure the sink deck is clean and free of debris. The faucet requires three holes spaced 4 inches apart.
- Install the Faucet Body:
- Place the faucet body onto the sink deck, aligning the shanks with the pre-drilled holes.
- From underneath the sink, secure the faucet body using the provided washers and mounting nuts. Hand-tighten first, then use a wrench to snug them securely, but do not overtighten.
- Connect Water Supply Lines:
- Connect the hot and cold water supply lines to the 1/2 inch - 14 NPS male threaded shank inlets on the underside of the faucet.
- Connect the other ends of the supply lines to your hot and cold water shut-off valves. Use thread sealant tape on all threaded connections to prevent leaks.
- Install the Pop-Up Drain:
- Follow the instructions provided with the pop-up drain assembly. Typically, this involves placing the drain body into the sink drain hole with a gasket, securing it from underneath, and then connecting the pivot rod and clevis strap to the faucet's lift rod.
- Ensure all drain connections are sealed properly to prevent leaks.
- Test for Leaks:
- Once all connections are made, slowly turn on the main water supply.
- Check all connections for leaks. If leaks are detected, turn off the water supply and tighten the affected connections.
- Operate the faucet handles to ensure proper water flow and temperature control.
6. Operation
The Kingston Brass KB161 faucet features two acrylic handles for controlling water flow and temperature.
- Water Flow: Turn the handles 1/4 turn to open or close the water flow.
- Temperature Control: The left handle typically controls hot water, and the right handle controls cold water. Adjust both handles to achieve the desired water temperature.
- Aerator: The integrated aerator mixes air with water to provide a smooth, splash-free stream. It can be removed for cleaning if necessary.
- Pop-Up Drain: Use the lift rod located behind the faucet spout to open and close the sink drain.
7. Maintenance and Care
Proper care will ensure the longevity and appearance of your faucet.
- Cleaning: Clean the polished chrome finish regularly with a soft cloth and mild soap or a non-abrasive cleaner specifically designed for chrome. Avoid abrasive cleaners, harsh chemicals, or scouring pads, as these can damage the finish.
- Aerator Maintenance: If water flow becomes restricted, the aerator may be clogged with sediment. Unscrew the aerator from the spout, clean any debris, and rinse thoroughly before reattaching.
- Cartridge: The faucet features a Drip-free washerless cartridge system, designed for durability. If a drip occurs, it may indicate a need to inspect or replace the cartridge. Consult a plumber if you are unsure.
8. Troubleshooting
Refer to the following common issues and solutions:
| Problem | Possible Cause | Solution |
|---|---|---|
| Low Water Flow | Clogged aerator; partially closed shut-off valves; debris in supply lines. | Clean the aerator (see Section 7). Ensure hot and cold water shut-off valves are fully open. Flush supply lines if necessary. |
| Faucet Drips | Loose connections; worn cartridge. | Check and tighten all water supply connections. If dripping persists, the internal cartridge may need inspection or replacement by a qualified professional. |
| Water Leaks from Base of Faucet | Loose mounting nuts; improper sealing. | Ensure mounting nuts are securely tightened. Verify that gaskets and seals are correctly positioned during installation. |
9. Warranty and Support
This Kingston Brass faucet comes with a limited warranty. For specific warranty details and terms, please refer to the documentation included with your purchase or visit the official Kingston Brass website.
For technical assistance or replacement parts, please contact Kingston Brass customer support. You can find contact information on the Kingston Brass website or through your retailer.
Kingston Brass Official Website: Visit Kingston Brass Store on Amazon


