Introduction
This manual provides detailed instructions for the installation, operation, and maintenance of your Moen T90331NL Push-N-Lock Bathtub Drain Cover. Please read these instructions carefully before beginning installation to ensure proper function and longevity of the product. Keep this manual for future reference.
Product Features
- Nickel Finish: Provides a bright, highly reflective warm grey metallic appearance.
- Push-N-Lock Trim: Designed for easy operation to open and close the drain.
- All Metal Construction: Ensures durability and reliability.
- Simple Operation: Push down to close the drain, pull up to open and allow water to drain.
- Compatibility: Fits standard 1-1/2-inch threaded drains.
- Dimensions: Features 1-1/2 inch threads and a 1-3/4 inch diameter.
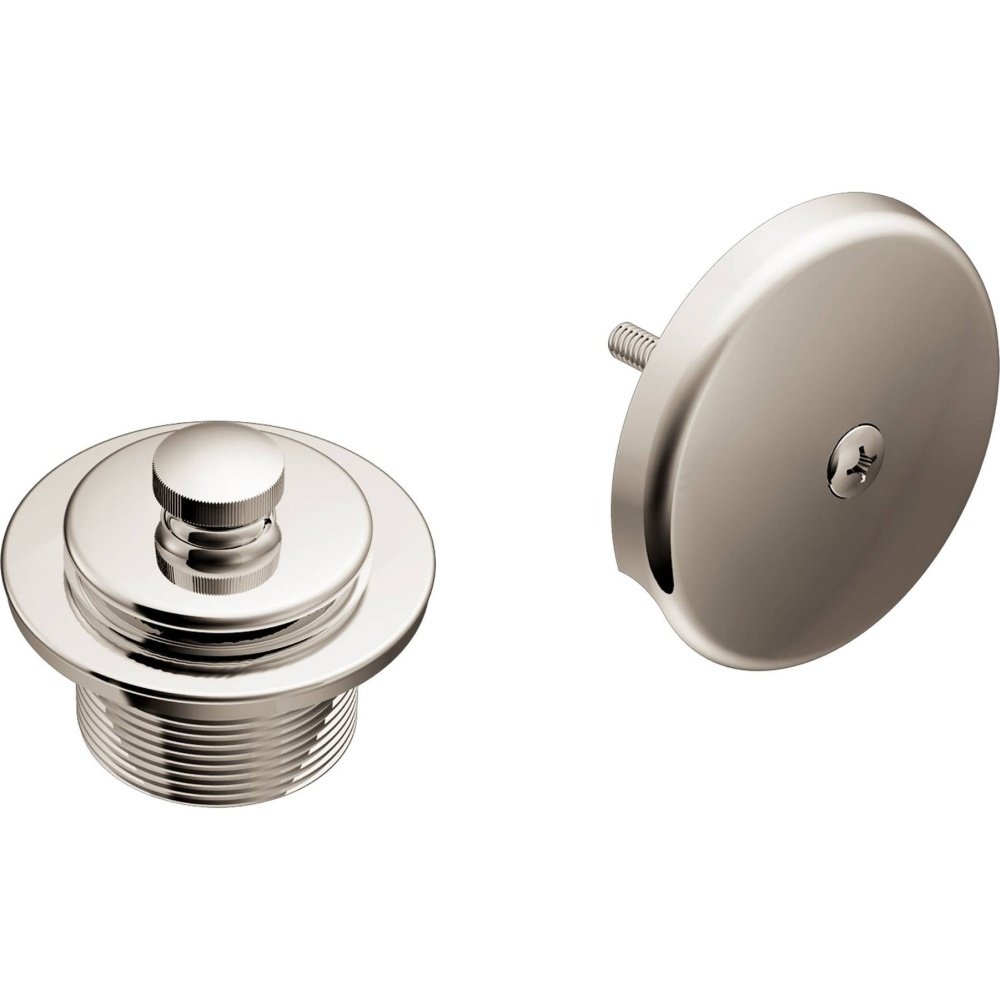
Image: Moen T90331NL Push-N-Lock Bathtub Drain Cover. This image shows the drain cover with its nickel finish and Push-N-Lock mechanism.
Setup and Installation
Before installation, ensure you have the necessary tools, which typically include a screwdriver (if your existing drain requires it) and plumber's putty or thread sealant (optional, for a watertight seal).
- Remove Old Drain Cover: If replacing an existing drain cover, carefully remove it. This may involve unscrewing it or simply pulling it out, depending on its design. Clean any debris or sealant residue from the drain opening.
- Prepare New Drain Cover: Inspect the Moen T90331NL drain cover for any damage. Ensure the threads are clean.
- Apply Sealant (Optional): For an extra watertight seal, apply a thin bead of plumber's putty or thread sealant around the underside edge of the drain cover flange or on the threads.
- Install Drain Cover: Carefully thread the Moen T90331NL drain cover into the 1-1/2-inch threaded drain opening. Turn clockwise until it is hand-tight. Do not overtighten, as this can damage the threads or the drain cover.
- Test for Leaks: Fill the bathtub with water and close the drain using the Push-N-Lock mechanism. Observe for any leaks around the drain cover. If leaks occur, tighten slightly or reapply sealant.
Note: If you are unsure about any step, it is recommended to consult a qualified plumber.
Operating Instructions
The Moen T90331NL drain cover features a simple Push-N-Lock mechanism for easy operation.
- To Close the Drain: Gently push down on the top of the drain cover until it clicks into the closed position. This will seal the drain, allowing the tub to fill with water.
- To Open the Drain: Gently pull up on the top of the drain cover until it releases and pops up. This will open the drain, allowing water to flow out of the tub.
Maintenance
Regular cleaning and maintenance will help preserve the finish and functionality of your Moen T90331NL drain cover.
- Cleaning: Clean the drain cover regularly with a soft cloth and mild soap. Rinse thoroughly with water and dry with a soft cloth to prevent water spots.
- Avoid Harsh Cleaners: Do not use abrasive cleaners, harsh chemicals, or scouring pads, as these can damage the nickel finish.
- Check for Debris: Periodically check the drain area for hair or other debris that may accumulate and affect drainage. The drain cover can be easily removed for cleaning the drain pipe if necessary.
Troubleshooting
| Problem | Possible Cause | Solution |
|---|---|---|
| Drain does not seal properly. | Debris under the drain cover or worn seal. | Remove the drain cover and clean any debris. Inspect the rubber seal for damage and replace if necessary. Ensure the cover is fully pushed down. |
| Drain cover is difficult to push down or pull up. | Mineral buildup or lack of lubrication. | Clean the mechanism thoroughly. A small amount of silicone grease can be applied to moving parts if accessible, but avoid contact with the finish. |
| Slow drainage. | Hair or debris accumulation in the drain pipe. | Remove the drain cover and clear any blockages from the drain pipe. Use a drain snake or appropriate drain cleaner if needed. |
Specifications
| Feature | Detail |
|---|---|
| Model Number | T90331NL |
| Brand | Moen |
| Material | Metal |
| Color/Finish | Nickel |
| Drain Thread Size | 1-1/2 inches |
| Drain Cover Diameter | 1-3/4 inches |
| Item Weight | 12.3 ounces |
| Product Dimensions | 3.75 x 4.5 x 3 inches |
| UPC | 026508184516 |
| Special Features | Removable |
Warranty and Support
Manufacturer's Warranty: Moen products are manufactured under high standards of quality and workmanship. Most Moen faucets are backed by Moen's lifetime limited warranty. Moen warrants to the original consumer purchaser, for as long as they own their home (the "warranty period" for homeowners), that this product will be leak- and drip-free during normal use, and all parts and finishes will be free from defects in material and manufacturing workmanship. For all other purchasers (including industrial, commercial, and business use), the warranty period is 5 years from the original date of purchase.
For warranty claims, technical assistance, or replacement parts, please contact Moen Customer Support directly. Refer to the official Moen website or product packaging for the most current contact information.


