Introduction
This manual provides detailed instructions for the safe installation, operation, and maintenance of your Hampton Bay 113 102 Gazebo II 42-inch Ceiling Fan. Please read all instructions carefully before beginning installation and retain this manual for future reference.
Safety Information
- Always disconnect power at the circuit breaker before installation or servicing.
- Ensure all electrical connections comply with local codes and ordinances.
- The fan must be mounted to a ceiling joist or an outlet box marked "Acceptable for Fan Support of 35 lbs (15.9 kg) or less."
- Do not operate the fan with damaged parts.
- Maintain a minimum clearance of 7 feet from the floor to the fan blades.
Package Contents
Verify that all components listed below are included in your package. If any parts are missing or damaged, contact customer service before proceeding with installation.

Image: Product packaging for the Hampton Bay Gazebo II 42-inch Ceiling Fan, highlighting features such as Quiet Motor Technology, Indoor/Outdoor use, Wet Locations suitability, various mounting options, reversible blades (white/maple), and a Lifetime Motor Warranty.
- Ceiling Fan Motor Assembly
- Fan Blades (5 reversible blades: white and maple finish)
- Blade Brackets
- Downrod Assembly
- Canopy and Mounting Bracket
- Remote Control and Receiver (if included with your model)
- Hardware Pack (screws, washers, wire nuts)
- Pull Chain (as shown in image)

Image: A detailed view of the white pull chain, a component included with the fan for manual speed and light control (if a light kit is installed).
Setup and Installation
Follow these steps for proper installation of your ceiling fan. It is recommended to have two people for installation.
Mounting Options
The Hampton Bay Gazebo II fan offers versatile mounting options including close to ceiling, downrod, or slope mounting. Choose the appropriate method for your ceiling type and height.

Image: A chart illustrating recommended downrod lengths based on ceiling height, ranging from 10 to 16 feet. It advises reducing downrod length by 12 inches if a light kit is installed.
- Secure the Mounting Bracket: Attach the mounting bracket to the ceiling outlet box. Ensure the box is securely fastened to the building structure and can support the fan's weight.
- Assemble the Downrod: Insert the downrod through the canopy and connect it to the fan motor assembly. Secure with the provided pin and screw.
- Hang the Fan: Carefully lift the fan assembly and hang it from the mounting bracket using the ball joint in the downrod.
Electrical Wiring
All wiring must be performed by a qualified electrician or in accordance with local electrical codes.
- Connect the fan's ground wire (green or bare copper) to the household ground wire.
- Connect the fan's neutral wire (white) to the household neutral wire.
- Connect the fan's hot wire (black) to the household hot wire.
- If using a remote control, follow the specific wiring instructions provided with the remote receiver.
- Secure all wire connections with approved wire nuts and ensure no loose strands are exposed.
Attaching Fan Blades
Attach the fan blades to the blade brackets, then secure the blade brackets to the motor housing. Ensure all screws are tightened securely.
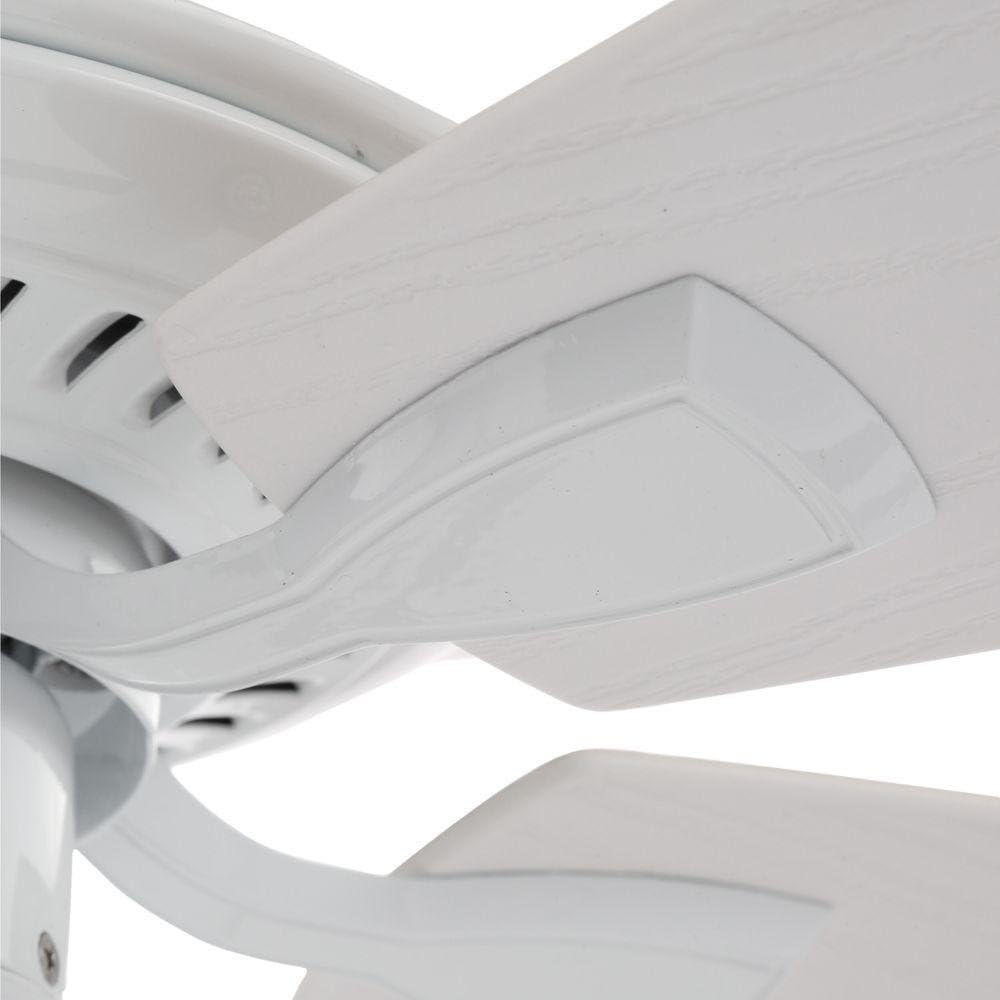
Image: A close-up of a white fan blade securely attached to its bracket, demonstrating the connection point to the fan motor.

Image: Two fan blades displayed side-by-side, showcasing their reversible design. One side features a clean white finish, while the other has a natural maple wood grain.
Operating Instructions
Once installed, your Hampton Bay Gazebo II ceiling fan is ready for operation.
Fan Speed Control
The fan features multiple speed settings to adjust airflow. Use the pull chain or the remote control (if applicable) to cycle through the speeds.
- Pull Chain: Pull the chain to change fan speeds (e.g., High, Medium, Low, Off).
- Remote Control: If your model includes a remote, use the designated buttons to adjust fan speed and turn the fan on/off.
Reversible Airflow Function
Your fan is equipped with a reverse switch, typically located on the motor housing, to change the direction of airflow. This allows for year-round comfort.
- Summer Operation: Set the switch to circulate air downwards, creating a cooling breeze.
- Winter Operation: Set the switch to circulate air upwards, helping to distribute warm air evenly throughout the room.
- Always turn off the fan and wait for the blades to stop completely before changing the direction switch.
Maintenance and Care
Regular maintenance ensures the longevity and optimal performance of your ceiling fan.
Cleaning
- Dusting: Use a soft brush or lint-free cloth to dust the fan blades and motor housing regularly.
- Wiping: For a more thorough cleaning, wipe the fan with a slightly damp cloth. Do not use abrasive cleaners or solvents, as these can damage the finish.
- Ensure the fan is turned off and power is disconnected before cleaning.
Troubleshooting
| Problem | Possible Cause | Solution |
|---|---|---|
| Fan does not start | No power to the fan; Loose wire connections; Remote control battery low. | Check circuit breaker; Verify all wire connections are secure; Replace remote battery. |
| Fan wobbles excessively | Loose blade screws; Unbalanced blades; Loose mounting bracket. | Tighten all blade screws; Use a balancing kit (not included); Ensure mounting bracket is secure. |
| Noisy operation | Loose screws; Motor housing rubbing; Incorrect installation. | Check and tighten all screws; Ensure no parts are rubbing; Re-check installation steps. |
Product Specifications
| Brand | Hampton Bay |
| Model Name | 113 102 (Gazebo II) |
| Size | 42 inches (Cutting Diameter / Assembled Diameter) |
| Color | White |
| Electric Fan Design | Ceiling Fan |
| Power Source | Corded Electric |
| Voltage | 120 Volts |
| Wattage | 60 watts |
| Speed | 300 RPM |
| Number of Power Levels | 2 |
| Control Method | Remote, Pull Chain |
| Room Type | Bedroom, Living Room |
| Indoor/Outdoor Usage | Outdoor (Suitable for Wet Locations) |
| Item Weight | 15.75 - 15.8 Pounds |
| Material | Glass (likely for light kit, if installed), Metal, Wood (blades) |
| UPC | 0792145351986 |

Image: The Hampton Bay Gazebo II 42-inch Ceiling Fan in white finish, installed on an outdoor patio with a white brick wall and lush greenery in the background, demonstrating its suitability for outdoor use.
Warranty and Support
Warranty Information
The Hampton Bay 113 102 Gazebo II Ceiling Fan is advertised with a Lifetime Motor Warranty. For specific terms and conditions, please refer to the warranty documentation included with your purchase or contact Hampton Bay customer service.
Note: The product specifications also list "Warranty Description: Na." Please consult the official warranty card for the most accurate and up-to-date information.
Customer Support
For technical assistance, missing parts, or warranty claims, please contact Hampton Bay customer support. Contact information can typically be found on the product packaging or the manufacturer's official website.