Introduction
This manual provides essential information for the safe and efficient installation, operation, and maintenance of your HP ATX 300W Power Supply, Model 366505-001. This power supply is designed to provide reliable power to compatible personal computer systems.
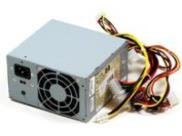
Image 1: Front view of the HP ATX 300W Power Supply. This image displays the compact form factor and primary connectors of the power supply unit.
Please read this manual thoroughly before attempting any installation or operation. Keep this manual for future reference.
Safety Information
- Electrical Hazard: Power supplies contain high voltage components. Do not open the power supply casing. Risk of electric shock.
- Ventilation: Ensure adequate ventilation around the power supply. Do not block air vents. Overheating can cause damage or fire.
- Grounding: Always connect the power supply to a properly grounded electrical outlet.
- Moisture: Do not expose the power supply to water or excessive moisture.
- Professional Installation: If you are unsure about the installation process, seek assistance from a qualified technician.
- Compatibility: Use only with compatible personal computer systems as specified.
Setup and Installation
Follow these steps for proper installation of the HP ATX 300W Power Supply into your personal computer system:
- Preparation:
- Turn off and unplug your computer from the wall outlet.
- Open the computer case according to your computer's manufacturer instructions.
- Discharge any static electricity by touching a grounded metal object before handling components.
- Remove Old Power Supply (if applicable):
- Disconnect all cables from the existing power supply to the motherboard, graphics card, hard drives, and other components.
- Unscrew the old power supply from the computer case and carefully remove it.
- Install New Power Supply:
- Carefully place the HP ATX 300W Power Supply into the designated power supply bay in your computer case.
- Secure the power supply to the case using the appropriate screws.
- Connect Cables:
- Connect the main 20+4 pin ATX connector to the motherboard.
- Connect the 4-pin or 8-pin CPU power connector to the motherboard.
- Connect SATA power connectors to hard drives, SSDs, and optical drives.
- Connect any necessary PCIe power connectors to graphics cards (if applicable).
- Ensure all connections are firm and correctly seated.
- Final Steps:
- Organize cables to improve airflow and prevent interference.
- Close the computer case.
- Plug the computer's power cord into the power supply and then into a grounded wall outlet.
Operation
Once installed, the HP ATX 300W Power Supply operates automatically with your computer system. When you power on your computer, the power supply will deliver stable and consistent power to all connected components.
- Power On/Off: The power supply is controlled by your computer's power button. Ensure the main power switch on the back of the power supply (if present) is in the 'ON' position before powering on the computer.
- Cooling: The integrated air cooling system will activate automatically to maintain optimal operating temperatures. Ensure the fan intake and exhaust are not obstructed.
- Power Output: This unit provides a maximum output of 300 Watts. Ensure your system's total power requirements do not exceed this limit for stable operation.
Maintenance
Regular maintenance helps ensure the longevity and optimal performance of your power supply:
- Cleaning: Periodically clean the exterior of the power supply and its fan vents to prevent dust buildup. Use compressed air to gently clear dust from the fan and internal components (with the computer powered off and unplugged).
- Inspection: Occasionally inspect power cables for any signs of wear, fraying, or damage. Replace damaged cables immediately.
- Environment: Operate the computer in a clean, dry, and well-ventilated environment to prevent dust accumulation and overheating.
Troubleshooting
If you encounter issues with your power supply, consider the following common troubleshooting steps:
- No Power:
- Check if the power cord is securely plugged into both the power supply and the wall outlet.
- Ensure the main power switch on the power supply is in the 'ON' position.
- Verify the wall outlet is functional by plugging in another device.
- Check all internal power connections (motherboard, CPU, peripherals) are firmly seated.
- Intermittent Power/System Instability:
- Ensure the power supply's wattage (300W) is sufficient for all your computer components. Upgrading components may require a higher wattage power supply.
- Check for overheating. Ensure proper airflow and clean any dust from the power supply fan.
- Inspect for loose cable connections.
- Unusual Noises:
- A grinding or loud fan noise may indicate a failing fan. Consider professional inspection or replacement.
If problems persist after attempting these steps, contact HP customer support or a qualified computer technician.
Specifications
| Brand | HP |
| Model Name / Number | 366505-001 |
| Form Factor | ATX |
| Output Wattage | 300 Watts |
| Connector Type | ATX |
| Compatible Devices | Personal Computer |
| Cooling Method | Air |
| Product Dimensions (L x W x H) | 9.5 x 12 x 4 inches |
| Item Weight | 5.59 pounds (2.54 Kilograms) |
| ASIN | B001U0ICS6 |
| Date First Available | August 16, 2010 |
Warranty and Support
For information regarding the warranty coverage for your HP ATX 300W Power Supply, please refer to the warranty documentation provided with your original computer system or contact HP customer support directly. Warranty terms and conditions may vary based on region and purchase date.
For technical support, service, or further inquiries, please visit the official HP support website or contact their customer service department. Have your product model number (366505-001) and serial number (if applicable) ready when contacting support.
HP Support Website: www.hp.com/support