Product Overview
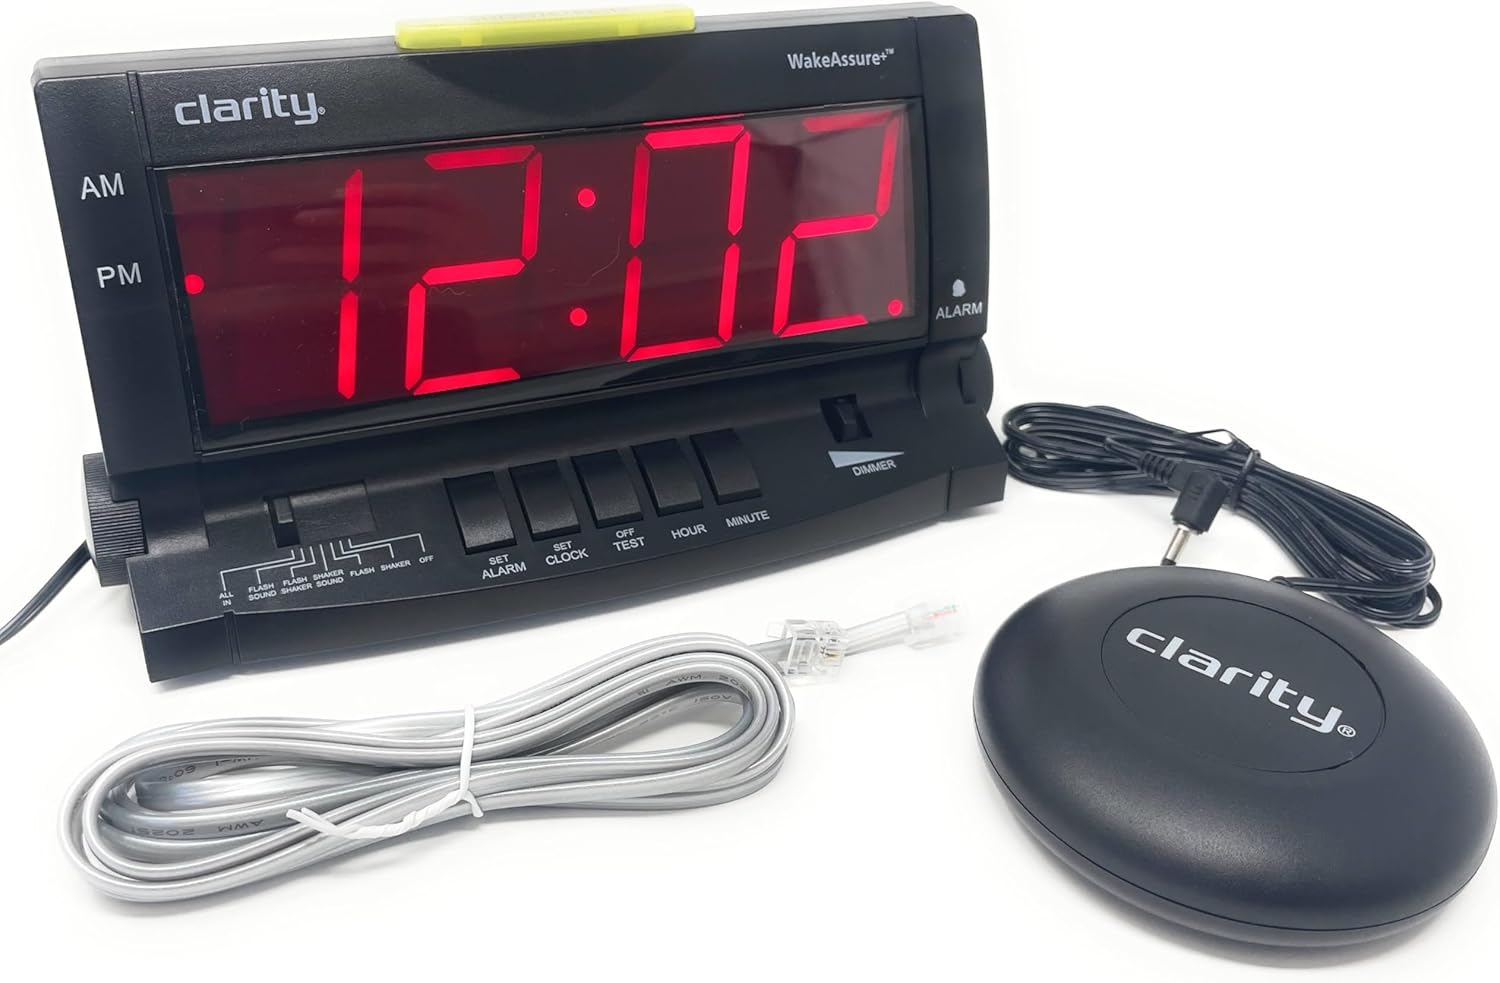
The Clarity Wake Assure+ Desktop Alarm Clock is designed to provide a reliable and effective wake-up solution, especially for heavy sleepers, the deaf, and the hard of hearing. It combines a loud audible alarm with a powerful vibrating bed shaker to ensure you never miss an important wake-up call.
Key features include:
- Guaranteed Wake-Up: Choose between a loud audible alarm (up to 85dB), a powerful vibrating bed shaker, or both.
- Customizable Alarm: Adjustable volume and tone settings for the audible alarm.
- Easy-to-Read Display: Large 1.8-inch digital LCD display with full dimmable functionality to reduce light disturbance.
- Battery Backup: Maintains time and program settings during power outages with a standard 9V battery (not included).
- Built-in Telephone Jack: Alerts users to incoming phone calls, beneficial for landline users or those with videophones.
- AC-Powered: Plugs into any standard wall outlet, eliminating the need for frequent battery replacements for primary operation.
Setup
- Unpacking: Carefully remove all components from the packaging. Verify that you have the alarm clock unit, vibrating bed shaker, and AC power adapter.
- Power Connection: Insert the small plug of the AC power adapter into the 9V DC jack located on the back of the alarm clock. Plug the AC adapter into a standard wall outlet. The display will illuminate.

Figure 2: Rear view of the alarm clock, highlighting the 9V DC power input and the vibrating shaker port. - Battery Backup Installation (Optional but Recommended): For power outage protection, open the battery compartment on the back of the unit and insert one standard 9V battery (not included). Close the compartment securely. This battery will maintain time and alarm settings during a power interruption.
- Connecting the Vibrating Bed Shaker: Plug the cord of the vibrating bed shaker into the dedicated shaker port on the back of the alarm clock. Place the shaker under your pillow or mattress for optimal vibration.
- Setting the Time:
- Press and hold the SET CLOCK button.
- While holding SET CLOCK, press the HOUR button to adjust the hour. Observe the AM/PM indicator.
- While holding SET CLOCK, press the MINUTE button to adjust the minute.
- Release the SET CLOCK button when the correct time is set.
- Connecting to Telephone Line (Optional): If you wish to be alerted to incoming phone calls, connect a telephone line cord (included) from your wall jack to either the LINE 1 or LINE 2 port on the side of the alarm clock.
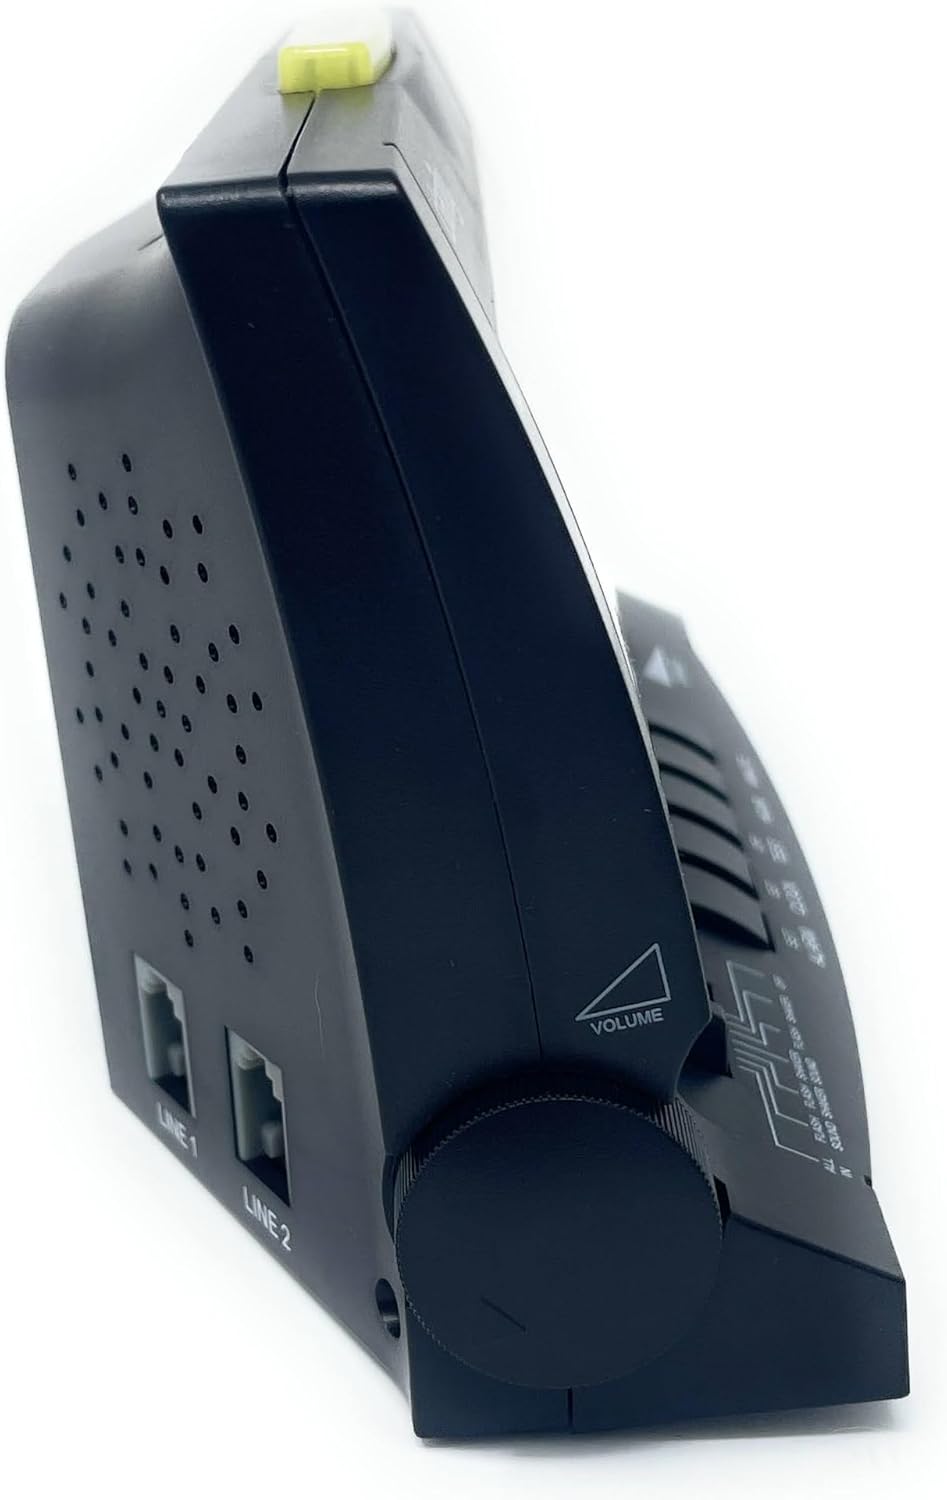
Figure 3: Side view of the alarm clock, illustrating the volume control knob and the telephone line input jacks.
Operating Instructions
Setting the Alarm
- Press and hold the SET ALARM button.
- While holding SET ALARM, press the HOUR button to adjust the alarm hour. Observe the AM/PM indicator.
- While holding SET ALARM, press the MINUTE button to adjust the alarm minute.
- Release the SET ALARM button when the desired alarm time is set.
- To activate the alarm, slide the ALARM MODE switch (located on the front panel) to your preferred setting:
- ALL IN: Activates sound, flash, and shaker.
- FLASH SOUND SHAKER: Activates flash, sound, and shaker.
- FLASH SOUND: Activates flash and sound.
- FLASH SHAKER: Activates flash and shaker.
- SOUND: Activates sound only.
- SHAKER: Activates shaker only.
- OFF: Alarm is deactivated.

Figure 4: Front view of the alarm clock, showing the large digital display and the alarm mode selection switch.
Adjusting Alarm Volume and Tone
- Volume: Rotate the VOLUME knob located on the left side of the unit to increase or decrease the audible alarm volume.
- Tone: Rotate the TONE knob located on the right side of the unit to adjust the pitch (frequency) of the audible alarm. This is particularly useful for individuals with specific hearing loss frequencies.

Figure 5: Side view of the alarm clock, illustrating the tone control knob.
Snooze Function
When the alarm sounds, press the large SNOOZE/RESET bar located on the top of the unit to temporarily silence the alarm. The alarm will sound again after approximately 9 minutes.

Dimmer Function
Slide the DIMMER switch (located on the front panel) to adjust the brightness of the digital display. This allows you to set the display to a comfortable level for day or night viewing.
Telephone Call Alert
If connected to a telephone line, the alarm clock will provide an alert (flash, sound, or shaker, depending on alarm mode settings) when an incoming call is detected, even if the alarm is not set to go off.
Maintenance
- Cleaning: To clean the alarm clock, wipe the exterior surfaces with a soft, dry cloth. Do not use abrasive cleaners, waxes, or solvents as they may damage the finish. Ensure the unit is unplugged before cleaning.
- Battery Replacement: If the battery backup is installed, replace the 9V battery annually or if the clock loses time during a power outage.
- Storage: If storing the unit for an extended period, unplug it from the power outlet and remove the 9V battery.
Troubleshooting
| Problem | Possible Cause | Solution |
|---|---|---|
| Clock display is blank. | No power, AC adapter unplugged, or power outage with no battery backup. | Ensure AC adapter is securely plugged into the clock and a working wall outlet. Install a fresh 9V battery for backup. |
| Alarm does not sound/vibrate/flash. | Alarm not set, alarm mode switch set to OFF, or volume too low. | Verify alarm time is set correctly. Check that the ALARM MODE switch is set to a desired alert option (e.g., ALL IN, SOUND, SHAKER). Increase volume if using audible alarm. Ensure shaker is properly connected. |
| Display is too bright/dim. | Dimmer switch setting. | Adjust the DIMMER switch on the front panel to your preferred brightness level. Note: The display has specific brightness levels, not a continuous dimming range. |
| Telephone alert not working. | Telephone line not connected, or alarm mode not set to include flash/sound/shaker. | Ensure telephone line is securely connected to the clock and wall jack. Check that the ALARM MODE switch is set to an option that includes a visual, audible, or vibratory alert. |
| Time is incorrect after power outage. | No 9V battery installed, or battery is depleted. | Install a fresh 9V battery for battery backup. Reset the time if necessary. |
Specifications
| Feature | Detail |
|---|---|
| Brand | Clarity |
| Model Number | 600 |
| Display Type | Digital LCD (1.8" tall) |
| Alarm Volume | Up to 85dB |
| Power Source | AC-Powered with 9V Battery Backup (battery not included) |
| Product Dimensions | 6.5"W x 4"H |
| Item Weight | 2.45 pounds |
| Material | Plastic |
| Special Features | Vibrating Bed Shaker, Adjustable Tone, Dimmable Display, Telephone Jack |
Warranty Information
The Clarity Wake Assure+ Desktop Alarm Clock comes with a Limited Warranty. Please refer to the warranty card included in your product packaging for specific terms, conditions, and duration of coverage. Retain your proof of purchase for warranty claims.
Customer Support
For technical assistance, troubleshooting beyond this manual, or warranty inquiries, please contact Clarity customer support. Contact information can typically be found on the manufacturer's website or on the product packaging.
You may also visit the product page on Amazon for additional resources and frequently asked questions: Amazon Product Page


