
1. Introduction
The Parasound Z Amp v.3 is a stereo power amplifier designed for custom installations and compact audio systems. It delivers 45 watts per channel into an 8-ohm load, or 60 watts per channel into 4-ohm loads. It can also be bridged to provide over 90 watts mono into 8 ohms. Its compact 'half-width' chassis (1-3/4 inches tall, 9-1/2 inches wide) makes it suitable for various applications, including multi-room audio, PC/desktop audio, and small stereo systems. The Zamp v.3 features fully discrete, direct-coupled DC servo circuitry, high-speed bipolar output transistors, and a high-quality toroid power transformer.
2. Key Features
- Compact power amplifier with multiroom capabilities.
- 45 watts per channel into 8 ohms.
- Headphone jack for private listening.
- Independent level controls for each channel on the rear panel.
- Fully discrete circuitry with a high-quality Toroid power transformer.
3. Setup and Connections
Before making any connections, ensure the amplifier is powered off and unplugged from the AC outlet.
3.1 Front Panel Overview

This image shows the Parasound Z Amp v3 amplifier from the front, held in a hand to illustrate its compact, half-width design. The front panel features the power button, headphone jack, and indicators for protection and temperature.
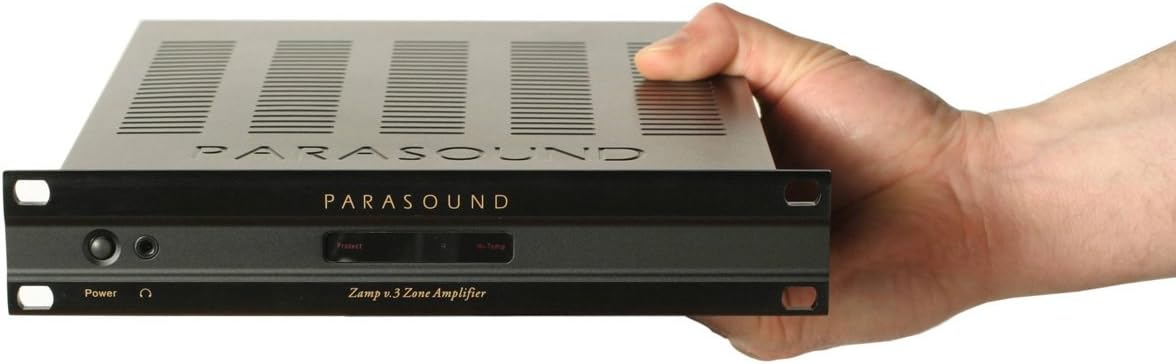
A detailed front view of the Parasound Z Amp v3 amplifier, highlighting the power button, headphone jack, and status indicators. The unit is shown with optional rack mount ears attached.
The front panel includes:
- Power Button: Turns the unit on or off.
- Headphone Jack: For connecting headphones.
- Protection Indicator: Illuminates if the amplifier enters protection mode due to overload or overheating.
- Hi-Temp Indicator: Illuminates if the amplifier is overheating.
- Left/Right Channel Status Indicators: Show operational status for each channel.
3.2 Rear Panel Connections
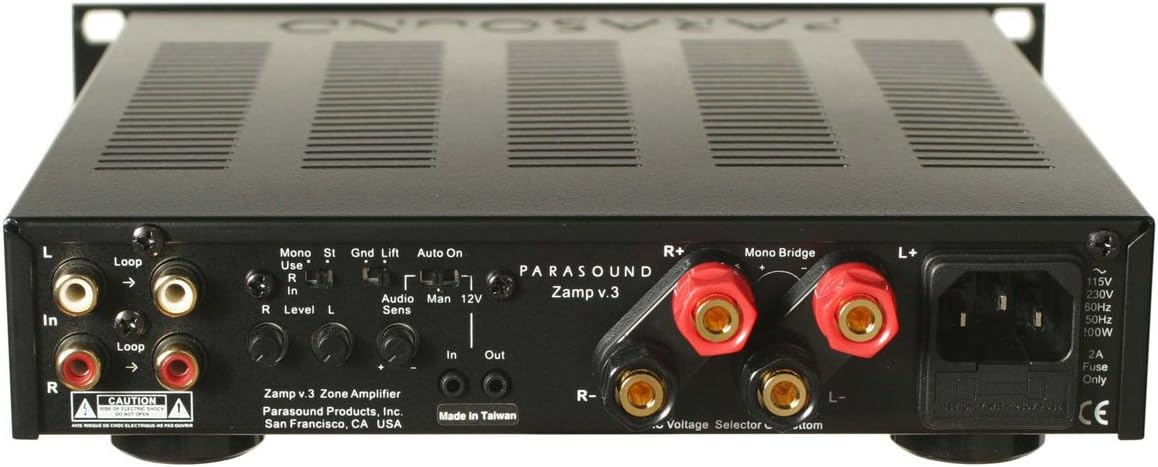
This image displays the rear panel of the Parasound Z Amp v3 amplifier, detailing all input and output connections. Visible features include RCA line-level inputs and loop outputs, speaker binding posts, mono bridge switch, ground lift switch, auto on/manual/12V trigger switch, and independent level controls for each channel.
- Line-Level Inputs (RCA): Connect your audio source (e.g., preamplifier, multi-room controller) to these inputs.
- Line-Level Loop Outputs (RCA): Allows you to pass the input signal to another amplifier or audio component.
- Speaker Binding Posts: Connect your speakers using high-quality speaker wire. Ensure correct polarity (+ to + and - to -). The Z Amp v3 supports 8-ohm and 4-ohm speakers.
- Mono Bridge Switch: Use this switch to bridge the amplifier for mono operation, providing higher power output to a single speaker (e.g., a subwoofer). Refer to the markings for correct speaker connection in bridged mode.
- Ground Lift Switch: Helps eliminate hum caused by ground loops. Try both positions if you experience hum.
- Auto On / Manual / 12V Trigger Switch:
- Auto On: The amplifier will automatically turn on when an audio signal is detected.
- Manual: The amplifier is controlled solely by the front panel power button.
- 12V Trigger: The amplifier turns on/off via a 12V trigger signal from another component.
- Level Controls (L/R): Independently adjust the input sensitivity for each channel to match your source component and achieve ideal gain staging.
- AC Power Inlet: Connect the supplied AC power cord here.
- Voltage Selector: Ensure this is set to the correct voltage for your region (e.g., 115V or 230V).
- Fuse Holder: Contains the main power fuse.
- Ensure speaker impedance is within the amplifier's specified range (4-8 ohms for stereo, 8 ohms for bridged mono).
- Use appropriate gauge speaker wire for your cable length.
- Tighten binding posts securely, but do not overtighten.
3.3 Speaker Connection Guidelines
For optimal performance and safety, observe the following:
4. Operating Instructions
4.1 Powering On/Off
Depending on the setting of the Auto On / Manual / 12V Trigger switch:
- Manual: Press the front panel power button to turn the amplifier on or off.
- Auto On: The amplifier will power on automatically when an audio signal is detected at the inputs and power off after a period of no signal.
- 12V Trigger: The amplifier will power on or off in response to a 12V trigger signal from a connected component.
4.2 Adjusting Volume
The Z Amp v3 does not have a master volume control on the front panel. Volume is controlled by your source component (e.g., preamplifier, receiver) or by the individual Left and Right level controls on the rear panel. Adjust the rear panel level controls to achieve a balanced sound and appropriate gain for your system.
4.3 Headphone Use
Plug your headphones into the front panel headphone jack. When headphones are connected, speaker output will typically be muted.
5. Maintenance
To ensure the longevity and optimal performance of your Parasound Z Amp v3, follow these maintenance guidelines:
- Cleaning: Use a soft, dry cloth to clean the exterior of the amplifier. Avoid abrasive cleaners or solvents.
- Ventilation: Ensure adequate ventilation around the unit. Do not block the ventilation slots on the top or sides. Avoid placing the amplifier in enclosed spaces without proper airflow.
- Power Cord: Periodically check the power cord for any signs of damage.
- Connections: Occasionally check all audio and speaker connections to ensure they are secure.
6. Troubleshooting
If you encounter issues with your Z Amp v3, consult the following troubleshooting tips:
6.1 No Power
- Check if the power cord is securely plugged into the amplifier and the AC outlet.
- Verify the AC outlet is functional.
- Check the fuse on the rear panel. If blown, replace it with a fuse of the exact same type and rating.
- Ensure the front panel power button is pressed (if in Manual mode) or the Auto On/12V Trigger settings are correct.
6.2 No Sound
- Confirm the audio source is playing and its output is connected correctly to the Z Amp v3's inputs.
- Check all speaker connections for correct polarity and secure contact.
- Ensure the rear panel level controls are not set to minimum.
- If headphones are plugged in, unplug them to restore speaker output.
6.3 Distorted Sound or Low Volume
- Adjust the rear panel level controls to match the output of your source component.
- Ensure your speakers' impedance is compatible with the amplifier.
- Check for loose or damaged speaker wires.
- Verify the audio source is not overdriving the amplifier's inputs.
6.4 Protection or Hi-Temp Indicator Illuminates
- The amplifier may be overheating. Turn off the unit, allow it to cool down, and ensure adequate ventilation.
- Check speaker connections for short circuits.
- Ensure speaker impedance is not too low for the amplifier.
6.5 Hum or Buzzing Noise
- Try flipping the Ground Lift switch on the rear panel.
- Ensure all components are plugged into the same AC circuit if possible.
- Check for faulty interconnect cables.
7. Specifications
| Specification | Value |
|---|---|
| Brand | Parasound |
| Model Name | Z Amp v3 |
| Model Number | Z Amp v3 |
| Power Output (Stereo, 8 ohms) | 45 watts per channel (20 Hz - 20 kHz, both channels driven) |
| Power Output (Stereo, 4 ohms) | 60 watts per channel |
| Power Output (Bridged Mono, 8 ohms) | Over 90 watts |
| Item Dimensions (L x W x H) | 10 x 9.5 x 2 inches |
| Item Weight | 3.5 Kilograms |
| UPC | 791084500066 |
| GTIN | 791084500066 |
| Manufacturer | Parasound |
8. Warranty and Support
For warranty information and technical support, please refer to the official Parasound website or contact their customer service directly. Keep your purchase receipt as proof of purchase for any warranty claims.


