1. Introduction
This manual provides essential information for the safe and effective operation, maintenance, and setup of your NorthStar PTO Generator Model 165929. Please read and understand all instructions before operating the generator. Proper use and maintenance will ensure optimal performance and longevity of your equipment.

Figure 1.1: NorthStar PTO Generator Model 165929. This image displays the complete generator unit, highlighting its robust construction and integrated control panel with various receptacles.
2. Safety Information
Operating power equipment requires strict adherence to safety guidelines to prevent injury or damage. Always prioritize safety.
2.1 General Safety Warnings
- Read and understand the entire manual before assembly, installation, operation, or maintenance.
- Keep children and unauthorized personnel away from the generator during operation.
- Wear appropriate personal protective equipment (PPE), including eye protection, hearing protection, and sturdy footwear.
- Ensure the generator is properly grounded before connecting any electrical loads.
2.2 Electrical Safety
- Never operate the generator in wet conditions or expose it to rain.
- Do not overload the generator. Refer to the specifications for maximum wattage.
- Use only approved extension cords that are rated for outdoor use and the appropriate amperage.
- Inspect all electrical connections and cords for damage before each use.
2.3 Mechanical Safety
- Ensure the PTO shaft is securely attached and guarded.
- Never attempt to adjust or repair the generator while it is running or connected to the PTO.
- Keep hands, feet, and clothing away from moving parts.
3. Components Overview
Familiarize yourself with the main components of your NorthStar PTO Generator.
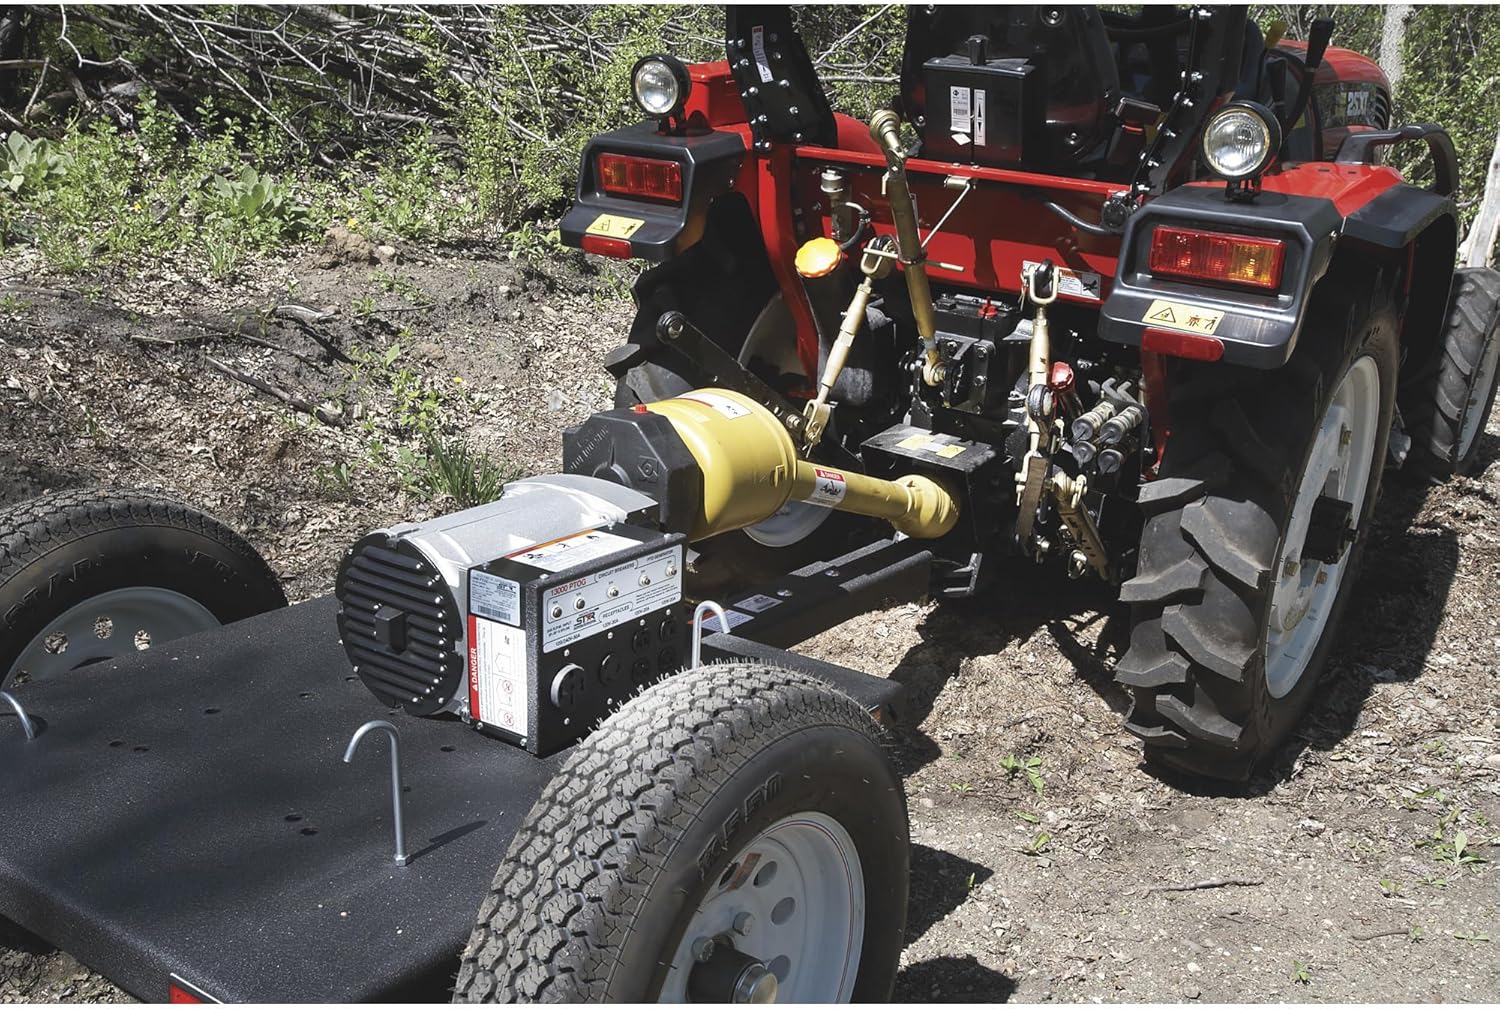
Figure 3.1: Key components of the NorthStar PTO Generator. This diagram highlights the single-phase, bi-directional generator head with 100% copper windings, the PTO 6-spline input shaft with protective shield, the conveniently located control panel, and the cast iron gearbox designed for reduced noise and extended lifespan.
- Generator Head: Features 100% copper windings for efficient power generation.
- PTO Input Shaft: Standard 1 3/8 inch, 6-spline input shaft, geared for 540 RPM, with a protective shield.
- Control Panel: Houses circuit breakers, a voltmeter, and various receptacles.
- Receptacles: Includes a welding receptacle and four 120V 20 Amp receptacles.
- Circuit Breakers: Pushbutton reset circuit breakers for overload protection.
- Gearbox: Cast iron construction for durability and reduced operational noise.
4. Setup
Proper setup is crucial for safe and efficient operation.
4.1 Mounting the Generator
The generator should be mounted on a stable, level surface, such as a trailer, to ensure stability during operation.

Figure 4.1: The NorthStar PTO Generator securely mounted on a utility trailer. This setup provides mobility and a stable platform for operation in various locations.
4.2 Connecting to the Tractor PTO
- Ensure the tractor engine is off and the PTO is disengaged.
- Align the generator's 6-spline input shaft with the tractor's PTO output shaft.
- Carefully slide the PTO shaft onto the tractor's output shaft until it locks into place. Verify the connection is secure.
- Ensure all protective shields are in place over the PTO shaft.

Figure 4.2: The NorthStar PTO Generator connected to the rear PTO of a tractor via a drive shaft. This image demonstrates the proper mechanical linkage required for power transfer.
4.3 Grounding the Generator
Proper grounding is essential to prevent electrical shock. Consult local electrical codes for specific grounding requirements.
- Connect a grounding wire from the generator's grounding lug to a suitable earth ground (e.g., a grounding rod driven into the earth).
- Ensure the grounding connection is firm and corrosion-free.
5. Operation
Follow these steps for safe and effective operation of your PTO generator.
5.1 Starting the Generator
- Ensure all electrical loads are disconnected from the generator.
- Start the tractor engine and allow it to warm up.
- Engage the tractor's PTO at the recommended 540 RPM. Monitor the generator's voltmeter to confirm stable voltage output.
5.2 Connecting Electrical Loads
- Once the generator is producing stable power, connect your electrical devices to the appropriate receptacles.
- Do not exceed the rated wattage of the generator or individual receptacles.
- For welding applications, connect the welding equipment to the dedicated welding receptacle.

Figure 5.1: A user connecting a power cord to one of the 120V receptacles on the NorthStar PTO Generator's control panel. This illustrates the process of drawing power from the unit.

Figure 5.2: A person performing welding operations using power supplied by the NorthStar PTO Generator. This demonstrates the generator's capability to support high-demand tools.

Figure 5.3: A person using an angle grinder, powered by the NorthStar PTO Generator, for metalwork. This highlights the generator's versatility for various power tools.
5.3 Using Circuit Breakers
The generator is equipped with pushbutton reset circuit breakers. If a circuit breaker trips, disconnect the overloaded device, wait a few moments, and then press the breaker button to reset it. If it trips again, investigate the cause of the overload.
6. Maintenance
Regular maintenance ensures the longevity and reliable performance of your generator.
6.1 Inspection
- Before each use, inspect the PTO shaft, electrical cords, and receptacles for any signs of wear or damage.
- Check for loose fasteners and tighten as necessary.
- Ensure all protective guards are securely in place.
6.2 Cleaning
- Keep the generator clean and free of dirt, dust, and debris.
- Use a dry cloth to wipe down exterior surfaces. Avoid using water or cleaning solutions directly on electrical components.
6.3 Storage
- Store the generator in a clean, dry location, protected from weather and extreme temperatures.
- Disconnect the PTO shaft and store it safely when not in use.
7. Troubleshooting
This section addresses common issues you might encounter.
7.1 No Power Output
- Check PTO Engagement: Ensure the tractor's PTO is fully engaged and operating at the correct RPM (540 RPM).
- Check Circuit Breakers: Verify that no circuit breakers have tripped. Reset if necessary.
- Inspect Connections: Ensure all electrical cords are securely connected and undamaged.
- Verify Grounding: Confirm the generator is properly grounded.
7.2 Circuit Breaker Trips Repeatedly
- Reduce Load: The generator may be overloaded. Disconnect some devices to reduce the total wattage.
- Faulty Device: A connected device may have a short circuit or be drawing excessive current. Test devices individually.
- Damaged Cord: Inspect the extension cord or device cord for damage.
7.3 Unusual Noise or Vibration
- Loose Mounting: Check if the generator is securely mounted to its platform.
- PTO Shaft Alignment: Ensure the PTO shaft is correctly aligned and not binding.
- Internal Issue: If persistent, discontinue use and contact customer support.
8. Specifications
Technical specifications for the NorthStar PTO Generator Model 165929.
| Feature | Specification |
|---|---|
| Model Number | 165929 |
| Part Number | 171310 |
| Surge Watts | 13,000 watts |
| Rated Watts | 12,000 watts |
| Voltage | 120 Volts |
| Required HP | 24 HP |
| PTO Input Shaft | 1 3/8 inch, 6-spline |
| PTO RPM | 540 RPM |
| Windings | 100% Copper |
| Circuit Breaker | 100 Amp Thermal Magnetic |
| Receptacles | Welding receptacle, Four 120V 20 Amp receptacles |
| Item Weight | 125 pounds |
| Package Dimensions | 35.5 x 22.7 x 17.1 inches |
9. Warranty and Support
For warranty information, technical assistance, or to order replacement parts, please contact NorthStar customer support. Keep your purchase receipt and model number readily available when contacting support.
Refer to the official NorthStar website or your purchase documentation for the most current warranty terms and contact details.


