1. Introduction
This manual provides comprehensive instructions for the installation, operation, and maintenance of your Optoma Panoview DE-9092EGA Electric Projection Screen. Please read this manual thoroughly before use to ensure proper setup and to maximize the lifespan of your product. This high-quality electric projection screen features a 16:9 aspect ratio, a 92-inch diagonal viewing area, and an advanced tubular motor for smooth, reliable operation.
2. Safety Information
- Electrical Safety: Ensure the screen is connected to a properly grounded power outlet. Do not operate with damaged power cords. Disconnect power before any maintenance or cleaning.
- Installation: Installation should be performed by qualified personnel. Ensure mounting surfaces are strong enough to support the screen's weight.
- Operation: Keep hands and objects clear of the screen's path during operation. Do not attempt to manually force the screen up or down.
- Environment: Avoid exposing the screen to extreme temperatures, humidity, or direct sunlight.
3. Package Contents
Verify that all items are present in the package:
- Optoma Panoview DE-9092EGA Electric Projection Screen
- Infrared (IR) Remote Control
- Wall Mount for Remote Control
- L-shaped Adjustable Mounting Brackets (for wall/ceiling installation)
- Power Cable
- User Manual (this document)
4. Setup and Installation
4.1 Unpacking
Carefully remove the screen from its packaging. Retain packaging for future transport or storage.
4.2 Mounting Options
The DE-9092EGA screen can be mounted on a wall or ceiling using the provided adjustable L-shaped brackets.
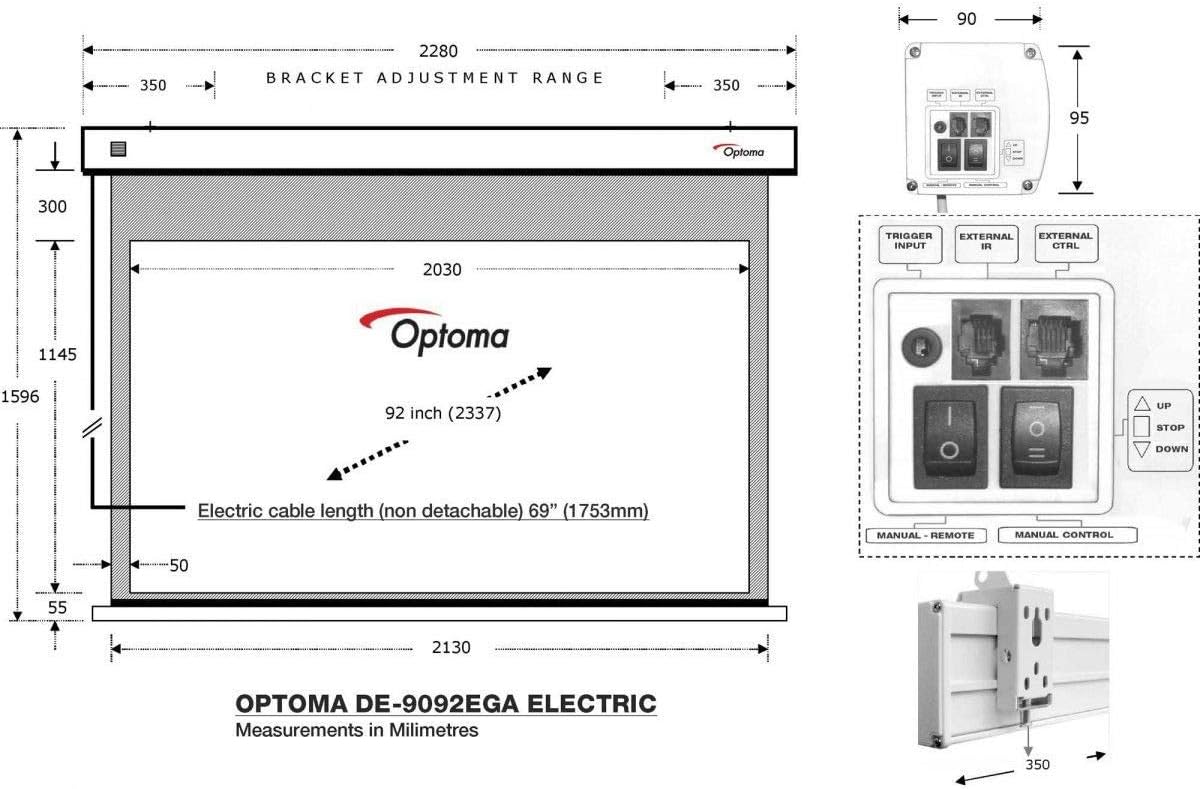
Figure 1: Screen Dimensions, Mounting Brackets, and Control Panel. The diagram illustrates the screen's overall dimensions (2130mm width, 1596mm height), the 92-inch diagonal viewing area (2030mm wide), and the 1753mm non-detachable electric cable length. It also shows the bracket adjustment range (350mm from each end) and a detailed view of the control interface with Trigger Input, External IR, External Control, and manual Up/Stop/Down buttons.
- Measure and Mark: Determine the desired mounting location. Use the provided L-brackets to mark the drilling points on the wall or ceiling. Ensure the marks are level and spaced correctly according to the screen's dimensions (refer to Figure 1). The bracket adjustment range is 350mm from each end of the screen casing.
- Drill Holes: Drill appropriate holes for the mounting hardware.
- Secure Brackets: Attach the L-brackets securely to the wall or ceiling using suitable screws and anchors (not included, as they depend on wall material).
- Mount Screen: Carefully lift the screen and hook it onto the installed L-brackets. Ensure it is securely seated.
4.3 Electrical Connection
Connect the screen's power cable to a standard electrical outlet. The screen features an advanced tubular motor for smooth and reliable operation.
4.4 Control Interface Connection
The screen includes an integrated control interface for various control options:
- RS232: For integration with home automation or control systems.
- 12V Trigger: Allows the screen to automatically deploy or retract when a projector (with 12V trigger output) is turned on or off.
- External IR: For connecting an external IR receiver, useful if the built-in IR receiver is obstructed.
5. Operating Instructions

Figure 2: Optoma Panoview DE-9092EGA Electric Projection Screen (Extended).
5.1 Using the IR Remote Control
The included portable IR remote control allows for convenient operation of the screen. Point the remote control towards the screen's IR receiver (located on the casing).
- UP Button: Press to retract the screen.
- DOWN Button: Press to deploy the screen.
- STOP Button: Press to stop the screen at any desired position.
5.2 Manual Control
In addition to the remote control, the screen features manual control buttons directly on the integrated control interface (refer to Figure 1 for location).
- UP Button: Retracts the screen.
- STOP Button: Stops the screen.
- DOWN Button: Deploys the screen.
5.3 Adjusting Screen Limits
The screen's upper and lower limits can be adjusted to customize the viewing area. Consult the detailed instructions provided with the screen's motor mechanism for precise adjustment procedures. Typically, these adjustments involve small screws or dials located near the motor housing, accessible by removing an end cap.
6. Maintenance
- Cleaning the Screen Surface: Use a soft, damp cloth with mild soap and water to gently clean the matte white screen surface. Do not use abrasive cleaners or solvents, as these can damage the screen material.
- Cleaning the Casing: Wipe the screen casing with a dry or slightly damp cloth.
- Motor Maintenance: The advanced tubular motor is designed for maintenance-free operation. Do not attempt to lubricate or disassemble the motor.
7. Troubleshooting
| Problem | Possible Cause | Solution |
|---|---|---|
| Screen does not respond to remote control. | 1. Remote control batteries are dead. 2. IR receiver is obstructed. 3. Remote control is out of range. | 1. Replace batteries. 2. Clear any obstructions. 3. Move closer to the screen and ensure direct line of sight. |
| Screen does not move. | 1. No power. 2. Motor malfunction. | 1. Check power connection and outlet. 2. Contact customer support if power is confirmed. |
| Screen stops unexpectedly. | 1. Obstruction. 2. Motor overheating (safety feature). | 1. Check for obstructions. 2. Allow motor to cool down for 15-20 minutes before attempting operation again. |
8. Specifications
| Feature | Detail |
|---|---|
| Model Number | DE-9092EGA |
| Screen Size (Diagonal) | 92 inches (233.7 cm) |
| Aspect Ratio | 16:9 |
| Viewing Area Width | 2030 mm |
| Screen Surface | 4-layer Matte White with 1.0 Gain |
| Control Options | IR Remote, Manual Buttons, RS232, 12V Trigger, External IR |
| Mounting Type | Wall or Ceiling (adjustable L-brackets) |
| Motor Type | Advanced Tubular Motor |
| Color | White (casing) |
| Material | Polychlorure de vinyle (PVC) for screen surface |
| Weight | 1180 Grams |
9. Warranty and Support
The Optoma Panoview DE-9092EGA Electric Projection Screen comes with a 1-year warranty from the date of purchase, covering manufacturing defects. For technical support, warranty claims, or service inquiries, please contact your authorized Optoma dealer or visit the official Optoma website for contact information.


