
1. Introduction
Thank you for choosing the VideoSecu Adjustable Ceiling TV Mount MLCE7-1O2. This mount is designed to securely hold most 26-55 inch LCD, LED, and Plasma flat panel displays, offering versatile viewing angles through its tilt, swivel, and rotation capabilities. Constructed from heavy-gauge steel, it ensures durability and a loading capacity of up to 66 lbs. This manual provides detailed instructions for safe installation, operation, and maintenance of your TV mount.
2. Safety Information
WARNING: Failure to read and follow all instructions may result in personal injury, property damage, or voiding of your warranty. If you have any questions, please contact customer support.
- Do not install this product if you cannot understand these instructions or have doubts about the safety of the installation.
- This mount is intended for installation on wood stud ceilings or solid concrete/brick ceilings. Do not install on drywall alone.
- Ensure the mounting surface can safely support the combined weight of the equipment and all attached hardware.
- Do not exceed the maximum weight capacity of 66 lbs (30 kg).
- Use only the provided mounting hardware. If any parts are missing or defective, contact VideoSecu for replacement.
- Always have at least two people for installation to prevent injury or damage.
- Check the area inside the 4 mounting holes on your TV to ensure no plugs or ports will be blocked by the mounting plate.
3. Package Contents
Verify that all components are present and undamaged before installation. If any parts are missing or damaged, do not proceed with installation and contact customer support.
- Ceiling Plate Assembly
- Adjustable Extension Pole
- TV Mounting Plate (VESA compatible)
- VESA Adapter Arms (for larger VESA patterns)
- Hardware Kit (various screws, washers, spacers for TV and ceiling attachment)
- Instruction Manual
4. Setup and Installation
4.1 Pre-Installation Checks
- TV Size & Weight: This mount supports TVs from 26 to 55 inches and up to 66 lbs.
- VESA Compatibility: Check your TV's VESA pattern. This mount supports VESA patterns from 100x100mm up to 400x400mm.
- Ceiling Type: Ensure your ceiling is suitable for mounting (wood stud or solid concrete/brick).
- Clearance: Verify that the chosen location provides adequate clearance for the TV and its adjustments.
4.2 Mounting the Ceiling Plate
The adjustable ceiling plate can be attached to both flat and sloped ceilings.

Figure 1: The ceiling plate can be adjusted to accommodate flat, cathedral, or vaulted ceilings.
- Locate a suitable wood stud or solid concrete/brick area in your ceiling.
- Position the ceiling plate and mark the drilling points.
- Drill pilot holes as per the instructions provided in the hardware kit.
- Secure the ceiling plate using the appropriate lag bolts and washers. Ensure it is firmly attached.
4.3 Assembling the Extension Pole
The extension pole allows for height adjustment from 19.4 to 34.7 inches in 2-inch increments. An optional 16-inch extension pole is available separately (ASIN: B005DUU9VM) for longer drops.

Figure 2: The extension pole showing adjustable height settings.
- Attach the extension pole to the ceiling plate using the provided bolts.
- Adjust the pole to your desired height and secure it with the locking pin and screws.
4.4 Attaching the TV Mounting Plate to Your TV
The TV mounting plate can be used directly for smaller VESA patterns or with adapter arms for larger patterns.

Figure 3: TV mounting plate with optional VESA adapter arms for wider compatibility.
- Carefully lay your TV face down on a soft, clean surface.
- Identify the correct screws, washers, and spacers from the hardware kit that fit your TV's VESA mounting holes.
- Attach the TV mounting plate (and adapter arms if needed) to the back of your TV. Ensure all screws are tightened securely.
- Note: Double-check that the mounting plate does not block any ports or cables on the back of your TV.
4.5 Mounting the TV to the Extension Pole
This step requires at least two people for safety.
- Carefully lift the TV with the attached mounting plate.
- Align the mounting plate with the end of the extension pole and slide it into place.
- Secure the TV to the pole using the provided locking mechanism (e.g., screws or bolts).
5. Operating and Adjustments
The VideoSecu MLCE7-1O2 mount offers multiple adjustment options for optimal viewing.

Figure 4: Illustration of the tilt and swivel range.
- Height Adjustment: The extension pole allows for height adjustment from 19.4" to 34.7" from the ceiling. Loosen the locking screws on the pole, adjust to the desired height, and re-tighten securely.
- Tilt Adjustment: The TV can tilt 15 degrees forward and 5 degrees backward. Loosen the tilt adjustment knobs/bolts, set the desired angle, and re-tighten firmly.
- Swivel Adjustment: The mount allows for 360-degree swivel (left/right rotation). Loosen the swivel mechanism, rotate the TV to the desired position, and re-tighten.
- Rotation Adjustment: The flat panel screen can be rotated 90 degrees from landscape to portrait orientation. This feature is typically found at the TV mounting plate connection point.
- Post-Installation Level Adjustment: After installation, fine-tune the level of your TV to ensure it is perfectly straight.
6. Maintenance
- Periodically check all screws and bolts to ensure they remain tight and secure.
- Clean the mount with a soft, dry cloth. Avoid abrasive cleaners or solvents.
- Do not hang anything from the mount or TV other than the intended display.
7. Troubleshooting
- TV is not level after installation: Use the post-installation level adjustment feature to fine-tune the TV's horizontal alignment. Ensure all locking screws are tightened after adjustment.
- Mount feels unstable: Recheck all mounting points on the ceiling and the TV. Ensure all bolts are securely tightened. Verify that the ceiling structure can support the weight. Do not exceed the maximum weight capacity.
- Cannot adjust tilt/swivel: Ensure any locking mechanisms or knobs for tilt and swivel are loosened before attempting to adjust. Re-tighten them firmly once the desired position is achieved.
- Mounting plate blocks TV ports: This can occur with some TV models. If possible, use spacers from the hardware kit to create more clearance. If not, consider if this mount is suitable for your specific TV model.
8. Specifications
| Feature | Detail |
|---|---|
| Model Number | MLCE7-1O2 |
| Brand | VideoSecu |
| Mounting Type | Ceiling Mount |
| Movement Type | Tilt, Swivel, Rotation |
| Material | Alloy Steel |
| Color | Black |
| Compatible Devices | Television |
| Minimum Supported Screen Size | 26 Inches |
| Maximum Supported Screen Size | 55 Inches (some up to 65 Inches) |
| VESA Compatibility | 100x100, 200x200, 300x200, 300x300, 400x200, 400x300, 400x400mm |
| Maximum Weight Capacity | 66 lbs (30 kg) |
| Height Adjustment Range | 19.4" - 34.7" (485mm - 885mm) |
| Tilt Angle | 15° Forward / 5° Backward |
| Swivel Angle | 360° Left/Right |
| Rotation | 90° (Landscape to Portrait) |
| UPC | 753182730103 |
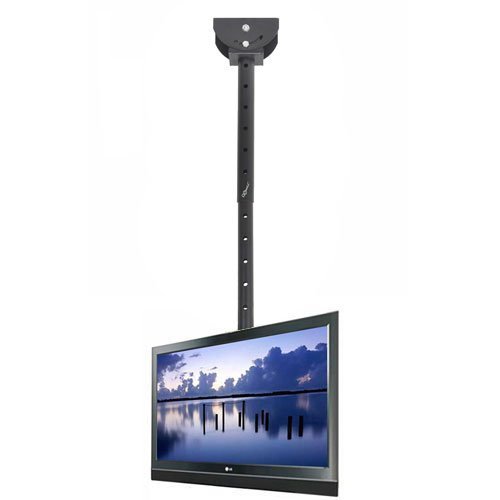
Figure 5: Key dimensions and adjustment ranges of the VideoSecu MLCE7-1O2 mount.
9. Warranty and Support
For warranty information or technical support, please refer to the product packaging or contact VideoSecu customer service directly. Keep your purchase receipt for warranty claims.