
1. Introduction
This manual provides comprehensive instructions for the installation, operation, and maintenance of your Pixel Technologies PRO500 SiriusXM Satellite Radio Amplified Outdoor 12 dBi High Gain Antenna. This antenna is designed to enhance SiriusXM satellite radio reception, offering improved signal strength and rejection of interference for optimal listening experience.
2. Safety Information
Please read and understand all safety instructions before installing or operating this product. Failure to follow these instructions may result in injury or damage.
- Electrical Safety: Ensure all power sources are disconnected before making any electrical connections. Avoid contact with power lines during installation.
- Mounting Safety: Install the antenna in a secure location where it will not fall or be dislodged by wind or other environmental factors. Use appropriate tools and safety gear (e.g., ladder, gloves, eye protection).
- Lightning Protection: For outdoor installations, consider installing a lightning arrestor in line with the coaxial cable to protect your equipment from lightning strikes.
- Cable Management: Secure all cables to prevent tripping hazards and damage from environmental exposure.
3. Package Contents
Verify that all items listed below are present in your package:
- PRO500 Antenna Panel
- Metal Adjustable Mounting Base
- Mounting Hardware (bolts, nuts, washers, U-bolt for pole mounting)
- 3-Foot RG6 Coaxial to SMB Conversion Cable
- Installation Instructions (this manual)

Figure 3.1: The PRO500 antenna panel, adjustable mounting bracket, and the included 3-foot RG6 coaxial to SMB conversion cable.
4. Setup and Installation
Proper installation is crucial for optimal performance. The PRO500 antenna can be mounted on a wall or a pole/pipe.
4.1 Site Selection
Choose a location with a clear, unobstructed view of the southern sky (for North American SiriusXM reception). Avoid obstructions such as buildings, trees, or other large structures that could block the satellite signal. The antenna should be mounted as high as possible to minimize interference.
4.2 Mounting the Antenna
The PRO500 includes a versatile metal mounting base that allows for both wall and pole mounting.
4.2.1 Wall Mounting
- Position the mounting base against the desired wall surface.
- Mark the locations for drilling pilot holes through the mounting base's screw holes.
- Drill pilot holes appropriate for your chosen fasteners (screws, anchors, etc. - not included).
- Securely attach the mounting base to the wall using suitable hardware.
- Attach the antenna panel to the adjustable arm of the mounting base using the provided bolts and nuts.

Figure 4.1: The PRO500 antenna panel attached to the adjustable wall mounting bracket.

Figure 4.2: Detail of the multi-angle adjustment mechanism on the mounting bracket, allowing for precise aiming.
4.2.2 Pole/Pipe Mounting
- Attach the mounting base to a suitable pole or pipe using the provided U-bolt and associated hardware. Ensure the U-bolt is tightened securely to prevent rotation.
- Attach the antenna panel to the adjustable arm of the mounting base using the provided bolts and nuts.

Figure 4.3: The U-bolt and associated hardware used for securing the mounting bracket to a pole or pipe.
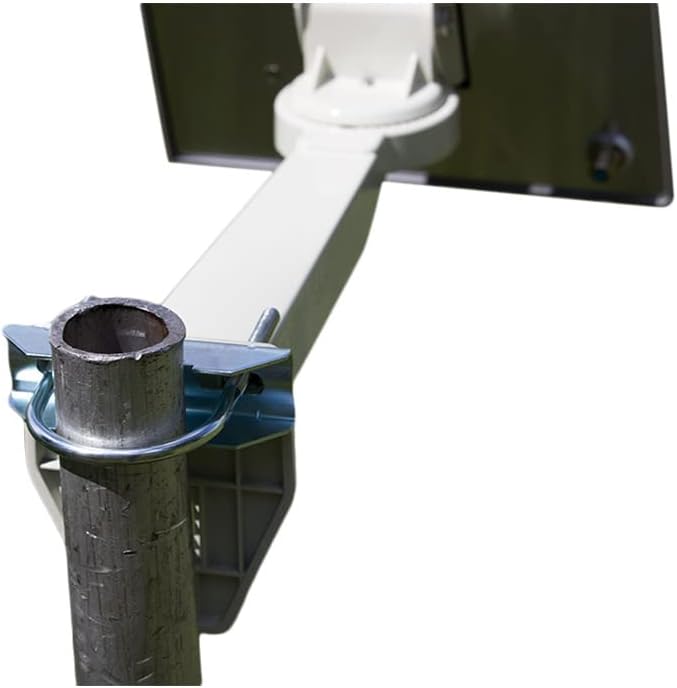
Figure 4.4: The PRO500 antenna securely mounted on a pole, ready for aiming.
4.3 Connecting the Antenna
- Connect your main RG6 coaxial cable (not included) to the F-type connector on the back of the PRO500 antenna panel. Ensure the connection is hand-tightened, then use a wrench to tighten slightly further, being careful not to overtighten.
- Run the RG6 coaxial cable from the antenna to the location of your SiriusXM receiver.
- At the receiver end, connect the 3-foot RG6 Coaxial to SMB Conversion Cable to your main RG6 coaxial cable. This conversion cable has an F-type female connector on one end and an SMB male connector on the other.
- Connect the SMB male connector of the conversion cable to the antenna input port on your SiriusXM receiver or dock.

Figure 4.5: Rear view of the PRO500 antenna, highlighting the F-type coaxial connection point.

Figure 4.6: The 3-foot RG6 coaxial to SMB conversion cable, used to connect the main coaxial line to the SiriusXM receiver's SMB input.
4.4 Aiming the Antenna
The PRO500 antenna needs to be aimed towards the SiriusXM satellites. For North America, this generally means aiming towards the southern sky. Use the adjustable mounting bracket to fine-tune the antenna's direction and elevation for the best possible signal strength on your receiver. Consult your SiriusXM receiver's signal strength meter for precise aiming.
5. Operation
Once installed and properly aimed, the PRO500 antenna operates passively to receive SiriusXM satellite signals. The internal amplifier boosts the signal, and the built-in filters reduce interference, providing a clean signal to your receiver. No user interaction is required for the antenna's operation after installation.
- Ensure your SiriusXM receiver is powered on and functioning correctly.
- Monitor your receiver's signal strength indicator to confirm optimal reception.
6. Maintenance
The PRO500 antenna is designed for outdoor use and requires minimal maintenance.
- Periodic Inspection: Annually inspect the antenna and mounting hardware for any signs of wear, corrosion, or loosening. Tighten any loose bolts or screws.
- Cleaning: If necessary, gently clean the antenna's surface with a soft, damp cloth to remove dirt or debris. Avoid abrasive cleaners or solvents.
- Cable Integrity: Check the coaxial cable for any damage, cracks, or fraying, especially where it enters the antenna or building. Replace damaged cables promptly.
7. Troubleshooting
If you experience issues with your SiriusXM reception, consider the following troubleshooting steps:
| Problem | Possible Cause | Solution |
|---|---|---|
| No signal or weak signal | Antenna not aimed correctly | Adjust antenna direction and elevation towards the southern sky. Use your receiver's signal meter. |
| Intermittent signal loss | Obstructions (trees, buildings) or loose cable connections | Ensure a clear line of sight to the satellites. Check all coaxial cable connections for tightness. Inspect cables for damage. |
| "Antenna Not Connected" error | Faulty cable or connection to receiver | Verify the SMB conversion cable is securely connected to the receiver and the main coaxial cable. Test with a known good cable if possible. |
| Poor audio quality / static | Interference or weak signal | Re-aim the antenna for stronger signal. Ensure no other RF devices are causing interference near the antenna or receiver. |
8. Specifications
| Feature | Detail |
|---|---|
| Model | PRO500 |
| Brand | Pixel Technologies |
| Antenna Type | Amplified Outdoor High Gain Satellite Radio Antenna |
| Gain | 12 dBi |
| Compatibility | SiriusXM Satellite Radio Receivers |
| Coaxial Cable Type (Recommended) | RG6 |
| Maximum Cable Length (without additional amplification) | Up to 200 Feet (with RG6) |
| Impedance | 50 Ohm |
| Product Dimensions | 17 x 10 x 5.5 inches |
| Item Weight | 2 pounds |
| Color | Black |
| UPC | 855028001078 |
9. Warranty and Support
For warranty information and technical support, please refer to the Pixel Technologies official website or contact their customer service directly. Keep your purchase receipt as proof of purchase for any warranty claims.
Manufacturer: Pixel Technologies