Introduction
This instruction manual provides detailed guidance for the assembly, painting, and care of your Tamiya Italian Carro Armato M13/40 military model kit. Please read all instructions carefully before beginning assembly. This kit is designed for adult modelers and requires precision and attention to detail.

Figure 1: Tamiya Italian Carro Armato M13/40 Model Kit Box Art. This image displays the completed model on the kit's packaging, illustrating the tank and two crew figures.
Setup and Assembly
Kit Contents
Your Tamiya M13/40 model kit includes precision-molded plastic parts, photo-etched parts for enhanced detail, a metal gun barrel, and decals for various marking options. Carefully inspect all sprues and components upon opening the box.

Figure 2: Tamiya M13/40 Model Kit Box Contents. This image shows the kit box opened, revealing the plastic sprues, instruction manual, and other components.
Recommended Tools
Successful assembly requires a selection of specialized tools. Refer to the image below for a visual guide to recommended tools and adhesives.

Figure 3: Recommended Tools and Adhesives. This chart illustrates essential tools such as tweezers, cutters, decal scissors, paint brushes, masking tape, plastic cement, and decal setting solutions.
- Hobby Knife/Cutter: For precise removal of parts from sprues.
- Plastic Cement: For bonding plastic parts. Ensure proper ventilation.
- Tweezers: For handling small parts, especially photo-etched components.
- Side Cutters: For cleanly detaching parts from sprues.
- Sandpaper/Files: For cleaning mold lines and refining part edges.
- Putty: For filling any minor gaps or seams.
- Masking Tape: For painting and holding parts during assembly.
- Decal Setting Solution: For optimal decal adhesion and conformity to surfaces.
General Assembly Tips
- Part Preparation: Carefully remove parts from the sprues using a hobby knife or side cutters. Clean any mold lines or excess plastic (flash) with a hobby knife or fine sandpaper.
- Test Fitting: Before applying cement, always test fit parts to ensure proper alignment and fit. This helps identify and address any potential issues early.
- Adhesive Application: Apply plastic cement sparingly to one surface to be joined. Hold parts firmly together until the cement sets.
- Photo-Etched Parts: Handle photo-etched parts with care using tweezers. These delicate metal parts require super glue for attachment.
- Metal Barrel: The included metal barrel replaces the plastic barrel for enhanced realism. Follow the instructions for its specific attachment. Note: The metal barrel and photo-etched parts may be taped to the inside of the box lid.
Specific Assembly Notes
- Track Assembly: This kit features link-and-length tracks. Assemble these sections carefully, ensuring correct alignment and tension. Minor adjustments, such as removing a single track piece, may be necessary to achieve a perfect fit.
- Hull Superstructure: When assembling the four walls of the superstructure, ensure they are firmly in place and held together for approximately 60 seconds to allow the cement to create a strong bond and prevent gaps.
- Minor Gaps/Seams: Due to the kit's design, some minor gaps or seam lines may appear, particularly on the upper hull parts. These can be easily addressed with modeler's putty and light sanding for a smooth finish.

Figure 4: Commander Figure Detail. This close-up shows the detailed commander figure positioned in the tank's turret, highlighting the intricate molding and paintwork.

Figure 5: Rear Deck Details. This image provides a detailed view of the rear deck of the M13/40 model, showcasing tools, stowage, and engine deck grilles.
Painting Guide
Achieving an authentic finish requires careful painting. Refer to the chart below for recommended Tamiya XF (flat) and X (gloss) acrylic paints. Always apply paint in thin, even coats.
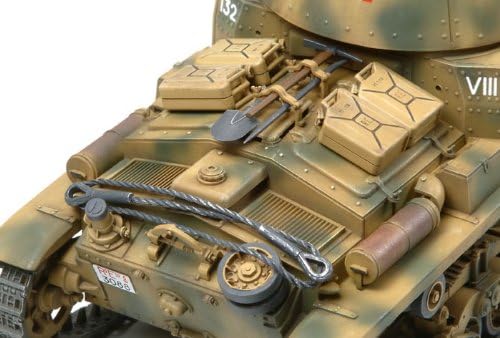
Figure 6: Paint Requirements Chart. This chart lists various Tamiya XF (flat) and X (gloss) acrylic paints by color code and description, essential for painting the model.
Decal Application
- Ensure the painted surface is smooth and glossy for optimal decal adhesion. A clear gloss coat can be applied if using flat paints.
- Cut out the desired decal close to its edge.
- Dip the decal in lukewarm water for 10-20 seconds until it can slide freely from the backing paper.
- Carefully slide the decal onto the model's surface.
- Position the decal using a wet brush or cotton swab.
- Gently blot away excess water with a soft cloth or paper towel.
- Apply decal setting solution to help the decal conform to surface details and eliminate silvering.
Display and Handling
Once assembled and painted, your Tamiya M13/40 model is a static display piece. Handle it with care to prevent damage to delicate parts, paint, or decals. Avoid direct sunlight and extreme temperatures to preserve the model's finish.
Maintenance
Cleaning
To clean your model, gently dust it with a soft brush or a can of compressed air. Avoid using harsh chemicals or abrasive materials, as these can damage the paint and plastic. For stubborn dust, a slightly damp cloth can be used, but ensure no water pools in crevices.
Storage
Store your model in a dust-free environment, ideally in a display case or a sealed container. Protect it from direct sunlight, which can cause paint fading and plastic degradation over time. Maintain a stable room temperature to prevent material warping.
Troubleshooting
- Parts Not Fitting: Ensure all mold lines and flash are removed. Test fit parts before cementing. If a gap persists, use modeler's putty to fill and sand smooth.
- Tracks Too Long/Short: The link-and-length tracks may require minor adjustment. If too long, carefully remove one link. If too short, ensure all links are fully seated and cemented.
- Decals Silvering: This occurs when air is trapped under the decal. Ensure the surface is glossy before application and use decal setting solution to help the decal conform and eliminate air bubbles.
- Missing Parts/Decals: Double-check all sprues and the inside of the box lid (especially for photo-etched parts and metal barrels). If parts are genuinely missing, contact Tamiya customer support.
- Paint Issues: Ensure surfaces are clean and dry before painting. Apply paint in thin coats to avoid brush marks or clumping. Allow adequate drying time between coats.
Specifications
| Feature | Detail |
|---|---|
| Brand | TAMIYA |
| Model Name | TAM35296 (1/35 Italian Medium Tank Carro Armato M13/40) |
| Item Model Number | TMYTAM35296 |
| Material | Plastic |
| Included Components | Photoetched Parts, Metal Barrel |
| Item Dimensions (L x W x H) | 12 x 12 x 5 inches |
| Item Weight | 10.6 ounces |
| Recommended Age | Adult (Manufacturer recommended: 4 years and up) |
| Date First Available | November 18, 2008 |
Warranty
As a model kit, this product typically does not come with a functional warranty in the traditional sense, as its performance depends on the assembly process. Tamiya is known for its high-quality components. If you encounter manufacturing defects or missing parts upon initial inspection, please contact Tamiya customer support immediately.
Support
For further assistance, technical questions, or inquiries regarding missing or defective parts, please contact Tamiya customer service. You can typically find contact information on the official Tamiya website or through your local hobby retailer.
- Tamiya Official Website: www.tamiya.com
- Local Hobby Retailer: Your point of purchase may also offer support.


