
Raypak P-R266A-EP-C
Raypak P-R266-A-EP-C Digital Propane Pool Heater
User Instruction Manual
Product Overview
The Raypak P-R266-A-EP-C Digital Propane Pool Heater is designed for efficient heating of swimming pools and spas. This model features an electronic ignition and a digital thermostat for precise temperature control. Built for residential applications, it combines durability with smart design, exceeding federal and state fuel efficiency standards.
Key features include:
- 266,000 BTU propane digital pool and spa heater
- Microprocessor-controlled thermostat for precise temperature setting
- Non-corrosive and rust-resistant cabinet and internal components
- Features PolyTuf powder coating, polymer headers, and an all copper-fin-tube heat exchanger
- Equipped with a stainless steel tube sheet, 2 inch CPVC water connections, burner tray, and fire tile

Figure 1: Front view of the Raypak P-R266-A-EP-C Digital Propane Pool Heater.
Setup and Installation
Proper installation is crucial for the safe and efficient operation of your Raypak pool heater. It is recommended that installation be performed by a qualified professional.
Site Selection
Choose a location that is level, well-ventilated, and provides adequate clearance around the unit for maintenance and operation. Ensure the location complies with all local building codes and regulations regarding gas appliances and pool equipment.
Plumbing Connections
Connect the heater to your pool's filtration system using 2-inch CPVC water connections. Ensure all connections are secure and leak-free. The heater is designed for high flow rates.
Gas Connection
Connect the propane gas supply to the heater. This unit is gas-powered. All gas connections must be made by a licensed professional and tested for leaks according to local codes.
Electrical Connection
The heater requires an electrical connection for its electronic ignition and digital thermostat. Ensure the electrical supply matches the heater's requirements and is installed by a qualified electrician, adhering to all electrical codes.
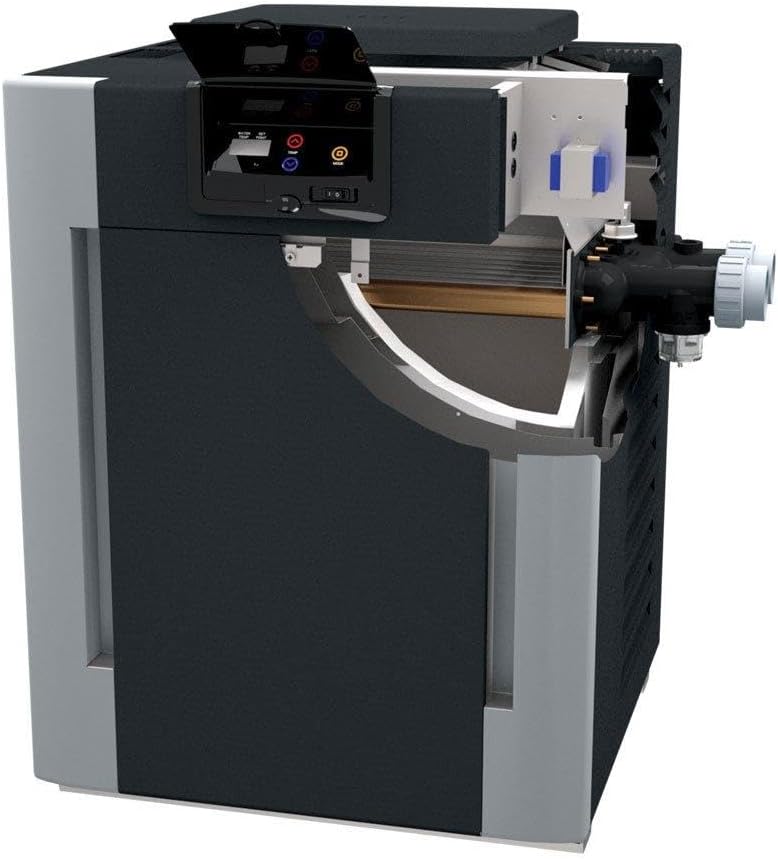
Figure 2: Internal components of the heater, showing the heat exchanger and plumbing connections.
Operating Instructions
The Raypak P-R266-A-EP-C features a user-friendly digital thermostat for easy operation.
Powering On/Off
Locate the main power switch on the control panel. Flip the switch to the 'ON' position to power the unit. To turn off, flip the switch to the 'OFF' position.
Setting Water Temperature
- Open the protective cover over the digital control panel.
- The display will show the current water temperature (WATER TEMP) and the set point (SET POINT).
- Use the 'TEMP' up (▲) and down (▼) arrow buttons to adjust the desired water temperature.
- Press the 'MODE' button (◼) to confirm the setting or to cycle through different modes if available.
The microprocessor-controlled thermostat allows for precise temperature adjustments. The heater will automatically ignite and begin heating the water to the set temperature.

Figure 3: Dimensional diagram of the heater, useful for installation planning.
Maintenance
Regular maintenance ensures the longevity and efficient operation of your Raypak pool heater. It is recommended to have the unit inspected annually by a qualified service technician.
Routine Checks
- Keep Area Clear: Ensure the area around the heater is free from debris, leaves, and any flammable materials.
- Inspect Vents: Regularly check that the exhaust and air intake vents are not obstructed.
- Check for Leaks: Periodically inspect all water and gas connections for any signs of leaks.
- Clean Exterior: Wipe down the exterior cabinet with a damp cloth to remove dirt and dust.
Winterization
Before freezing temperatures arrive, properly winterize your pool heater to prevent damage. This typically involves draining all water from the heater and capping off connections. Consult a professional for proper winterization procedures specific to your climate.
Troubleshooting
This section provides basic troubleshooting steps for common issues. For complex problems, always contact a qualified service technician.
| Problem | Possible Cause | Solution |
|---|---|---|
| Heater not igniting | No gas supply, low water flow, electrical issue, or control panel error. | Check gas valve, ensure pump is running and filter is clean, verify power supply, consult manual for error codes. |
| Water not heating to set temperature | Incorrect set point, low gas pressure, dirty heat exchanger, or oversized pool for heater BTU. | Verify set temperature, check gas supply, clean heat exchanger (professional service recommended), ensure heater BTU matches pool size. |
| Error code displayed | Specific internal fault. | Refer to the full owner's manual for a complete list of error codes and their corresponding solutions. |
Specifications
Detailed specifications for the Raypak P-R266-A-EP-C Digital Propane Pool Heater:
| Attribute | Value |
|---|---|
| Model Number | P-R266A-EP-C |
| BTU Output | 266,000 BTU |
| Fuel Type | Propane |
| Product Dimensions | 215 x 31 x 30 inches |
| Item Weight | 215 pounds |
| Manufacturer | RAYPAK |
| Water Connections | 2 inch CPVC |
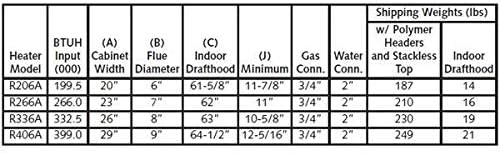
Figure 4: Detailed specifications table for different Raypak heater models, including dimensions and weights.
Warranty and Support
Raypak products are known for their durability and performance. For specific warranty details and terms, please refer to the warranty card included with your product or visit the official Raypak website.
Important Note: As per customer feedback, the manufacturer's warranty may be void if the heater is not installed by a Raypak certified technician. It is highly recommended to use professional installation services to ensure warranty coverage and proper operation.
For technical support, service, or to locate a certified technician, please contact Raypak customer service through their official channels. You can also find helpful resources and FAQs on the Raypak official website.
This product is supported by customer service and offers 30-day easy returns through the seller.
Ask a question about this manual
Ask about setup, troubleshooting, compatibility, parts, safety, or missing instructions. Manuals+ will review the question and use this page’s manual context to help answer it.