
Introduction
The dbx 1231 is a dual-channel, 31-band graphic equalizer designed for sound reinforcement applications. It features ISO frequency centers, a ±12 dB input gain range, and switchable 40Hz/18 dB per octave low-cut filters. Additional features include 45 mm faders, selectable ±6dB or ±15dB boost/cut range, and various connector types for versatile installation. The unit incorporates balanced inputs and outputs for signal integrity and chassis/signal ground lift capabilities to minimize hum.
This equalizer is engineered for reliable, long-term operation, featuring a magnetically isolated transformer, RF-filtered inputs and outputs, and a power-off hard-wire relay bypass with a 2-second power-up delay. These design elements ensure compatibility across diverse audio setups. The unit delivers a frequency response of 10Hz to 50kHz, a signal-to-noise ratio greater than 90dB, and low total harmonic distortion plus noise (THD+N) of less than 0.005%.
Key Features
- Dual-channel, 31-band 1/3 octave graphic equalization.
- Switchable boost/cut ranges of ±6 dB or ±15 dB for precise adjustments.
- ±12 dB input gain range.
- 18 dB/octave 40 Hz Bessel low-cut filter.
- Electronically balanced/unbalanced inputs and servo balanced/unbalanced outputs.
- RF filtered inputs and outputs for clean signal transmission.
- XLR, barrier strip, and 1/4" TRS connectors for flexible connectivity.
- Chassis/signal ground lift capabilities for hum isolation.
- Internal power supply transformer.
- Power-off hard-wire relay bypass with 2-second power-up delay.

Setup and Connections
Before connecting the dbx 1231, ensure all audio equipment is powered off. The equalizer should be placed in a standard 19-inch rack, occupying 3U of rack space. Connect the audio source to the input connectors and the amplifier or next processing unit to the output connectors.
Input and Output Connections
The dbx 1231 offers versatile connection options on its rear panel:
- XLR Connectors: For balanced audio signals. Pin 1 is ground, Pin 2 is hot (+), and Pin 3 is cold (-).
- 1/4" TRS Connectors: Can be used for balanced (Tip-Ring-Sleeve) or unbalanced (Tip-Sleeve) audio signals. For balanced, Tip is hot (+), Ring is cold (-), Sleeve is ground. For unbalanced, Tip is hot (+), Sleeve is ground.
- Barrier Strip Connectors: Provides screw terminals for permanent installations, supporting balanced or unbalanced wiring.

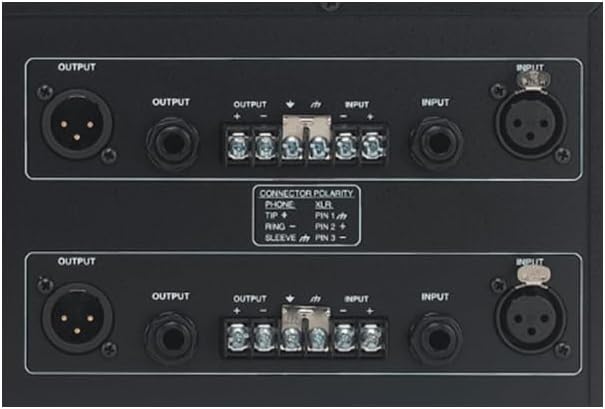
Power Connection
Connect the supplied AC power cord to the IEC power inlet on the rear panel of the unit and then to a suitable AC power outlet. The unit features an internal power supply transformer.

Operation
The dbx 1231 features a straightforward front panel layout for intuitive control over audio frequencies.


Front Panel Controls
- Frequency Faders: Each channel has 31 faders, corresponding to 1/3 octave frequency bands. Moving a fader up boosts the frequency, while moving it down cuts the frequency.
- Input Gain Control: A rotary knob to adjust the input signal level, with a range of ±12 dB.
- Output Level LEDs: A four-segment LED bar graph indicates the output signal level.
- Clip LED: Illuminates when the signal is clipping, indicating excessive input or output levels.
- Low Cut Filter Switch: Engages an 18 dB/octave 40 Hz Bessel low-cut filter to remove unwanted low-frequency rumble.
- Range Switch: Selects the boost/cut range for the frequency faders, either ±6 dB or ±15 dB.
- Bypass Switch: Engages or disengages the equalizer circuit, allowing for A/B comparison of the processed and unprocessed signal.
Adjusting Frequencies
To adjust specific frequency bands, use the corresponding faders. Start with all faders at the 0 dB (center) position. Make small adjustments and listen carefully to the effect on the audio. The ±6 dB range offers finer control, while the ±15 dB range provides more dramatic equalization.
Input Gain and Output Level
Use the Input Gain control to match the signal level from your source to the equalizer. Monitor the Output Level LEDs to ensure the signal is not clipping (Clip LED should not illuminate frequently). Adjust the input gain to achieve a healthy signal level without distortion.
Low-Cut Filter
Engage the Low Cut filter to remove unwanted low-frequency content, such as stage rumble or microphone handling noise. This can improve clarity and prevent speaker damage from excessive low-end energy.
Bypass Function
The Bypass switch allows you to quickly compare the sound with and without equalization. This is useful for evaluating your adjustments and ensuring the desired effect is achieved.
Technical Specifications
| Parameter | Specification |
|---|---|
| Input Connectors | XLR, 1/4" TRS, Barrier Strip |
| Input Type | Electronically balanced/unbalanced |
| Max Input Level | +22 dBu balanced or unbalanced |
| Output Connectors | XLR, 1/4" TRS, Barrier Strip |
| Output Type | Servo balanced/unbalanced |
| Max Output Level | +22 dBu balanced/unbalanced into 2 kΩ or greater |
| Frequency Response | 20 Hz to 20 kHz, +0.5 dB/-1 dB |
| Dynamic Range | 112 dB |
| THD + Noise | <0.005% |
| Interchannel Crosstalk | <-80 dB, 20 Hz to 20 kHz |
| Low Cut Filter | 40 Hz, 18 dB/octave Bessel |
| EQ Bypass | Relay bypass |
| Power Supply | 100-240 VAC, 50/60 Hz |
| Power Consumption | 24 Watts |
| Dimensions (H x W x D) | 5.25" x 19" x 7.9" (13.34 cm x 48.26 cm x 20.07 cm) |
| Weight | 13.84 lbs (6.28 kg) |

Maintenance
The dbx 1231 is designed for years of maintenance-free operation. To ensure its longevity and optimal performance, follow these general guidelines:
- Cleaning: Use a soft, dry cloth to clean the exterior of the unit. Avoid abrasive cleaners, solvents, or strong detergents, as these can damage the finish and controls.
- Ventilation: Ensure adequate ventilation around the unit. Do not block ventilation openings. Proper airflow prevents overheating.
- Environment: Operate the unit in a dry environment, away from direct sunlight, excessive heat, and moisture.
- Power Cord: Regularly inspect the power cord for any signs of damage. If damaged, replace it with an approved cord.
Troubleshooting
If you encounter issues with your dbx 1231, consult the following common troubleshooting steps:
- No Sound:
- Check all audio cable connections (inputs and outputs) to ensure they are secure and correctly wired.
- Verify that the unit is powered on and the power cord is securely connected.
- Ensure the Bypass switch is not engaged if you expect to hear the equalized signal.
- Check the Input Gain and Output Level controls; they should not be set to minimum.
- Hum or Noise:
- Engage the Chassis/Signal Ground Lift switch on the rear panel to break potential ground loops.
- Ensure all audio cables are properly shielded and in good condition.
- Check for proper grounding of all connected equipment.
- Distortion:
- Reduce the Input Gain if the Clip LED is frequently illuminating.
- Ensure the faders are not set to extreme boost positions, which can cause clipping in subsequent equipment.
- Check the input level of the next device in the signal chain.
- Uneven Sound Between Channels:
- Verify that the fader settings for both channels are symmetrical if a stereo image is desired.
- Check the Input Gain settings for each channel.
Warranty and Support
For warranty information and technical support, please refer to the warranty card included with your product or visit the official dbx website. Keep your purchase receipt as proof of purchase for any warranty claims.


