
1. Introduction
Thank you for purchasing the JWIN JDVD518 2.1-Channel Progressive Scan DVD Player. This manual provides essential information for the proper setup, operation, and maintenance of your new DVD player. Please read this manual thoroughly before using the product and retain it for future reference.
The JDVD518 offers high-quality video playback with progressive scan technology and digital audio output via HDMI, ensuring an enhanced home entertainment experience. It is compatible with NTSC, PAL, and auto systems.
2. Safety Information
To ensure safe operation and prevent damage, please observe the following precautions:
- Power Source: Connect the unit only to the power supply specified in this manual or on the unit itself.
- Ventilation: Do not block ventilation openings. Ensure adequate space around the unit for proper airflow.
- Water and Moisture: Do not expose the unit to rain, moisture, or dripping/splashing liquids. Do not place objects filled with liquids, such as vases, on the unit.
- Heat: Keep the unit away from heat sources such as radiators, heat registers, stoves, or other apparatus (including amplifiers) that produce heat.
- Cleaning: Unplug the unit from the wall outlet before cleaning. Use a dry cloth for cleaning.
- Servicing: Do not attempt to service this product yourself. Refer all servicing to qualified service personnel.
3. Package Contents
Verify that all items are present in the package:
- JWIN JDVD518 DVD Player
- Remote Control
- User Manual (this document)
- Power Cable
- (Additional cables such as HDMI or RCA may be included depending on the specific package)
4. Product Overview
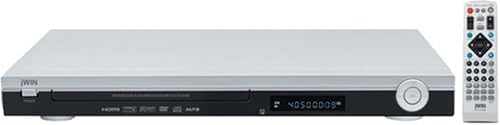
Figure 4.1: JWIN JDVD518 DVD Player and included remote control. The player features a sleek silver and black design with a front-loading disc tray and a digital display. The remote control is white with various function buttons.
4.1 Front Panel
The front panel provides access to basic controls and the disc tray.
- Power Button: Turns the unit on or off.
- Disc Tray: For inserting DVDs or CDs.
- Open/Close Button: Opens and closes the disc tray.
- Play/Pause Button: Starts or pauses playback.
- Stop Button: Stops playback.
- Display Screen: Shows playback information, track numbers, and time.
4.2 Rear Panel (Typical Connections)
The rear panel houses all input and output connections for the DVD player.
- HDMI Output: For digital video and audio connection to a compatible TV or AV receiver.
- Component Video Output (YPbPr): For progressive scan video connection to a TV.
- Composite Video Output: Standard definition video output.
- Analog Audio Output (L/R): For stereo audio connection to an amplifier or TV.
- Digital Audio Output (Coaxial/Optical): For digital audio connection to a receiver (specific types may vary).
- Power Input: Connects to the AC power cord.
4.3 Remote Control
The remote control provides full functionality for operating the DVD player from a distance.
- Power: Turns the player on/off.
- Numeric Keypad: For direct track selection.
- Navigation Buttons (Up/Down/Left/Right/Enter): For menu navigation.
- Play, Pause, Stop, Fast Forward, Rewind, Skip: Playback control buttons.
- Setup: Accesses the system setup menu.
- Audio/Subtitle/Angle: Selects audio tracks, subtitle languages, or camera angles.
- Zoom: Adjusts the screen zoom level.
- OSD (On-Screen Display): Toggles on-screen information.
5. Setup
5.1 Connecting the DVD Player
Choose one of the following connection methods based on your TV or receiver's capabilities:
- HDMI Connection (Recommended for best quality):
- Connect one end of an HDMI cable to the HDMI OUT port on the DVD player.
- Connect the other end to an available HDMI IN port on your TV or AV receiver.
- Select the corresponding HDMI input on your TV/receiver.
- Component Video (YPbPr) Connection:
- Connect the Y, Pb, and Pr video cables from the DVD player's COMPONENT VIDEO OUT to the corresponding inputs on your TV.
- Connect the L/R analog audio cables from the DVD player's AUDIO OUT to the corresponding audio inputs on your TV or receiver.
- Composite Video Connection:
- Connect the yellow video cable from the DVD player's VIDEO OUT to the yellow video input on your TV.
- Connect the L/R analog audio cables from the DVD player's AUDIO OUT to the corresponding audio inputs on your TV or receiver.
5.2 Power Connection
After all audio/video connections are made:
- Connect the power cord to the AC IN port on the rear of the DVD player.
- Plug the other end of the power cord into a standard AC wall outlet.
5.3 Initial Setup Menu
Upon first power-on, or after a factory reset, you may be prompted to configure basic settings:
- Language: Select your preferred on-screen display language.
- TV System: Choose NTSC, PAL, or Auto based on your region and TV compatibility.
- Aspect Ratio: Set to 4:3 (Standard) or 16:9 (Widescreen) to match your TV.
- Audio Output: Configure for Stereo or Digital output as needed.
6. Operating Instructions
6.1 Basic DVD Playback
- Turn on your TV and the JWIN JDVD518 DVD player.
- Select the correct input source on your TV (e.g., HDMI 1, Video 1).
- Press the OPEN/CLOSE button on the front panel or remote to open the disc tray.
- Place a DVD or CD disc gently into the tray with the label side facing up.
- Press the OPEN/CLOSE button again to close the tray. The player will typically begin playback automatically.
- If playback does not start, press the PLAY button on the remote or front panel.
- Use the PLAY, PAUSE, STOP, FAST FORWARD, REWIND, and SKIP buttons on the remote to control playback.
6.2 Progressive Scan Feature
The JDVD518 features progressive scan technology, which provides a smoother, flicker-free image compared to interlaced video. For progressive scan to function, your TV must support progressive scan input (often via component video or HDMI) and be configured correctly in the player's setup menu.
6.3 NTSC/PAL/Auto System Compatibility
This DVD player is compatible with NTSC and PAL video systems, which are used in different regions worldwide. The "Auto" setting allows the player to automatically detect and adjust to the disc's video format. Ensure your TV also supports the selected video system.
6.4 On-Screen Display (OSD)
Press the OSD button on the remote control to view information about the current disc, such as elapsed time, remaining time, chapter number, and audio/subtitle settings. Pressing it again will hide the display.
7. Maintenance
7.1 Cleaning the Unit
- Always unplug the DVD player from the power outlet before cleaning.
- Use a soft, dry cloth to wipe the exterior surfaces of the unit.
- Do not use liquid cleaners, aerosol cleaners, or strong chemical solvents, as these may damage the finish.
7.2 Disc Care
- Handle discs by their edges to avoid fingerprints on the playing surface.
- Keep discs in their cases when not in use to prevent scratches and dust accumulation.
- If a disc is dirty, wipe it gently from the center outwards with a soft, lint-free cloth. Do not use abrasive materials.
8. Troubleshooting
If you experience problems with your DVD player, refer to the following common issues and solutions:
| Problem | Possible Cause | Solution |
|---|---|---|
| No power | Power cord not connected; power outlet not active. | Ensure power cord is securely plugged in. Test the outlet with another device. |
| No picture | Incorrect video input selected on TV; video cables loose or incorrect connection. | Select the correct input source on your TV. Check all video cable connections. Ensure TV system (NTSC/PAL) matches. |
| No sound | Audio cables loose or incorrect connection; TV/receiver volume too low or muted. | Check all audio cable connections. Adjust TV/receiver volume. Ensure correct audio output is selected in player settings. |
| Disc does not play | Disc is dirty, scratched, or inserted incorrectly; incompatible disc format. | Clean the disc. Ensure disc is inserted label-side up. Verify disc format is supported (DVD, CD). |
| Remote control not working | Batteries are dead or inserted incorrectly; obstruction between remote and player. | Replace batteries. Ensure correct battery polarity. Remove any obstructions. Point remote directly at the player's sensor. |
9. Specifications
| Feature | Description |
|---|---|
| Model Number | JDVD518 |
| Video Output | HDMI, Component Video (YPbPr), Composite Video |
| Audio Output | 2.1-Channel Stereo, Digital Audio (Coaxial/Optical - typical) |
| Supported Audio Format | Dolby Digital, DTS, PCM |
| Progressive Scan | Yes |
| Video System Compatibility | NTSC, PAL, Auto |
| Supported Media Types | DVD, CD, DVD-R/RW, CD-R/RW, MP3, JPEG (typical) |
| Dimensions (W x D x H) | Approximately 14.7 x 12.1 x 3.5 inches |
| Weight | Approximately 4.9 pounds |
| Power Supply | AC 120V, 60Hz (typical for US market) |
10. Warranty and Support
JWIN products are designed for reliability and performance. For specific warranty information, please refer to the warranty card included with your product or visit the official JWIN website. Keep your purchase receipt as proof of purchase for warranty claims.
For technical support, troubleshooting assistance, or service inquiries, please contact JWIN customer support through the contact information provided on the official JWIN website or in your product documentation.
