
Crown 160MA
Crown 160MA Mixer/Amplifier User Manual
Model: 160MA
Brand: Crown
1. Introduction
This manual provides comprehensive instructions for the installation, operation, and maintenance of your Crown 160MA Mixer/Amplifier. The Crown 160MA is a versatile audio solution designed for commercial installed sound applications, including paging systems, background music, and music-on-hold. It features four inputs, a 60W amplifier output, and supports both 8-ohm and constant-voltage (70V and 100V) outputs.
Please read this manual thoroughly before operating the unit to ensure proper setup and to maximize its performance and longevity.
2. Key Features
- Four independent inputs with individual volume controls.
- Robust 60-watt amplifier output.
- Supports 8-ohm, 70V, and 100V constant-voltage outputs.
- Priority muting via VOX or external switch for important announcements.
- Voice-activated muting and phantom power capabilities.
- Flexible connectivity with balanced Phoenix-type mic/line input, telephone output, and dual RCA stereo music inputs.
- Screw-terminal speaker outputs for secure connections.
- Master bass and treble controls for precise audio adjustments.
- Convection cooling for quiet operation.
- Compact half-rack design for easy integration.
3. Product Overview
The Crown 160MA is designed for ease of use and reliable performance in commercial audio environments. Below are visual representations of the unit's front and rear panels, highlighting key controls and connections.

Figure 3.1: Front Panel Controls. This image shows the front of the Crown 160MA, featuring four input volume controls, a master volume control, bass and treble adjustments, SPI and CLIP indicators, and the power button with its blue LED indicator.

Figure 3.2: Rear Panel Connections. This image displays the rear panel of the Crown 160MA, detailing the amplifier output terminals (8Ω, 70V, 100V), AC power input, DIP switches for amplifier configuration, preamp output, telephone (MOH) output, and various input options including Input 1 (Phoenix connector with priority), Input 2, 3, and 4 (RCA unbalanced sum inputs), and VOX threshold adjustment.
4. Setup and Installation
4.1 Unpacking
Carefully remove the mixer/amplifier from its packaging. Inspect the unit for any signs of damage during transit. Retain the packaging for future transport or storage.
4.2 Placement
The Crown 160MA is designed for half-rack width installation. Ensure adequate ventilation around the unit, as it uses convection cooling. Avoid placing it near heat sources or in enclosed spaces without airflow.
4.3 Power Connection
Connect the supplied AC power cord to the AC inlet on the rear panel of the 160MA and then to a suitable AC power outlet (100-240VAC, 50/60Hz).

Figure 4.1: Power Connection. This image shows the rear panel of the Crown 160MA with the power cord properly connected to the AC inlet.
4.4 Speaker Connections
The 160MA supports 8-ohm, 70V, and 100V speaker systems. Use appropriate gauge speaker wire and ensure correct polarity. Connect speakers to the screw-terminal outputs on the rear panel.
- 8-Ohm Output: For low-impedance speakers. Connect the positive (+) speaker terminal to the 8Ω terminal and the negative (-) speaker terminal to the COM (common) terminal.
- 70V/100V Constant Voltage Output: For distributed speaker systems. Connect the positive (+) speaker terminal to the 70V or 100V terminal (depending on your system) and the negative (-) speaker terminal to the COM (common) terminal.
4.5 Input Connections
- Input 1 (Phoenix Connector): This input supports balanced mic/line signals and features priority muting. Connect your microphone or line-level source using a Phoenix connector.
- Inputs 2, 3, 4 (RCA): These are unbalanced stereo RCA inputs, summed to mono. Ideal for connecting music sources like CD players, media players, or tuners.
- Telephone (MOH) Output: Provides a dedicated output for Music-on-Hold systems.
- Preamp Output: Allows connection to an external power amplifier or other audio processing equipment.
4.6 DIP Switch Configuration
The rear panel features a set of DIP switches to configure various amplifier functions, including input priority and phantom power. Refer to the diagram on the unit's rear panel or the detailed specifications for specific switch settings.
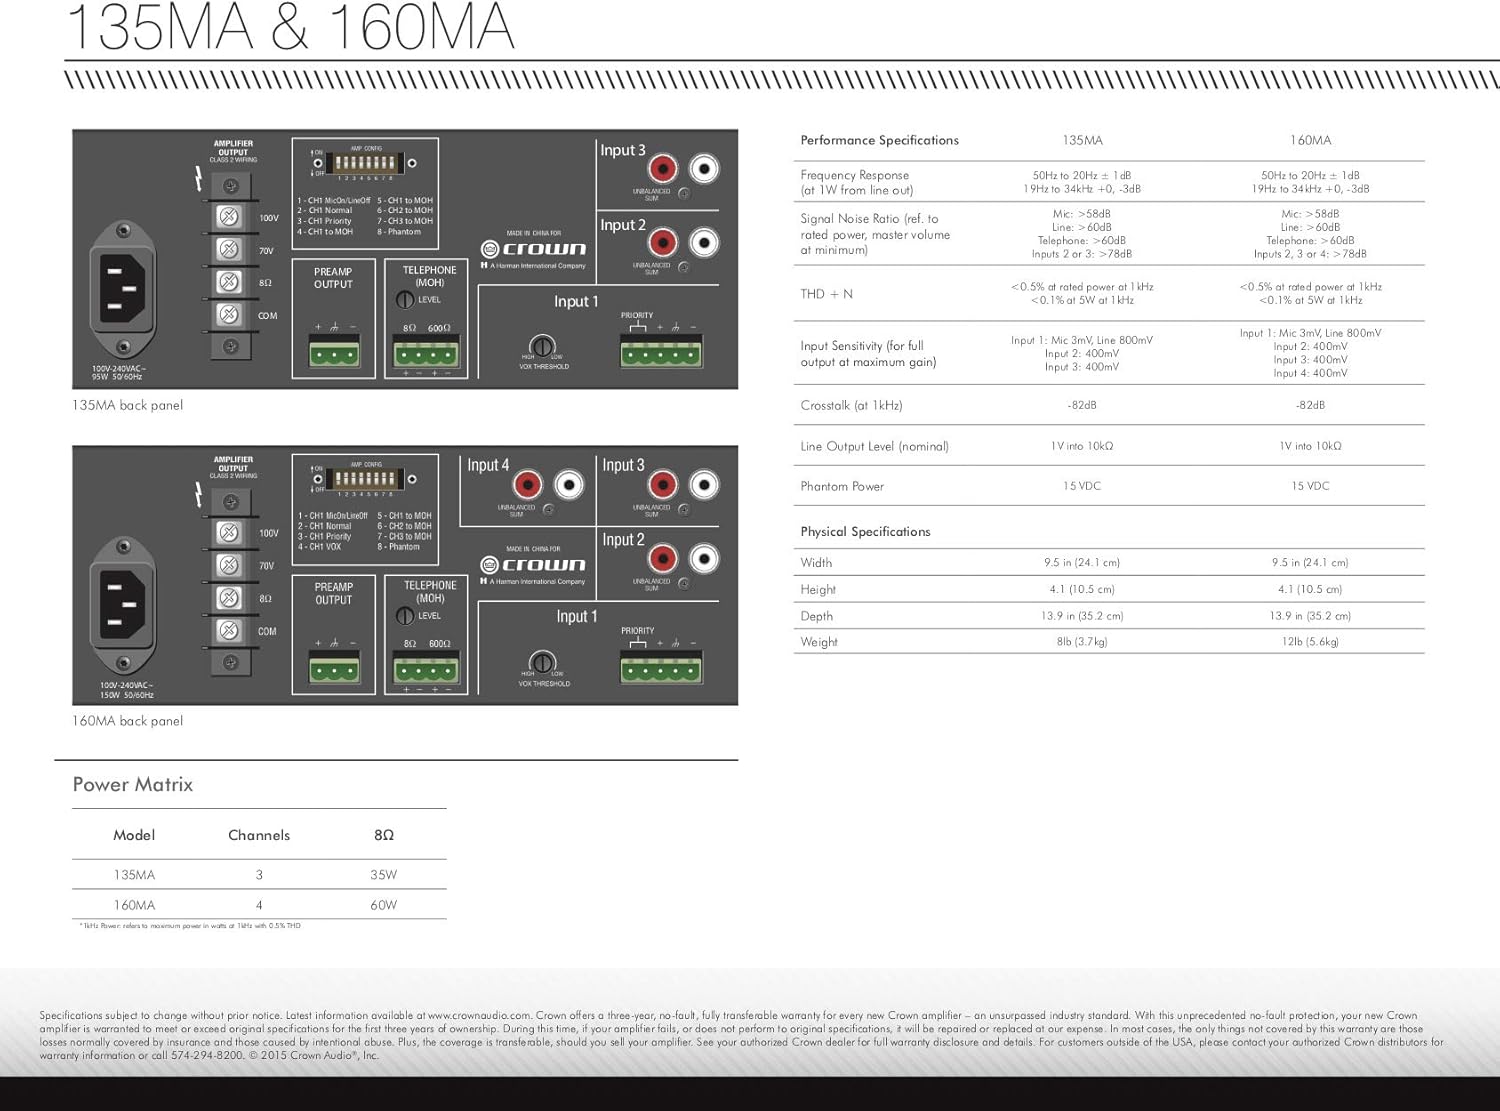
Figure 4.2: DIP Switch Settings and Specifications. This diagram provides a detailed view of the DIP switch configurations for both the 135MA and 160MA models, along with performance and physical specifications. It is crucial for setting up input priority, phantom power, and other advanced features.
5. Operation
5.1 Powering On/Off
Press the POWER button on the front panel to turn the unit on or off. The blue LED indicator will illuminate when the unit is powered on.
5.2 Adjusting Input Levels
Each of the four inputs has an independent volume control knob on the front panel. Rotate the knob clockwise to increase the input level and counter-clockwise to decrease it. Adjust these controls to balance the volume of different audio sources.
5.3 Master Volume Control
The MASTER volume knob controls the overall output level of the amplifier. Adjust this to set the desired listening volume for your speaker system.
5.4 Tone Controls
The BASS and TREBLE controls allow you to adjust the low and high frequencies of the master output. Use these to fine-tune the sound to your preference or acoustic environment.
5.5 Priority Muting
The 160MA features priority muting, typically configured via DIP switches for Input 1. When activated, a signal on the priority input will automatically attenuate other active inputs, ensuring that important announcements or signals are heard clearly. VOX (Voice Operated Switch) or an external switch can trigger this function.
5.6 Indicators
- SPI (Signal Present Indicator): Illuminates when an audio signal is detected at the output.
- CLIP Indicator: Illuminates when the amplifier output is clipping (distorting). If this light frequently illuminates, reduce the master volume or individual input levels to prevent damage to speakers and the amplifier.
6. Maintenance
The Crown 160MA Mixer/Amplifier is designed for reliable, long-term operation with minimal maintenance.
- Cleaning: Use a soft, dry cloth to clean the exterior of the unit. Do not use liquid cleaners or solvents.
- Ventilation: Ensure that the ventilation slots on the unit are not obstructed. Proper airflow is essential for convection cooling.
- Connections: Periodically check all input and output connections to ensure they are secure and free from corrosion.
7. Troubleshooting
| Problem | Possible Cause | Solution |
|---|---|---|
| No power | Power cord disconnected; no power from outlet; unit fault. | Check power cord connection. Verify outlet has power. If problem persists, contact support. |
| No sound output | Master volume too low; input volume too low; incorrect speaker connections; source device not playing. | Increase master and input volumes. Check speaker wiring and polarity. Ensure audio source is active and connected correctly. |
| Distorted sound / CLIP indicator on | Input signal too high; master volume too high; incorrect speaker impedance. | Reduce input levels or master volume. Verify speaker impedance matches amplifier output. |
| Priority muting not working | DIP switch settings incorrect; VOX threshold not set correctly; external switch not connected. | Check DIP switch settings for priority muting. Adjust VOX threshold. Verify external switch connection. |
8. Specifications
| Feature | Detail |
|---|---|
| Brand | Crown |
| Model Number | G160MA |
| Output Wattage | 60 Watts |
| Number of Channels | 4 |
| Connectivity Technology | Wired |
| Connector Type | RCA, Phoenix |
| Voltage | 100 Volts (Operating Range: 100-240VAC) |
| Power Source | Corded Electric |
| Item Weight | 12 Pounds (approx. 5.44 kg) |
| Product Dimensions (D x W x H) | 13.9" x 9.5" x 4.1" (35.3 cm x 24.1 cm x 10.4 cm) |
| Color | Black |
| First Available Date | September 14, 2004 |
9. Warranty and Support
9.1 Warranty Information
This product is sold as brand new. Returns are accepted but may be subject to a return service charge (up to 25%) if the item has been opened, used, or handled in a way that renders it not in "brand new" condition. Tampering with the item may void the possibility of a refund.
For detailed warranty terms and conditions, please refer to the official Crown product documentation or contact Crown customer support.
9.2 Customer Support
For technical assistance, troubleshooting beyond this manual, or warranty claims, please contact Crown customer support. You may also find additional resources, including a downloadable PDF user manual, on the official Crown website or through the provided link:
Related documents160MA


Ask a question about this manual
Ask about setup, troubleshooting, compatibility, parts, safety, or missing instructions. Manuals+ will review the question and use this page’s manual context to help answer it.