
1. Introduction
The Hitachi CP-A100 is an advanced XGA 3LCD Ultra Short Throw Projector designed for versatile use in educational and corporate environments. This projector features a revolutionary short throw distance, high brightness, and network capabilities, making it an ideal solution for various presentation needs. This manual provides essential information for the safe and efficient operation of your CP-A100 projector.
2. Safety Information
Please read all safety instructions carefully before using the projector. Failure to follow these instructions may result in electric shock, fire, or damage to the projector.
- Do not block ventilation openings. Ensure adequate space around the projector for proper airflow.
- Do not look directly into the projector lens when the lamp is on, as this can cause eye damage.
- Do not place the projector on an unstable cart, stand, or table.
- Do not expose the projector to rain or moisture to prevent fire or electric shock.
- Refer all servicing to qualified service personnel.
3. Package Contents
Verify that all items listed below are included in your package:
- Hitachi CP-A100 Projector
- VGA Cable
- Remote Control
- Power Cord
- User Manual (this document)
4. Setup
4.1 Physical Placement
The CP-A100 features an ultra short throw distance, allowing it to project a large image from a very short distance. This design minimizes shadows and prevents light from shining into the presenter's eyes.
- Distance: Project a 60-inch image from approximately 1.4 feet.
- Orientation: The projector can be placed vertically or horizontally. It can also be inverted for ceiling mount applications.
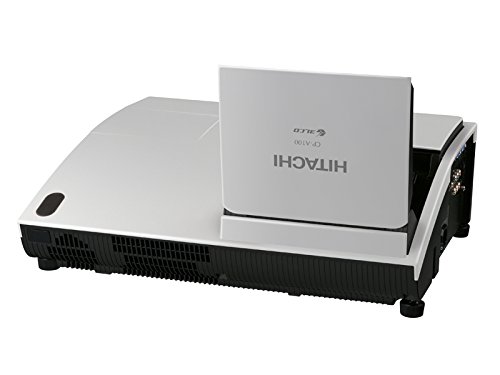
Figure 1: Hitachi CP-A100 Projector. Note the ultra-short throw lens design.
4.2 Connecting to Devices
Connect your source devices (e.g., computer, DVD player) to the projector using the appropriate cables.
- VGA Connection: Use the provided VGA cable to connect your computer's VGA output to the projector's VGA input.
- Network Connectivity: The CP-A100 supports network connectivity, allowing for remote monitoring and control. Connect an Ethernet cable from your network to the projector's LAN port. Refer to the network setup guide for detailed configuration.
4.3 Security Features
The CP-A100 includes several security functions to protect your device.
- Multilevel PIN Locks: Configure PIN codes to prevent unauthorized use.
- Security Bar: Use a physical security bar to deter theft.
- Kensington Slot: Attach a Kensington lock cable for added physical security.
5. Operating the Projector
5.1 Basic Operation
- Connect the power cord and press the Power button on the projector or remote control.
- Select the desired input source using the "Input" button on the remote or projector control panel.
- Adjust focus and zoom as needed.
5.2 Advanced Features
- My Buttons: Customize frequently used functions for quick access.
- Input Source Naming: Assign custom names to input sources for easier identification.
- My Text: Display custom text messages on the projection screen.
- E-Shot Feature: Transfer up to four still images from a computer to the projector for display.
- Whiteboard, Blackboard, or Day Time Modes: Optimize image settings for different projection surfaces and ambient light conditions.
6. Maintenance
Regular maintenance ensures optimal performance and extends the lifespan of your projector.
6.1 Lamp Replacement
The lamp door is conveniently located on top of the projector for easy access. When the lamp life indicator appears, replace the lamp following these steps:
- Turn off the projector and unplug the power cord.
- Allow the projector to cool down completely.
- Open the lamp cover on the top of the unit.
- Carefully remove the old lamp and install the new one.
- Close the lamp cover securely.
6.2 Filter Cleaning/Replacement
The air filter is located on the back of the projector for easy access. Clean or replace the filter regularly to prevent dust buildup and maintain cooling efficiency.
- Turn off the projector and unplug the power cord.
- Locate the filter cover on the back of the projector.
- Remove the filter cover and clean the filter with a soft brush or vacuum cleaner. Replace if heavily soiled or damaged.
- Reattach the filter cover.
7. Troubleshooting
If you encounter issues with your projector, refer to the following common problems and solutions:
- No Image: Ensure all cables are securely connected and the correct input source is selected. Check if the lamp is functioning.
- Image is Blurry: Adjust the focus ring on the lens. Ensure the projection surface is flat and the projector is stable.
- Overheating Warning: Check for blocked ventilation openings. Clean the air filter if it is dirty. Ensure the projector is in a well-ventilated area.
- Remote Control Not Working: Replace the batteries in the remote control. Ensure there are no obstructions between the remote and the projector's IR receiver.
For more complex issues, please contact Hitachi customer support.
8. Specifications
| Feature | Detail |
|---|---|
| Model Number | CPA100 |
| Product Dimensions | 5.08 x 15.63 x 14.02 inches |
| Item Weight | 13.01 pounds |
| Display Resolution | 1024 x 768 (XGA) |
| Brightness | 2500 ANSI Lumens |
| Connectivity Technology | VGA, Network |
| Special Feature | Ultra Short Throw |
| Recommended Uses | Business, Education |
| Manufacturer | HITACHI AMERICA LTD-UB DIVISION |
| Date First Available | May 26, 2006 |
9. Warranty and Support
For warranty information and technical support, please refer to the warranty card included with your product or visit the official Hitachi website. Keep your purchase receipt as proof of purchase for warranty claims.
Hitachi Customer Support: www.hitachi.com