
AVerMedia VISNCP300
Contents
AVerVision CP300 Camera User Manual
Model: VISNCP300 | Brand: AVerMedia
1. Introduction
This user manual provides comprehensive instructions for the setup, operation, and maintenance of your AVerVision CP300 Portable Gooseneck Document Camera. The AVerVision CP300 is designed to capture and display documents, objects, and images with high clarity, making it an ideal tool for presentations, education, and various professional applications.
2. Package Contents
Upon unpacking, please verify that all the following items are included in your package:

Figure 2.1: AVerVision CP300 camera unit, VGA cables, USB cables, and power adapter.
- AVerVision CP300 Document Camera Unit
- Power Adapter
- VGA Cable (x2)
- USB Cable (x2)
- Carrying Bag
- Remote Control
3. Product Overview
Familiarize yourself with the various components and connection ports of the AVerVision CP300.
3.1. Main Unit and Gooseneck Camera
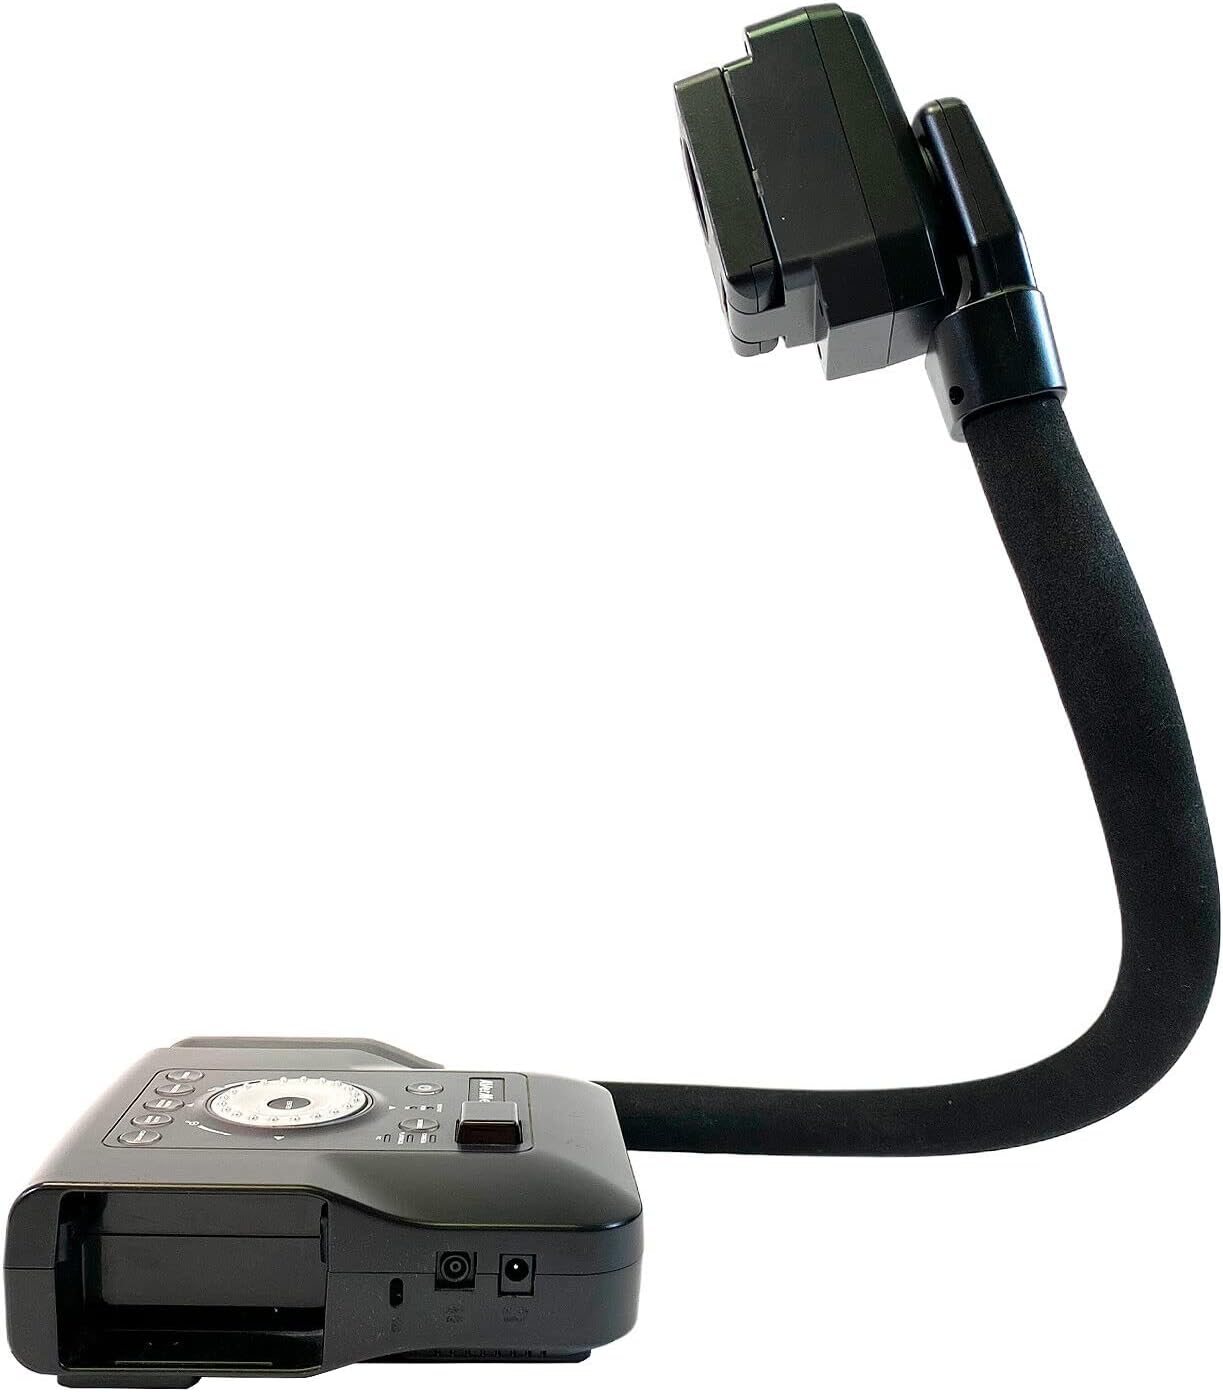
Figure 3.1: The AVerVision CP300 with its flexible gooseneck camera arm extended.
The main unit houses the control panel and connection ports, while the flexible gooseneck arm allows for precise positioning of the camera head to capture various angles and objects.
3.2. Control Panel
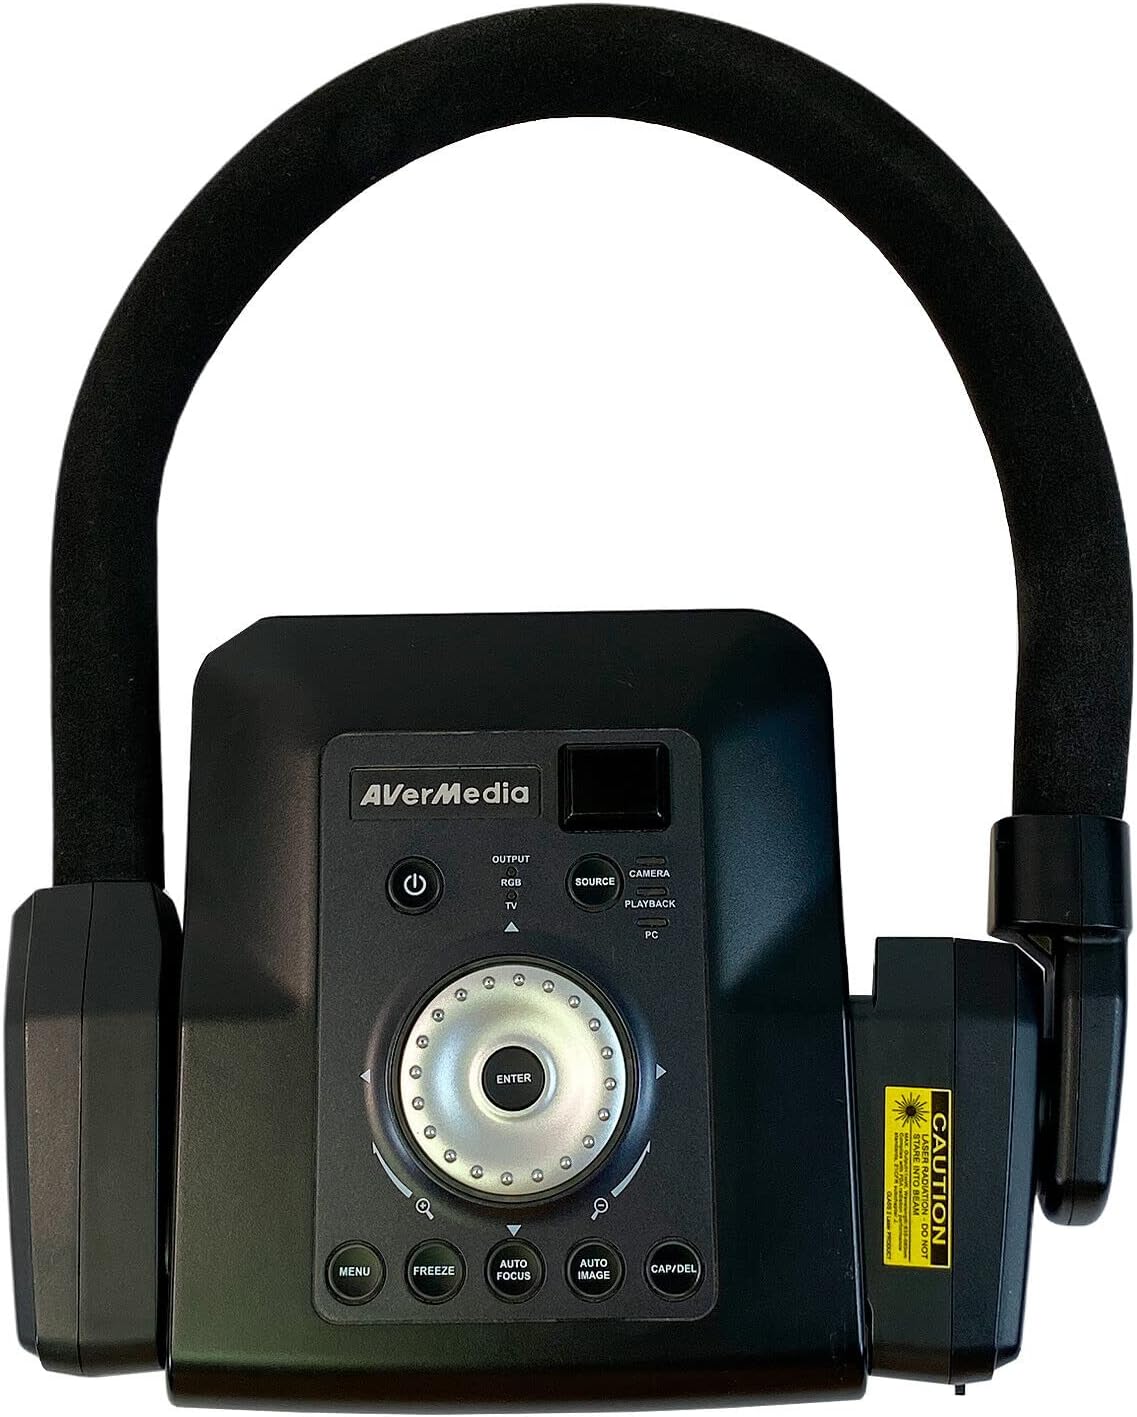
Figure 3.2: Top view of the AVerVision CP300 control panel.
The control panel features buttons for power, source selection, menu navigation, zoom, auto focus, auto image adjustment, freeze, and capture/delete functions. A central dial with an ENTER button facilitates navigation and selection.
3.3. Rear Connection Ports
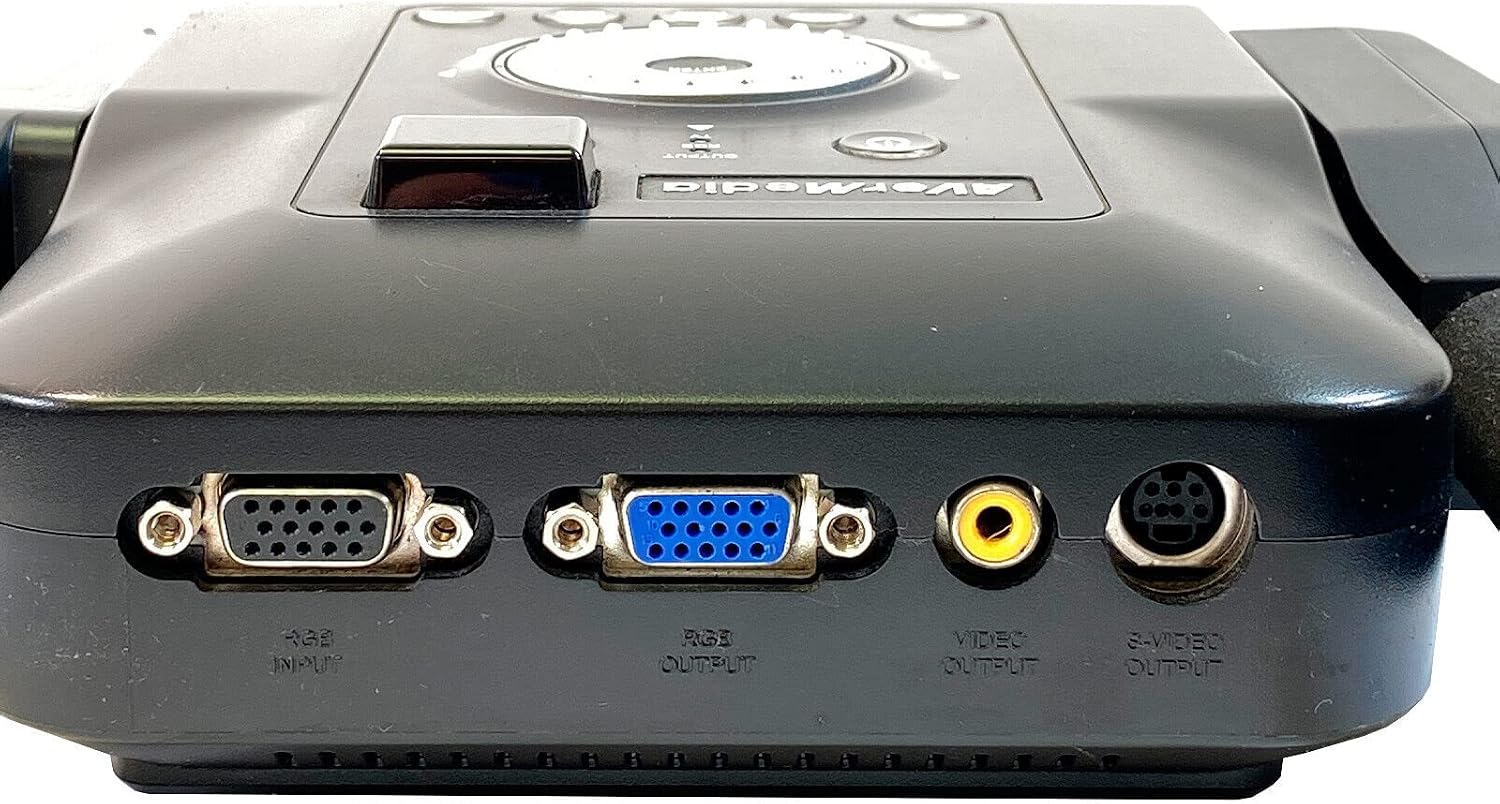
Figure 3.3: Rear connection ports including VGA input, VGA output, Video output, and S-Video output.
These ports allow connection to various display devices and computers. The VGA input is for connecting a PC, while the VGA output connects to a projector or monitor. Additional video outputs include standard Video (RCA) and S-Video.
3.4. Power and Light Ports

Figure 3.4: Side view showing the DC 12V input and Light Back port.
The DC 12V input is for connecting the power adapter. The Light Back port is for an optional external light source.
3.5. Product Label

Figure 3.5: Product label with model and electrical information.
The product label, typically located on the underside of the unit, provides important information such as the model number (VISNCP300), serial number, and electrical ratings (OUTPUT 12V --- 3.33-4.2A).
4. Setup
- Unpack the Unit: Carefully remove the AVerVision CP300 and all accessories from the packaging.
- Position the Camera: Place the main unit on a stable, flat surface. Adjust the gooseneck arm to the desired position for capturing your subject.
- Connect Power: Insert the DC plug of the power adapter into the "DC 12V INPUT" port on the side of the unit (refer to Figure 3.4). Plug the power adapter into a standard electrical outlet.
- Connect to Display/PC:
- For Projector/Monitor: Use a VGA cable to connect the "RGB OUTPUT" port on the AVerVision CP300 (refer to Figure 3.3) to the VGA input of your projector or monitor.
- For PC Connection: Use a VGA cable to connect the "RGB INPUT" port on the AVerVision CP300 (refer to Figure 3.3) to the VGA output of your computer if you wish to display your computer's screen through the document camera. Connect a USB cable from the AVerVision CP300 to your PC for software functionality (if applicable).
- For TV/VCR: Use a Video (RCA) or S-Video cable to connect the respective output port on the AVerVision CP300 (refer to Figure 3.3) to your TV or VCR.
- Power On: Press the power button on the control panel to turn on the unit.
5. Operating Instructions
This section details the basic operation and features of your AVerVision CP300.
5.1. Basic Operation
- Power On/Off: Press the POWER button () on the control panel to turn the unit on or off.
- Source Selection: Use the SOURCE button to switch between camera, TV, and PC input sources.
- Zoom: Use the ZOOM buttons (+ and -) to digitally zoom in or out on the captured image. The CP300 features 2X AVERZOOM and 8X digital zoom.
- Auto Focus: Press the AUTO FOCUS button to automatically adjust the image clarity. The camera features fast response auto focus.
- Auto Image: Press the AUTO IMAGE button to automatically adjust brightness and contrast for optimal viewing.
- Freeze: Press the FREEZE button to pause the live image on the screen. Press again to resume live view.
- Capture/Delete: Use the CAP/DEL button to capture the current image to the built-in memory (up to 80 images) or to delete stored images.
- Menu Navigation: Press the MENU button to access the on-screen display (OSD) menu. Use the directional buttons around the ENTER button to navigate, and ENTER to select.
5.2. Advanced Features
- Laser Positioning Guide: The patented laser positioning guide assists in accurately aligning documents or objects under the camera.
- Split Screen and Picture-in-Picture: These features allow for simultaneous display of multiple images or sources, enhancing presentation capabilities. Refer to the on-screen menu for activation.
- AVerBox and AVerVisor: These proprietary features provide additional tools for enhancing and manipulating the displayed image. Consult the on-screen menu for details.
- Annotation Software: The built-in AVerVision annotation software allows users to draw or write directly over the live image or captured images.
- Remote Control: The included remote control provides 360-degree accessible control over all functions, including a built-in laser pointer for presentations.
6. Maintenance
- Cleaning:
- Use a soft, dry cloth to clean the exterior of the unit.
- For the camera lens, use a lens cleaning cloth and a specialized lens cleaning solution. Do not use abrasive cleaners or solvents.
- Storage: When not in use, store the AVerVision CP300 in its carrying bag in a cool, dry place, away from direct sunlight and extreme temperatures.
- Handling: Avoid dropping or subjecting the unit to strong impacts. Do not attempt to open the case, as this will void the warranty (refer to Figure 3.5).
7. Troubleshooting
| Problem | Possible Cause | Solution |
|---|---|---|
| No image on screen |
|
|
| Image is blurry or out of focus |
|
|
| Image is too dark or too bright |
|
|
8. Specifications
| Feature | Detail |
|---|---|
| Model Number | VISNCP300 |
| Brand | AVerMedia |
| Product Dimensions | 15.2 x 12.1 x 7.6 inches |
| Item Weight | 14.19 pounds |
| Sensor | 3.2 megapixel |
| Zoom Type | Digital Zoom (2X AVERZOOM, 8X digital zoom) |
| Focus | Fast response auto focus |
| Video Capture Resolution | 720p (Supports 1280x720 WXGA resolution) |
| Built-in Memory | Stores up to 80 images |
| Color | Black |
| Shooting Modes | Automatic |
| Exposure Control Type | Automatic |
9. Warranty and Support
For warranty information and technical support, please refer to the documentation provided with your purchase or visit the official AVerMedia website. Keep your proof of purchase for warranty claims. Do not attempt to open the device casing, as this will void the product warranty.
Documents and downloads
Ask a question about this manual
Ask about setup, troubleshooting, compatibility, parts, safety, or missing instructions. Manuals+ will review the question and use this page’s manual context to help answer it.