Introduction
Welcome to the world of electric smoking with your Masterbuilt MB20071117 30-Inch Black Electric Digital Smoker. This manual provides essential information for setting up, operating, and maintaining your smoker to achieve delicious, smoked results. This electric smoker features a black finish, electric fuel type, and dry smoking method. It is equipped with a top controller for digital temperature and timer controls, offering precise cooking from 100 to 275 degrees F. With 730 sq. inches of cooking space across 4 chrome-coated racks and an 800-watt heating element, it's designed for ease of use for all experience levels. Convenient features include side-loading wood chips, a removable drip pan, and a top air damper.

Figure 1: Masterbuilt 30-Inch Black Electric Digital Smoker (Model MB20071117)
Setup and First Use
Before using your smoker for the first time, it is crucial to properly set it up and season it. This process helps to remove any manufacturing oils and prepares the interior for optimal smoking performance.
Assembly
Your Masterbuilt smoker requires minimal assembly. Refer to the included assembly guide for detailed, step-by-step instructions. Ensure all components are securely fastened before proceeding.
Seasoning the Smoker
To season your smoker:
- Ensure the water bowl is empty and the wood chip loader is removed.
- Set the temperature to 275°F (135°C).
- Allow the smoker to run for 3 hours.
- After 3 hours, add approximately 1/2 cup of wood chips to the wood chip loader.
- Continue running the smoker for another 30 minutes.
- Turn off the smoker and allow it to cool completely.
This seasoning process burns off any residual manufacturing oils and creates a protective layer inside the smoker.

Figure 2: Smoker interior with chrome-coated racks and components.
Operating Your Smoker
Operating your Masterbuilt electric smoker is straightforward, allowing you to focus on achieving perfectly smoked foods.
Preparing Your Meat
For best results, prepare your meat with your favorite dry rub. Ensure all sides of the meat are completely coated. For enhanced flavor and moisture, consider marinating the meat overnight in a plastic bag with a liquid such as mustard, allowing the seasonings to deeply penetrate the meat fibers.
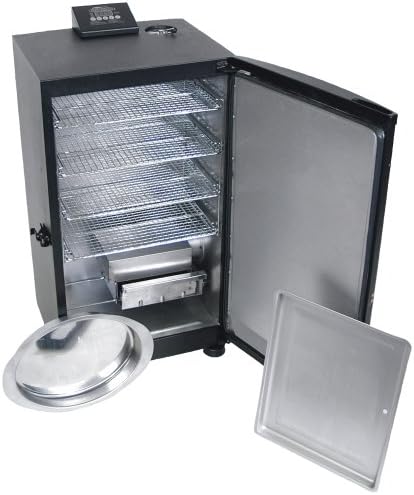
Figure 3: A pork butt prepared with dry rub, ready for smoking.
Video 1: Official Masterbuilt guide on preparing and smoking a Boston Butt in the electric smoker. This video demonstrates applying dry rub and mustard, loading the smoker, and achieving pulled pork results.
Loading the Smoker
When loading multiple food items, always place raw food on the lowest rack to prevent drippings from contaminating already cooked or prepared food on lower racks. The smoker's multiple racks provide ample space for various items.

Figure 4: Smoker loaded with different food items on its racks.
Adding Wood Chips
The Masterbuilt smoker features a convenient side-loading wood chip system. Simply pull out the loader, fill it with your desired wood chips, and push it back in. For continuous smoke flavor, add wood chips approximately every hour during the smoking process.

Figure 5: Close-up of the side wood chip loader for easy access.
Monitoring Temperature and Cooking Time
The digital temperature and timer controls allow for precise cooking. For items like a 4.5 to 5-pound pork butt, a general guideline is 1 hour per pound at 225°F (107°C). Monitor the internal temperature of your meat using a reliable meat thermometer. For pulled pork, the internal temperature should reach 195°F (90°C) for optimal tenderness. If you desire sliced pork, it may be ready at a lower internal temperature, around 165°F (74°C).
Achieving Pulled Pork Results
To achieve tender, pulled pork, after the initial smoking period (e.g., 5 hours for a 5lb butt), wrap the meat tightly in aluminum foil and return it to the smoker. This technique helps the internal temperature to rise to 195°F (90°C) without drying out the meat, ensuring a juicy and easily shreddable result. The bone should pull out cleanly when the meat is ready.
Maintenance and Care
Proper maintenance ensures the longevity and performance of your Masterbuilt smoker.
Cleaning
After each use, clean all parts that come into contact with food or drippings, such as the racks and drip pan. The interior of the smoker generally does not require extensive cleaning unless mold growth occurs. Many users opt to cover areas prone to drippings with aluminum foil for easier cleanup.
Storage
When not in use, especially for prolonged periods, it is recommended to store the smoker indoors. If storing outdoors, use a protective cover to shield it from the elements. Ensure the top vent is left open slightly to prevent moisture buildup inside the unit, which can lead to rust or mold.
Troubleshooting
While your Masterbuilt smoker is designed for reliability, here are a few common points to consider if you encounter issues:
- Temperature Inaccuracy: Some digital thermometers may show slight variations. For critical temperature monitoring, consider using a separate, calibrated meat thermometer to verify internal meat temperatures.
- Smoke Leakage: Ensure the door seal is intact and properly seated. While some minor smoke leakage can occur, significant leaks might indicate an issue with the seal or door alignment.
- Lack of Smoke: Ensure you are using appropriate wood chips and adding them at regular intervals (e.g., hourly). Verify the heating element is functioning correctly to ignite the chips.
For persistent issues, refer to the full user manual or contact Masterbuilt customer support.
Specifications
| Feature | Detail |
|---|---|
| Brand | Masterbuilt |
| Model Name | 20070910 |
| Power Source | Electric |
| Color | 30” Black (Old Version) |
| Outer Material | Chrome |
| Item Weight | 45.86 Pounds |
| Product Dimensions | 17"D x 20"W x 33.5"H |
| Inner Material | stainless_steel |
| Fuel Type | Electric |
| Heating Element | 1,200 watt |
| Cooking Space | 730 sq. Inches |
| Racks | 4 chrome-coated racks |

Figure 6: Product dimensions for the Masterbuilt 30-Inch Electric Digital Smoker.
Warranty and Support
For detailed warranty information, please refer to the official user manual provided with your product or visit the Masterbuilt website. Masterbuilt is committed to customer satisfaction and offers support for parts and inquiries.
- Official User Manual: A comprehensive PDF user manual is available for download here.
- Masterbuilt Website: Visit www.masterbuilt.com for more product information, recipes, and support resources.
- Customer Service: Masterbuilt customer service can assist with parts and other inquiries.


