
1. Introduction
This manual provides detailed instructions for the proper use and care of your Vivitar ViviCam 5299 Digital Camera. Please read this manual thoroughly before operating the camera to ensure optimal performance and longevity. Keep this manual for future reference.
2. Safety Information
- Do not expose the camera to water or moisture.
- Avoid dropping the camera or subjecting it to strong impacts.
- Keep the camera away from direct sunlight or high temperatures.
- Use only recommended batteries (2x AAA Alkaline) and memory cards (SD, up to 1GB).
- Do not attempt to disassemble or repair the camera yourself. Refer to qualified service personnel.
- Dispose of batteries properly according to local regulations.
3. Package Contents
Please check that all items are present in your camera package:
- Vivitar ViviCam 5299 Digital Camera
- USB Cable
- User Manual (this document)
Note: AAA batteries and an SD memory card are not included and must be purchased separately.
4. Camera Overview
Familiarize yourself with the various parts and controls of your ViviCam 5299.
4.1 Front View

Figure 4.1: Front view of the camera, highlighting the lens and flash unit.
- Lens: Captures images and video.
- Flash: Provides illumination in low-light conditions.
- Self-Timer Lamp: Indicates self-timer countdown.
4.2 Back View and Controls
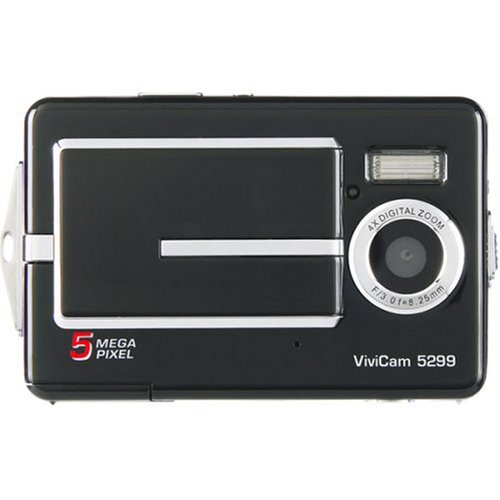
Figure 4.2: Back view of the camera, displaying the LCD screen and control panel.
- 2.4" Color TFT-LCD Display: For viewing images, videos, and menu options.
- Power Button: Turns the camera on or off.
- Shutter Button: Press to take a photo or start/stop video recording.
- Zoom In/Out Buttons: Adjust digital zoom.
- Menu Button: Accesses camera settings.
- DISP Button: Changes display information on the LCD.
- Macro Button: Toggles macro focus mode for close-up shots.
- Mode Button: Switches between photo, video, and playback modes.
- Directional Pad/OK Button: Navigates menus and confirms selections.
5. Setup
5.1 Battery Installation
The ViviCam 5299 requires two AAA alkaline batteries.
- Locate the battery compartment cover on the bottom of the camera.
- Slide the cover open.
- Insert two AAA alkaline batteries, ensuring correct polarity (+/-) as indicated inside the compartment.
- Close the battery compartment cover securely.
5.2 Memory Card Installation
The camera supports SD memory cards up to 1GB (not included).
- Locate the SD card slot, usually next to the battery compartment or on the side.
- Insert the SD card with the metal contacts facing the correct direction (refer to the diagram near the slot).
- Push the card gently until it clicks into place.
- To remove, push the card in again until it springs out slightly, then pull it out.
5.3 Initial Power On
After installing batteries and a memory card:
- Press and hold the Power Button until the LCD screen turns on.
- The camera may prompt you to set the date and time. Use the directional pad to navigate and the OK button to confirm.
6. Operating the Camera
6.1 Power On/Off
Press the Power Button to turn the camera on or off.
6.2 Taking Photos
- Ensure the camera is in photo mode (indicated on the LCD). If not, press the Mode Button to switch.
- Frame your shot using the LCD screen.
- Use the Zoom In/Out Buttons to adjust the 4x digital zoom.
- For close-up subjects (14 cm), press the Macro Button.
- Press the Shutter Button halfway to focus, then press fully to take the picture.
6.3 Recording Videos
- Press the Mode Button to switch to video recording mode.
- Press the Shutter Button to start recording. A timer or indicator will appear on the LCD.
- Press the Shutter Button again to stop recording.
6.4 Playback Mode
- Press the Mode Button to enter playback mode.
- Use the Directional Pad to scroll through your photos and videos.
- Press the OK Button to view a video or zoom into a photo.
6.5 Connecting to a Computer
You can transfer photos and videos to your computer using the supplied USB cable.
- Turn off the camera.
- Connect one end of the USB cable to the camera's USB port and the other end to your computer.
- Turn on the camera. It should be recognized as a removable disk or mass storage device.
- Access the camera's memory card via your computer's file explorer to copy files.
6.6 Connecting to a TV
The camera features a TV-OUT port for viewing content on a television.
- Connect a compatible AV cable (not included) from the camera's TV-OUT port to your television's AV input.
- Turn on the camera and the television.
- Select the correct AV input channel on your television.
- The camera's display will appear on your TV screen.
7. Maintenance
7.1 Cleaning the Camera
- Use a soft, lint-free cloth to clean the camera body.
- For the lens and LCD screen, use a specialized lens cleaning cloth and solution. Do not use abrasive materials.
- Ensure the camera is turned off before cleaning.
7.2 Storage
- Remove batteries if the camera will not be used for an extended period.
- Store the camera in a cool, dry place, away from dust and extreme temperatures.
8. Troubleshooting
If you encounter issues with your ViviCam 5299, refer to the following common problems and solutions:
| Problem | Possible Cause | Solution |
|---|---|---|
| Camera does not turn on. | Dead or incorrectly inserted batteries. | Replace batteries with fresh AAA alkaline batteries, ensuring correct polarity. |
| Poor image quality / blurry photos. | Insufficient lighting, dirty lens, subject too close/far, camera shake. | Use flash in low light. Clean the lens. Ensure subject is within focus range (use Macro for close-ups). Hold camera steady. |
| Batteries drain quickly. | Frequent flash use, prolonged LCD use, old batteries. | Reduce flash usage. Turn off camera when not in use. Use fresh, high-quality alkaline batteries. |
| Cannot connect to computer/TV. | Incorrect cable, camera off, wrong input selected on TV. | Ensure correct USB/AV cable is used. Turn camera on after connecting. Select correct input on TV. |
| Memory card error. | Card not inserted correctly, incompatible card, corrupted card. | Reinsert card. Ensure it's an SD card up to 1GB. Try formatting the card (this will erase all data). |
9. Specifications
Detailed technical specifications for the Vivitar ViviCam 5299 Digital Camera:
- Image Sensor: 5.0 Megapixel CMOS
- LCD Display: 2.4” Color TFT-LCD
- Zoom: 4x Digital Zoom
- Lens: Focus Free with Macro, 8.25 mm f/3.0
- Focus Range: 14 cm (Macro), 40 cm ~ Infinity (Normal)
- White Balance: Auto, Daylight, Cloudy, Tungsten, Fluorescent
- Image Resolution: 2592 x 1944, 2048 x 1536, 1600 x 1200, 1280 x 960, 640 x 480
- Video Quality: VGA 640 x 480, QVGA 320 x 240 at 30 or 15 fps
- Storage Memory: 32 MB Flash Memory (internal), SD Memory Card (optional, up to 1 GB)
- File Format: JPEG, EXIF 2.2, DCF 1.1, MJPEG (AVI)
- Operating Environment: Windows 98SE/ME/2000/XP
- Connectors: USB Port, TV-OUT
- Power: 2 x AAA Batteries (Alkaline, not included)
- Weight: Approx. 85 g (3.0 oz) without Batteries and SD Memory Card
- Dimensions: Approx. 85 x 56 x 22 mm (3.3 x 2.2 x 0.86 in)
- Model Number: 60546
- UPC: 019643605466
10. Warranty and Support
10.1 Warranty Information
The Vivitar ViviCam 5299 Digital Camera comes with a 1 Year Limited Warranty covering parts and labor from the date of purchase. This warranty typically covers manufacturing defects and malfunctions under normal use. It does not cover damage caused by misuse, accidents, unauthorized repairs, or normal wear and tear.
10.2 Customer Support
For technical assistance, warranty claims, or further inquiries, please refer to the contact information provided with your purchase documentation or visit the official Vivitar website. Please have your camera model number (ViviCam 5299) and proof of purchase ready when contacting support.