
Introduction
This manual provides detailed instructions for the safe and effective use, setup, operation, and maintenance of your NEIKO 31213A HVLP Air Spray Paint Gun. Designed for professional-quality results, this high-volume, low-pressure spray gun is suitable for a variety of painting projects, including walls, automotive, and home improvement. Please read this manual thoroughly before initial use and retain it for future reference.
Safety Information
WARNING: Always follow basic safety precautions to reduce the risk of fire, electric shock, and personal injury when using this product.
- Always wear appropriate personal protective equipment, including eye protection (safety glasses/goggles), respiratory protection (respirator/mask), and gloves.
- Ensure adequate ventilation in the work area to prevent the accumulation of hazardous fumes. Do not spray in confined spaces.
- Do not operate the spray gun near open flames, pilot lights, or other ignition sources. Paint and solvents are often flammable.
- Never point the spray gun at yourself or others. Always engage the trigger lock when not spraying.
- Disconnect the air supply before cleaning, adjusting, or performing maintenance on the spray gun.
- Use only compatible paints and solvents as recommended by the paint manufacturer.
Components
Your NEIKO 31213A HVLP Air Spray Paint Gun kit includes the following main components:
- One-piece all-steel gun body
- Rust-resistant stainless-steel nozzle (1.3 mm)
- Solid brass cap
- 600cc (20.3 fl. oz) aluminum cup with lid
- Metal air gauge/regulator
- Cleaning brush
- Multi-size wrench for assembly/disassembly
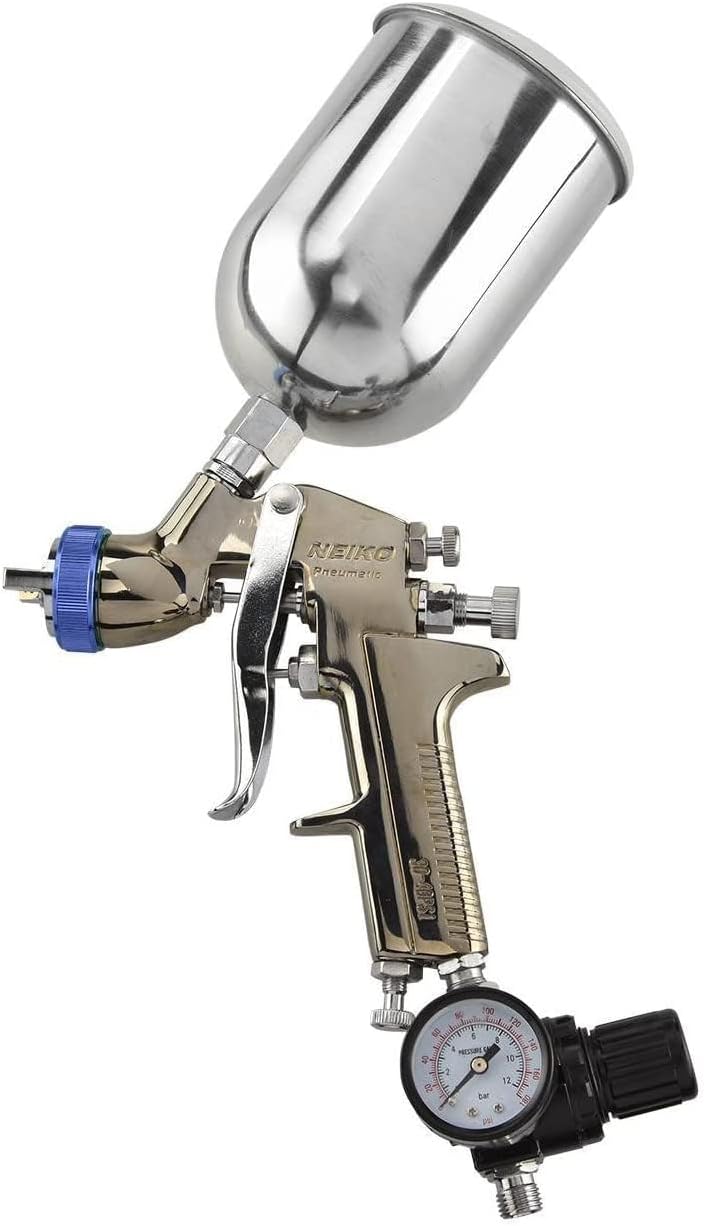
Figure 1: Complete NEIKO 31213A Spray Gun Assembly

Figure 2: Side view of the spray gun body, highlighting the controls.

Figure 3: Detailed view of the included air pressure regulator.

Figure 4: The 600cc aluminum gravity feed cup.
Setup
- Assemble the Spray Gun: Attach the 600cc aluminum cup to the top of the spray gun. Ensure it is securely threaded.
- Connect Air Regulator: Thread the metal air gauge/regulator onto the air inlet at the bottom of the spray gun handle.
- Connect Air Hose: Attach your air compressor hose to the air regulator. Ensure all connections are tight to prevent air leaks.
- Prepare Paint: Thoroughly mix and thin your paint according to the paint manufacturer's recommendations. Strain the paint to remove any impurities that could clog the nozzle.
- Fill Cup: Pour the prepared paint into the 600cc gravity feed cup. Securely place the lid on the cup to prevent spillage and contamination.

Figure 5: The 600cc aluminum cup attached to the spray gun.
Operating Instructions
- Adjust Air Pressure: With the air compressor on and connected, adjust the air regulator to achieve the desired operating pressure. The recommended operating pressure is 40 PSI, with a working pressure of 10 PSI. The average air consumption is 4.5 CFM.
- Adjust Spray Pattern: The spray gun features three adjustable valve knobs for precise paint application. Adjust these knobs to control the fluid flow, fan pattern, and air pressure to suit your specific project needs.
- Test Spray: Before applying paint to your actual project, always perform a test spray on a piece of scrap material. This allows you to fine-tune the settings for optimal coverage and finish.
- Apply Paint: Hold the spray gun perpendicular to the surface, maintaining a consistent distance (typically 6-8 inches). Move the gun at a steady pace, overlapping each pass by about 50% to ensure even coverage. Release the trigger at the end of each pass.

Figure 6: Proper technique for using the spray gun.
Maintenance and Cleaning
Proper cleaning and maintenance are crucial for the longevity and performance of your spray gun.
- Empty Remaining Paint: After each use, empty any remaining paint from the gravity feed cup.
- Flush with Solvent: Pour appropriate cleaning solvent (compatible with your paint) into the cup. Spray the solvent through the gun until it runs clear.
- Disassemble and Clean: Disconnect the air supply. Use the provided multi-size wrench to carefully disassemble the nozzle, air cap, and fluid needle. Clean all components thoroughly with the cleaning brush and solvent. Pay close attention to small orifices to prevent clogging.
- Clean Cup: Wash the aluminum cup and lid with solvent and water.
- Lubricate (if necessary): Apply a small amount of lubricant to moving parts and threads as needed, ensuring not to get lubricant into the fluid passages.
- Reassemble and Store: Reassemble the spray gun, ensuring all parts are correctly aligned and tightened. Store the gun in a clean, dry place.
Troubleshooting
If you encounter issues with your spray gun, refer to the following common problems and solutions:
| Problem | Possible Cause | Solution |
|---|---|---|
| Uneven Spray Pattern | Clogged air cap or fluid tip; incorrect pressure/fluid adjustment. | Clean air cap/fluid tip; adjust fluid and air pressure knobs. |
| No Paint Flow | Clogged nozzle; empty cup; air supply disconnected. | Clean nozzle; refill cup; check air hose connection. |
| Paint Leaking from Nozzle | Damaged fluid needle or seat; loose air cap. | Inspect and replace damaged parts; tighten air cap. |
| Excessive Overspray | Too high air pressure; paint too thin. | Reduce air pressure; thicken paint as per manufacturer. |
Specifications
| Feature | Specification |
|---|---|
| Brand | NEIKO |
| Model Name | 31213A |
| Nozzle Size | 1.3 mm |
| Tank Volume | 600 CC (20.3 fl. oz) |
| Operating Pressure | 40 PSI (Max) |
| Working Pressure | 10 PSI |
| Average Air Consumption | 4.5 CFM |
| Air Inlet | 1/4" NPS |
| Material | Aluminum, Stainless Steel, Metal |
| Product Dimensions | 5.83"W x 8.94"H |
| Item Weight | 0.01 Ounces |
Warranty and Support
For warranty information or technical support, please refer to the product packaging or contact NEIKO customer service directly. Keep your purchase receipt as proof of purchase.
Visit the official NEIKO Store for more products and information: NEIKO Store