Introduction
Thank you for choosing the Friedrich 11600 Btu Portable Air Conditioner. This manual provides important information for the proper installation, operation, and maintenance of your new air conditioner. Please read this manual thoroughly before using the appliance and keep it for future reference.
Important Safety Information
To reduce the risk of fire, electrical shock, or injury when using your air conditioner, follow these basic precautions:
- Read all instructions before using the appliance.
- Ensure the power supply matches the voltage specified on the rating label.
- Do not operate the air conditioner with a damaged cord or plug.
- Do not block air outlets or inlets.
- Always unplug the unit before cleaning or servicing.
- Keep the unit on a flat, stable surface to prevent water leakage.
- This appliance is not intended for use by persons (including children) with reduced physical, sensory or mental capabilities, or lack of experience and knowledge, unless they have been given supervision or instruction concerning use of the appliance by a person responsible for their safety.
Package Contents
Verify that all components are present and in good condition:
- Friedrich 11600 Btu Portable Air Conditioner Unit
- Remote Control
- (2) Exhaust Hoses
- Sliding Window Curtain for Each Side of the Hose to Seal Window Opening
- User Manual (this document)
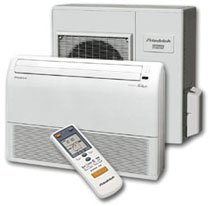
An image showing the Friedrich 11600 Btu Portable Air Conditioner unit, which is white and rectangular, along with its accompanying remote control. The unit features a front grille and control panel, while the remote control has a small display and various buttons.
Setup
1. Unpacking
Carefully remove the air conditioner and all accessories from the packaging. Retain the original packaging for future storage or transport.
2. Placement
- Place the unit on a firm, level surface in a location that is not exposed to direct sunlight or heat sources.
- Ensure there is at least 20 inches (50 cm) of space around the unit for proper air circulation.
- The unit must be placed near a window or opening to allow for exhaust hose installation.
3. Window Kit Installation
The unit comes with two exhaust hoses and a sliding window curtain system for sealing the window opening.
- Attach one end of each exhaust hose to the designated exhaust ports on the back of the air conditioner.
- Extend the sliding window curtain to fit your window opening.
- Insert the other ends of the exhaust hoses into the openings in the window curtain.
- Secure the window curtain in the window frame, ensuring a tight seal to prevent outside air from entering.
- Ensure the exhaust hoses are not kinked or bent sharply, as this can restrict airflow and reduce efficiency. The maximum exhaust hose length is 5 ft.
4. Power Connection
Plug the power cord into a grounded 120V, 60Hz electrical outlet. The power cord length is 6 ft. Do not use extension cords or adapter plugs.
Operating Instructions
Control Panel Overview
The control panel on the unit features buttons for Power, Mode, Fan Speed, Temperature Up/Down, and Timer. A digital display shows the current temperature or timer settings.
Remote Control Functions
The remote control provides full functionality from a distance. Ensure batteries are correctly installed.
- Power Button: Turns the unit On or Off.
- Mode Button: Cycles through cooling, fan-only, and dry (dehumidify) modes.
- Fan Speed Button: Adjusts fan speed (Low, Medium, High). There are 3 cooling speeds and 3 fan-only speeds.
- Temperature Buttons (Up/Down): Adjusts the desired temperature in cooling mode.
- Timer Button: Sets the auto-on or auto-off timer.
Operating Modes
- Cool Mode: Provides cooling. Set your desired temperature using the Up/Down buttons. The unit will cycle on and off to maintain the set temperature.
- Fan Mode: Circulates air without cooling. Use this mode for ventilation.
- Dry Mode (Dehumidify): Reduces humidity in the room. The fan speed is typically fixed in this mode.
Maintenance
Regular maintenance ensures optimal performance and extends the life of your air conditioner.
1. Air Filter Cleaning
The air filter should be cleaned every two weeks or more frequently depending on usage and air quality.
- Turn off and unplug the unit.
- Locate and remove the air filter (usually behind a grille).
- Wash the filter with warm, soapy water. Rinse thoroughly.
- Allow the filter to air dry completely before reinstalling.
2. Water Drainage
The unit collects condensation during operation. Depending on humidity levels, you may need to drain the water periodically.
- Continuous Drainage: For continuous operation in high humidity, connect a drain hose (not included) to the continuous drain port and route it to a floor drain or bucket.
- Manual Drainage: When the internal water tank is full, the unit may stop operating and display an indicator. Turn off and unplug the unit, place a shallow pan under the drain port, and remove the drain plug to empty the water.
3. Exterior Cleaning
Wipe the exterior of the unit with a soft, damp cloth. Do not use harsh chemicals or abrasive cleaners.
4. Storage
If storing the unit for an extended period:
- Drain all accumulated water.
- Clean the air filter.
- Unplug the power cord and coil it neatly.
- Store the unit in a cool, dry place, preferably in its original packaging.
Troubleshooting
Before contacting customer support, try these common troubleshooting steps:
| Problem | Possible Cause | Solution |
|---|---|---|
| Unit does not turn on. | No power; power cord unplugged; circuit breaker tripped. | Ensure unit is plugged in; check circuit breaker; try a different outlet. |
| Unit is not cooling effectively. | Air filter dirty; exhaust hose blocked/kinked; room too large; windows/doors open. | Clean air filter; check exhaust hose for obstructions; ensure room is sealed; verify unit BTU matches room size. |
| Water leakage. | Unit not level; drain plug loose; internal water tank full. | Place unit on a level surface; ensure drain plug is secure; drain water from the unit. |
| Unit is noisy. | Unit not on a level surface; fan obstruction. | Ensure unit is on a level surface; check for foreign objects near fan. |
Specifications
| Feature | Detail |
|---|---|
| Model Number | P12B |
| Cooling Capacity | 11,600 BtuH |
| Voltage | 120 Volts |
| Frequency | 60 Hz |
| Amperage | 11.5 Amps |
| Power Consumption | 1351 Watts |
| Noise Level | 48 dB |
| Dimensions (D x W x H) | 15.5"D x 19.25"W x 33.63"H |
| Refrigerant | R 410A |
| Max. Exhaust Hose Length | 5 ft. |
| Power Cord Length | 6 ft. |
| Control Type | Electronic with Remote Control |
| Cooling Speeds | 3 |
| Fan-Only Speeds | 3 |
| Ambient Operating Range | 63 to 95 Degrees F |
| Supply CFM | 255 |
| Standards | UL/Cul |
Warranty and Support
For warranty information and customer support, please refer to the warranty card included with your product or visit the official Friedrich website. Keep your purchase receipt as proof of purchase for warranty claims.
If you encounter issues not covered in the troubleshooting section, please contact Friedrich customer service for assistance.


