1. Introduction
The PlayStation Eye camera is an advanced digital camera designed for use with the PlayStation 3 console. It enables interactive gaming experiences, video communication, and creative content creation through its video, audio, and photo capture capabilities. This manual provides essential information for the proper setup, operation, and maintenance of your PlayStation Eye camera.
2. Product Features
The PlayStation Eye camera incorporates several features to enhance your interactive experience:
- EyeCreate Software Compatibility: Free EyeCreate download editing software allows users to save, edit, and add visual effects to photos, video, and audio clips.
- PlayStation Move Integration: Camera and audio reception make it an integral part of the PlayStation Move motion control system.
- Sophisticated Microphone: Features a microphone with the ability to reduce background noise and focus on spoken word for smoother, more accurate speech recognition.
- High Frame Rates: Two fast frame rates for improved tracking, responsiveness, and smoothness.
- Adjustable Lens: Two-position zoom lens for close-up and full-body options.
- 4-Channel Audio Input: 16-bits/channel, 48kHz, SNR 90db for high-quality audio capture.

Image 2.1: Front view of the PlayStation Eye camera, showcasing its lens and microphone array.
3. Setup
Follow these steps to properly set up your PlayStation Eye camera with your PlayStation 3 console:
- Unpack the Camera: Carefully remove the PlayStation Eye camera from its packaging.
- Connect to PlayStation 3: Insert the USB connector of the PlayStation Eye camera into an available USB port on your PlayStation 3 console.
- Position the Camera: Place the camera on a stable surface, such as on top of your television or a shelf, ensuring it has a clear view of the play area. Adjust the camera's angle as needed.
- Software Installation: If prompted, download and install any necessary system software updates or the EyeCreate application from the PlayStation Store.
- Initial Calibration: Follow any on-screen instructions for initial camera calibration, especially when using with PlayStation Move titles.
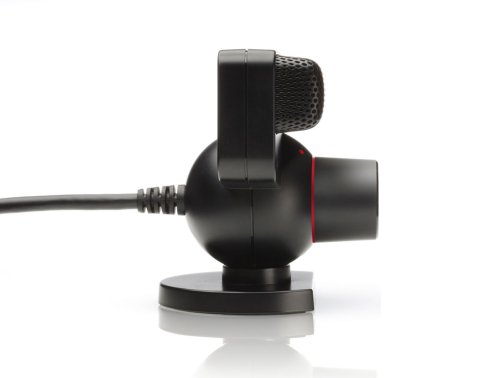
Image 3.1: Side view of the PlayStation Eye camera, illustrating the USB cable connection point.
4. Operating Instructions
Once set up, the PlayStation Eye camera can be used for various functions:
4.1. Video and Photo Capture
- Launch the EyeCreate application from the PlayStation 3 XMB (XrossMediaBar).
- Within EyeCreate, select options to capture video, still photos, or audio.
- Utilize the software's editing features to apply filters, distortions, or other effects to your captured media.
- Export your finished creations to the Video folder on the XMB for viewing.
4.2. PlayStation Move Gaming
- Ensure the camera is positioned to capture the entire play area where PlayStation Move controllers will be used.
- The camera tracks the spherical light of the PlayStation Move controller to translate your movements into gameplay.
- Refer to specific game manuals for optimal camera placement and lighting conditions.
4.3. Voice Chat and Communication
- The integrated microphone allows for voice chat in compatible games and applications.
- Position the camera so that the microphone array faces the speaker for optimal voice capture and background noise reduction.
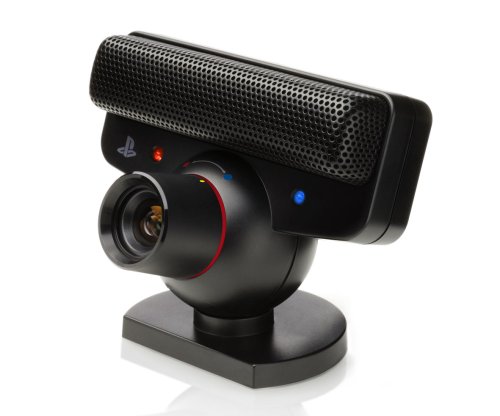
Image 4.1: Angled view of the PlayStation Eye camera, showing its adjustable base and lens.
5. Maintenance
Proper care ensures the longevity and optimal performance of your PlayStation Eye camera:
- Cleaning the Lens: Gently wipe the camera lens with a soft, dry, lint-free cloth. Avoid using abrasive cleaners or solvents.
- Cleaning the Body: Use a slightly damp cloth to clean the camera body. Ensure no moisture enters the device.
- Storage: When not in use, store the camera in a clean, dry place away from direct sunlight and extreme temperatures.
- Cable Care: Avoid bending or twisting the USB cable excessively. Do not pull the cable to disconnect the camera.
6. Troubleshooting
If you encounter issues with your PlayStation Eye camera, refer to the following common solutions:
- Camera Not Detected:
- Ensure the USB cable is securely connected to both the camera and the PlayStation 3 console.
- Try connecting the camera to a different USB port on the console.
- Restart your PlayStation 3 console.
- Poor Image Quality or Tracking:
- Check the lighting in your room. Avoid overly bright or dim conditions, and minimize direct light sources shining into the lens.
- Ensure the camera lens is clean and free of smudges or dust.
- Verify that there are no obstructions between the camera and the play area.
- Certain environmental factors, such as ceiling fans or reflective surfaces, can interfere with motion detection. Try to minimize these.
- Microphone Issues:
- Confirm that the microphone is enabled in your PlayStation 3 system settings and within the application you are using.
- Adjust the microphone sensitivity settings if available.
- Ensure there is no physical obstruction blocking the microphone array.
- Software Issues:
- Ensure your PlayStation 3 system software is up to date.
- Reinstall the EyeCreate application if you suspect a software malfunction.
If problems persist, consult the official PlayStation support website or contact customer service for further assistance.
7. Specifications
| Feature | Detail |
|---|---|
| Item Model Number | 99028 |
| Product Dimensions | 3.13 x 6.75 x 8.88 inches |
| Item Weight | 8.1 ounces |
| Manufacturer | Sony Computer Entertainment |
| Release Date | October 31, 2007 |
| Language | English |
8. Warranty Information
For information regarding product warranty, please refer to the documentation included with your purchase or visit the official PlayStation support website. Extended protection plans may be available from your retailer at the time of purchase. These plans typically offer additional coverage beyond the standard manufacturer's warranty.


