
Introduction
Thank you for choosing the CORNAT LI2 1931 Lisa 2 Bathtub Faucet. This manual provides detailed instructions for the safe and efficient installation, operation, and maintenance of your new chrome bathtub faucet. Please read all instructions carefully before beginning installation and retain this manual for future reference.

Image: The CORNAT LI2 1931 Lisa 2 chrome bathtub faucet, featuring a sleek design with two handles.
1. Setup and Installation
This section outlines the steps for installing your CORNAT LI2 1931 Lisa 2 bathtub faucet. Ensure all necessary tools and components are available before starting.
1.1 Components Included

Image: Exploded view showing all components of the CORNAT LI2 1931 Lisa 2 bathtub faucet, including the main body, handles, wall connections, and seals.
The package includes:
- 1x Bathtub faucet with two handles, chrome finish
- Mounting material (wall connections, seals)
- Rocker lever and support for shower head (shower head not included)
1.2 Required Tools (Not Included)
- Adjustable wrench
- Screwdriver
- Thread seal tape
- Spirit level
1.3 Installation Steps
- Prepare the Installation Area: Ensure the water supply is turned off at the main valve. Clean the wall surface where the faucet will be mounted.
- Install Wall Connections: Screw the eccentric S-connections into the wall outlets. Ensure the distance between the centers of the S-connections is 150 mm (± 25 mm). Use thread seal tape for a watertight seal. Adjust the S-connections until the faucet body can be mounted horizontally and vertically aligned.
- Attach Rosettes: Place the decorative rosettes over the S-connections against the wall.
- Mount the Faucet Body: Place the seals into the nuts of the faucet body. Carefully align the faucet body with the S-connections and tighten the nuts using an adjustable wrench. Do not overtighten.
- Install Handles: Attach the hot and cold water handles to their respective valves.
- Install Shower Head Holder: If using a shower head, attach the support to the designated outlet on the faucet body.
- Test for Leaks: Slowly turn on the main water supply and check all connections for leaks. Tighten any leaking connections gently.

Image: Schematic diagram illustrating the wall-mounted installation of a two-handle bathtub faucet, showing the eccentric S-connections and the main faucet body.
2. Operation
The CORNAT LI2 1931 Lisa 2 faucet is designed for ease of use, providing precise control over water temperature and flow.
2.1 Water Flow and Temperature Control
- Hot Water: Turn the left handle counter-clockwise to open the hot water supply.
- Cold Water: Turn the right handle counter-clockwise to open the cold water supply.
- Temperature Adjustment: Mix hot and cold water by adjusting both handles until the desired temperature is achieved.
- Flow Control: The further the handles are turned, the greater the water flow.
2.2 Shower Diverter
The faucet features a rocker lever to divert water flow between the bathtub spout and a connected shower head (not included).
- To direct water to the bathtub spout, ensure the rocker lever is in the downward position.
- To direct water to the shower head, pull the rocker lever upwards. The water will flow through the shower head once activated.

Image: A person adjusting the handles of the CORNAT LI2 1931 Lisa 2 faucet to control water flow into a bathtub.

Image: Close-up of a hand turning one of the faucet handles, demonstrating the ease of operation.
3. Maintenance and Care
Proper maintenance ensures the longevity and aesthetic appeal of your chrome faucet.
3.1 Cleaning the Faucet
- Clean the chrome surfaces regularly with a soft cloth and mild soap or a non-abrasive cleaner specifically designed for chrome.
- Avoid using abrasive sponges, scouring pads, or harsh chemical cleaners, as these can damage the chrome finish.
- Rinse thoroughly with clean water after cleaning and dry with a soft cloth to prevent water spots.
3.2 Aerator Maintenance
The faucet is equipped with an aerator designed to provide a soft, air-enriched water stream while saving up to 40% water.

Image: Diagram illustrating the aerator component, highlighting its function in creating an air-enriched water stream and saving up to 40% water.
- If water flow becomes weak or irregular, the aerator may be clogged with mineral deposits.
- Unscrew the aerator from the end of the spout.
- Rinse the aerator under running water and gently scrub away any debris or mineral buildup using a soft brush.
- Reattach the aerator, ensuring it is securely tightened.
4. Troubleshooting
This section addresses common issues you might encounter with your faucet.
| Problem | Possible Cause | Solution |
|---|---|---|
| Water leaks from spout when turned off | Worn washer or cartridge | Replace the washer or cartridge in the affected handle. |
| Water leaks from base of faucet | Loose connections at wall or worn seals | Check and tighten wall connections. Replace seals if worn. |
| Low water flow | Clogged aerator or supply lines | Clean the aerator (see Maintenance). Check supply lines for kinks or blockages. |
| Diverter not working correctly | Diverter mechanism clogged or faulty | Clean or replace the diverter mechanism. |
5. Technical Specifications
Detailed specifications for the CORNAT LI2 1931 Lisa 2 Bathtub Faucet.
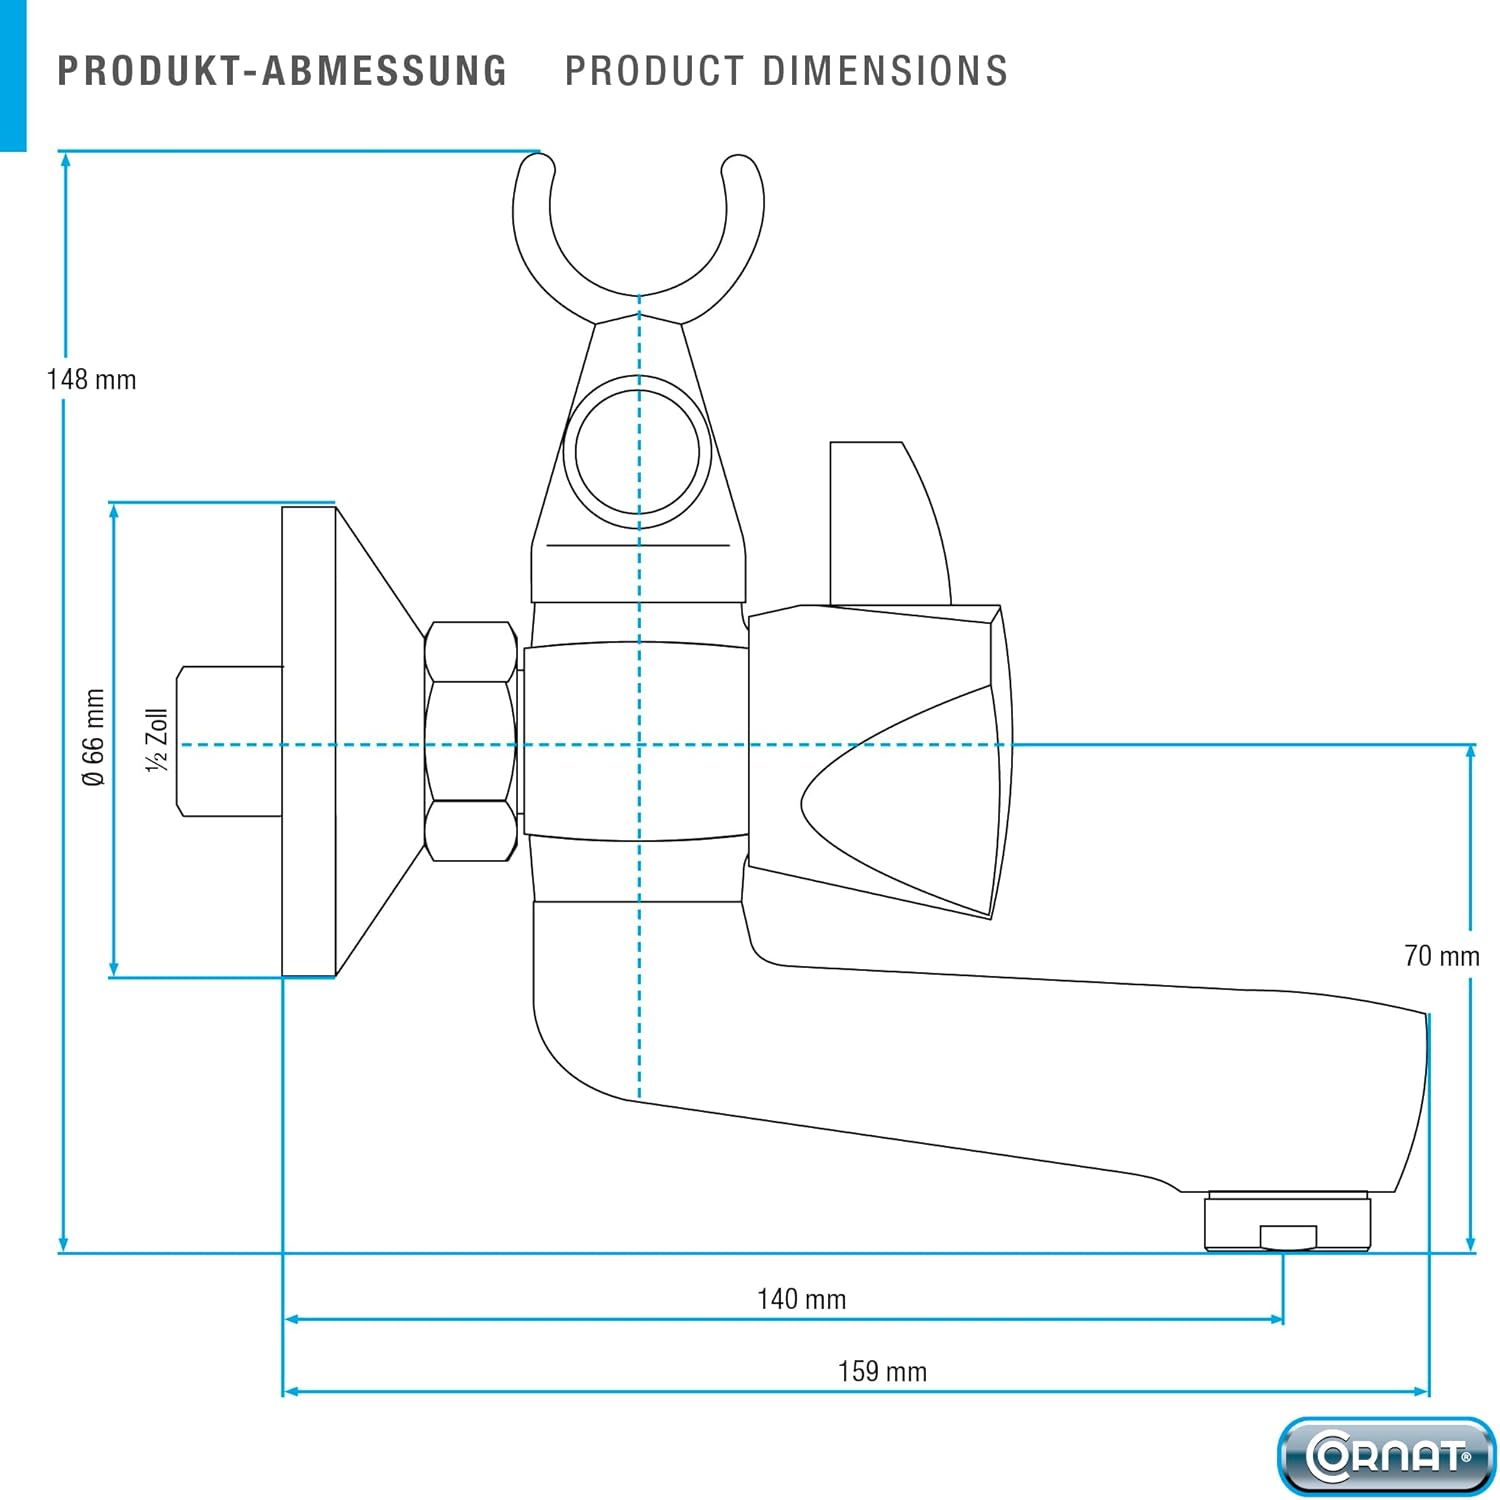
Image: Technical drawing showing the dimensions of the CORNAT LI2 1931 Lisa 2 bathtub faucet, including overall length, height, and connection measurements.
| Feature | Specification |
|---|---|
| Brand | Cornat |
| Model Name | LI2 |
| Product Type | Bathtub Faucet |
| Mounting Type | Wall Mount |
| Material | Chromed Metal |
| Color | Chrome |
| Number of Handles | 2 (Lever type) |
| Number of Holes Required | 2 |
| Wall Connection Distance | 150 ± 25 mm |
| Flow Rate | 8 Liters per minute |
| Item Weight | 1.21 Kilograms |
| Dimensions (D x W x H) | 17.5P x 25.2l x 18.5H cm |
| Spout Design | Gooseneck |
| Special Feature | With rocker lever and shower head holder |
6. Warranty Information
This CORNAT product is covered by the manufacturer's standard warranty. Please refer to the warranty card included with your purchase or visit the official Cornat website for detailed terms and conditions regarding warranty coverage, duration, and claims process. Keep your proof of purchase for any warranty claims.
7. Customer Support
Should you require assistance with installation, operation, or troubleshooting that is not covered in this manual, please contact Cornat customer support. Contact details can typically be found on the product packaging or the official Cornat website. When contacting support, please have your product model number (LI2) and purchase information ready.