
Introduction
This manual provides essential instructions for the safe and efficient operation of your Jensen JTA-220 3-Speed Stereo Turntable with AM/FM Receiver and 2 Built-in Speakers. Please read this manual thoroughly before using the product and retain it for future reference.
Safety Information
WARNING: To prevent fire or shock hazards, do not expose this appliance to rain or moisture. Do not remove the cover. No user-serviceable parts inside. Refer servicing to qualified service personnel.
- Ensure the unit is placed on a stable, level surface.
- Do not block ventilation openings.
- Keep the unit away from direct sunlight, heat sources, and excessive dust.
- Use only the power adapter supplied with the unit.
- Unplug the unit from the power outlet during lightning storms or when unused for long periods.
- This product contains chemicals known to the State of California to cause cancer and birth defects or other reproductive harm.
Package Contents
- Jensen JTA-220 Turntable Unit
- Dust Cover
- Instruction Manual
- 45 RPM Adapter
Product Overview
Familiarize yourself with the various parts and controls of your JTA-220 turntable.
Front Panel Controls
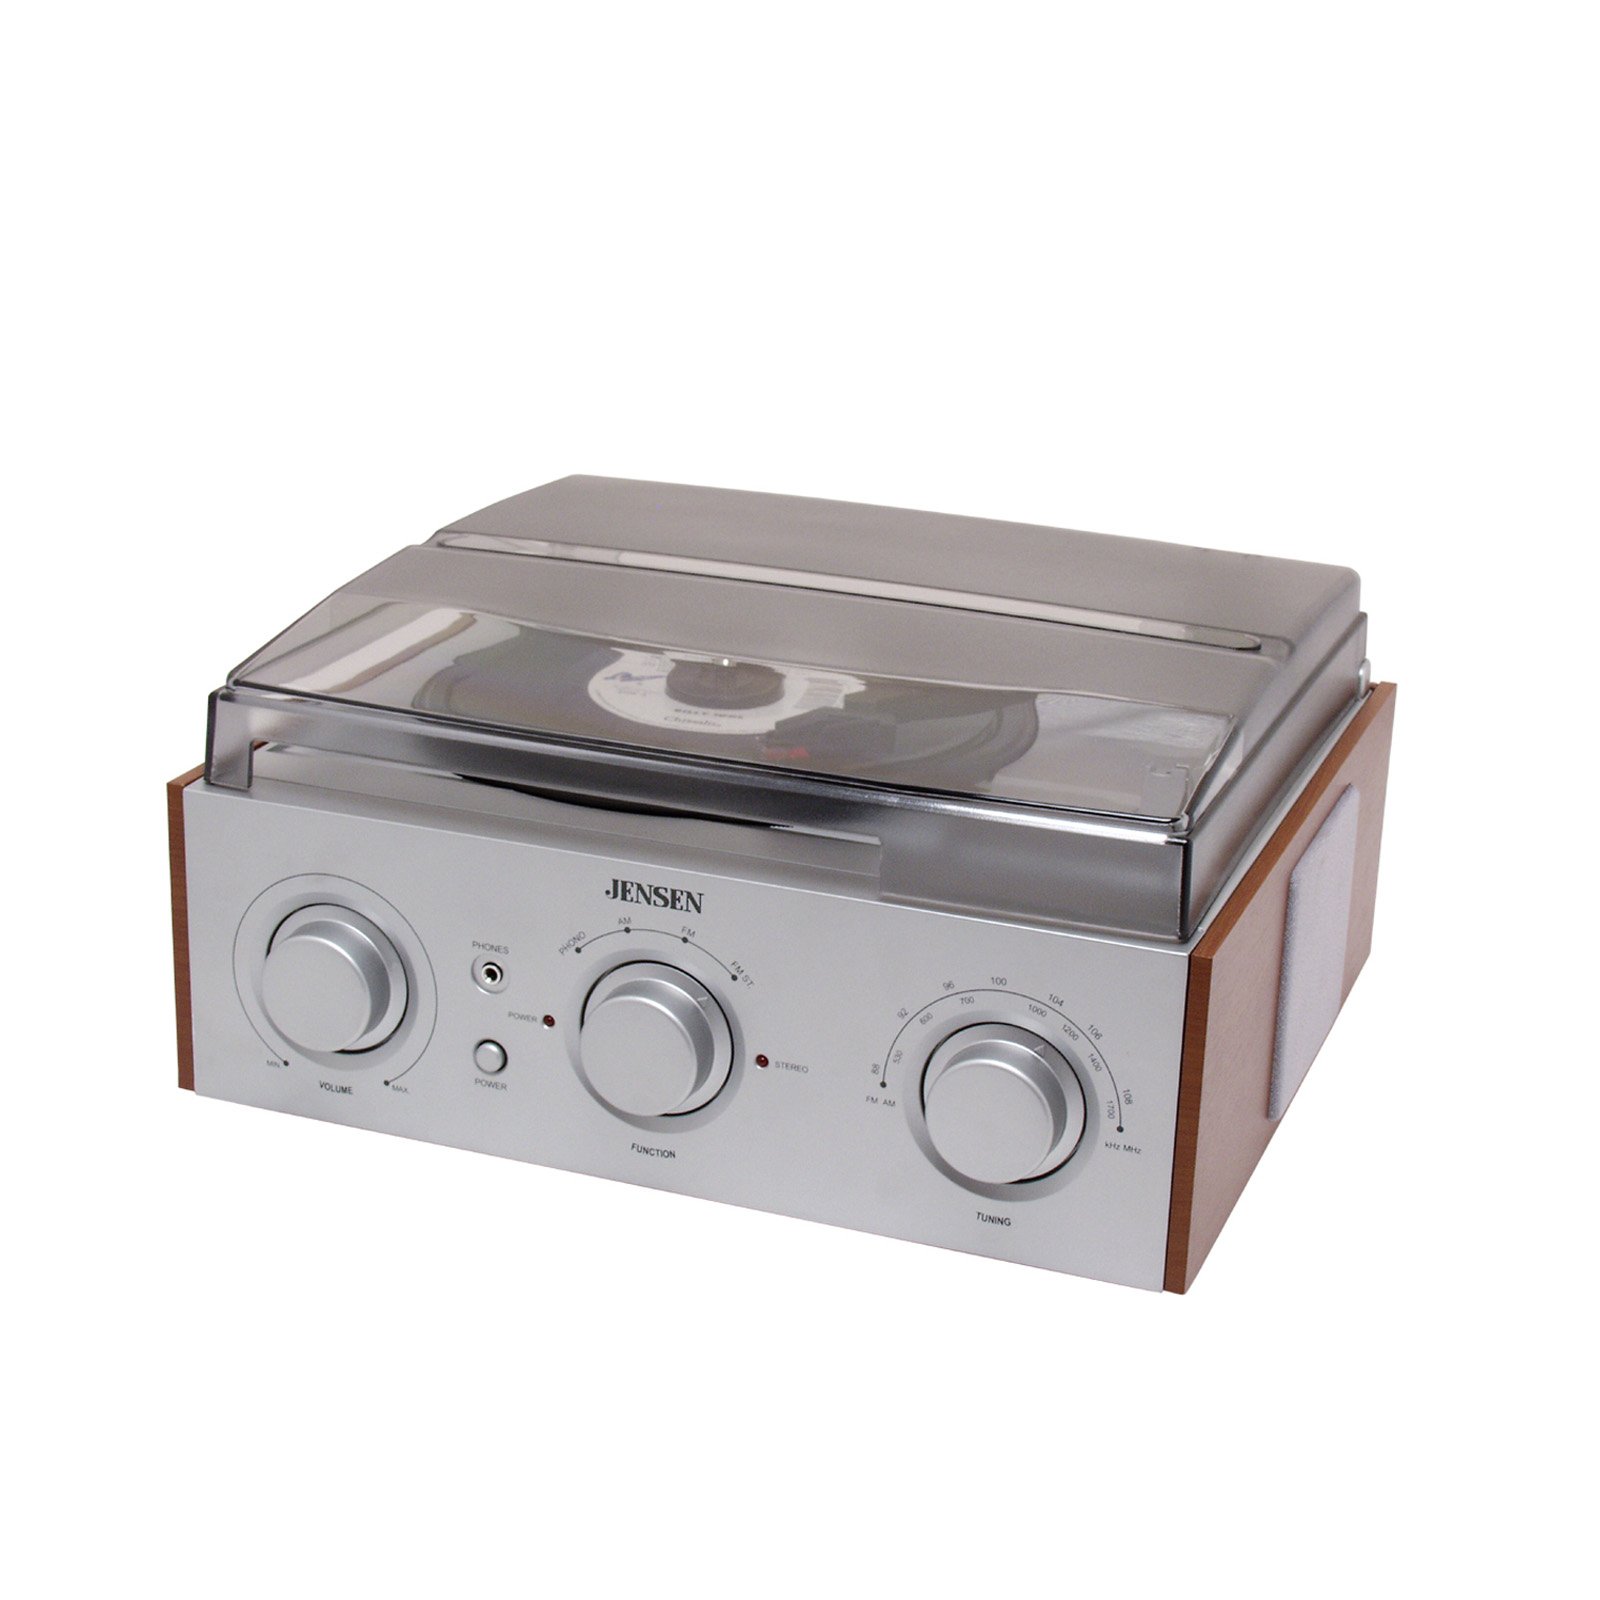
- VOLUME Knob: Adjusts the overall sound output level.
- PHONES Jack: Connect headphones for private listening.
- POWER Indicator: Illuminates when the unit is powered on.
- FUNCTION Knob: Selects between PHONO (turntable), AM, and FM modes.
- TUNING Knob: Adjusts the radio frequency for AM/FM reception.
Turntable Section

- PLATTER: Where the record rests during playback.
- SPINDLE: Holds the record in place.
- 45 RPM ADAPTER: Used for playing 45 RPM records with large center holes.
- TONEARM: Holds the stylus and tracks the record grooves.
- CUE LEVER: Lifts and lowers the tonearm gently.
- TONEARM CLIP: Secures the tonearm when not in use.
- SPEED SELECTOR: Allows selection of 33, 45, or 78 RPM playback speeds.
- AUTO STOP SWITCH: Enables or disables automatic platter stop at the end of a record.
Rear Panel Connections
- AC POWER INPUT: Connect the supplied AC power adapter here.
- EXTERNAL SPEAKER TERMINALS: Connect passive external speakers (not included) for enhanced sound.
- FM ANTENNA: Extend this wire for optimal FM radio reception.
- INTERNAL SPEAKER ON/OFF SWITCH: Toggles the built-in speakers.
Setup
- Unpacking: Carefully remove the unit from its packaging. Retain the packaging for storage or shipping.
- Placement: Place the turntable on a flat, stable surface away from direct heat sources or moisture.
- Power Connection: Connect the AC power adapter to the AC POWER INPUT on the rear of the unit, then plug the adapter into a standard 120V AC wall outlet.
- Dust Cover: Install the clear plastic dust cover by aligning its hinges with the slots on the back of the turntable.
- External Speakers (Optional): If using external speakers, connect them to the EXTERNAL SPEAKER TERMINALS on the rear panel. Ensure correct polarity (+ to + and - to -). Set the INTERNAL SPEAKER ON/OFF SWITCH to OFF if using only external speakers.
- FM Antenna: Extend the FM wire antenna for better radio reception.
Operating Instructions
Playing Records
- Lift the dust cover.
- Place a record on the turntable platter. If playing a 45 RPM single, place the 45 RPM adapter on the spindle first.
- Set the SPEED SELECTOR to the appropriate speed (33, 45, or 78 RPM) for your record.
- Rotate the FUNCTION knob to the "PHONO" position. The POWER indicator will light up.
- Unlock the TONEARM CLIP and gently move the tonearm towards the record.
- Lift the CUE LEVER to raise the tonearm. Position the stylus over the desired starting groove of the record.
- Gently lower the CUE LEVER to place the stylus onto the record. The platter will begin to rotate.
- Adjust the VOLUME knob to your desired listening level.
- At the end of the record, if the AUTO STOP SWITCH is ON, the platter will stop rotating. If OFF, the tonearm will continue to spin in the run-out groove. Manually lift the tonearm using the CUE LEVER and return it to the TONEARM CLIP.
- To stop playback manually, lift the tonearm with the CUE LEVER, return it to the TONEARM CLIP, and then rotate the FUNCTION knob to OFF.
Listening to AM/FM Radio
- Rotate the FUNCTION knob to "AM" or "FM" depending on your desired band. The POWER indicator will light up.
- Adjust the TUNING knob to select your desired radio station.
- Adjust the VOLUME knob to your desired listening level.
- For optimal FM reception, extend and adjust the FM wire antenna on the rear of the unit. For AM reception, rotate the entire unit for best signal.
Using Headphones
Connect any standard 3.5mm stereo headphones into the PHONES jack on the front panel. The built-in speakers will automatically mute when headphones are connected.
Connecting External Speakers
For a more robust audio experience, you can connect passive external speakers to the EXTERNAL SPEAKER TERMINALS on the rear of the unit. Ensure the INTERNAL SPEAKER ON/OFF SWITCH is set to OFF to use only external speakers. If the switch is ON, both internal and external speakers will play.
Maintenance
- Cleaning the Unit: Wipe the exterior of the unit with a soft, damp cloth. Do not use abrasive cleaners or solvents.
- Dust Cover: Keep the dust cover closed when not in use to protect the turntable components. Clean the dust cover with a soft, dry cloth.
- Stylus Care: The stylus (needle) is a delicate component. Clean it periodically with a soft brush, brushing from back to front. Avoid touching the stylus with your fingers. Replace the stylus if sound quality deteriorates significantly.
- Record Care: Keep records clean by wiping them gently with a soft, anti-static cloth before and after playing. Store records vertically in their sleeves to prevent warping.
Troubleshooting
| Problem | Possible Cause | Solution |
|---|---|---|
| No power | Power cord not connected; outlet not active. | Ensure power cord is securely plugged into the unit and a working outlet. |
| No sound from speakers | Volume too low; FUNCTION knob not set correctly; headphones connected; internal speakers off. | Increase volume; set FUNCTION to PHONO/AM/FM; unplug headphones; check INTERNAL SPEAKER ON/OFF SWITCH. |
| Turntable not spinning | Unit not powered on; tonearm not moved over record; AUTO STOP engaged prematurely. | Ensure power is on; move tonearm over record; try setting AUTO STOP SWITCH to OFF. |
| Poor radio reception | Antenna not extended/positioned correctly. | Extend and adjust FM wire antenna; rotate unit for AM reception. |
| Distorted sound | Dirty or worn stylus; dirty record; volume too high. | Clean or replace stylus; clean record; reduce volume. |
Specifications
- Model: JTA-220
- Power Source: AC 120V ~ 60Hz
- Turntable Speeds: 33/45/78 RPM
- Radio Bands: AM/FM
- Speakers: 2 Built-in Stereo Speakers
- Connectivity: Headphone Output, External Speaker Output Terminals
- Dimensions (H x W x D): 6.25" x 12.5" x 10.63" (approximate)
- Weight: 7.4 Ounces (approximate)
Warranty
This Jensen JTA-220 unit is covered by a JENSEN limited 90-day warranty. This warranty covers manufacturing defects under normal use. It does not cover damage resulting from misuse, accident, modification, or unauthorized repair. Please retain your proof of purchase for warranty claims.
Warranty does not cover misuse of product.
Customer Support
For technical assistance or service inquiries regarding your Jensen JTA-220 turntable, please visit the official Jensen website or refer to the contact information provided with your product packaging. You may also find additional support resources and FAQs online.
Online Resources: Jensen Brand Store on Amazon