Introduction
This manual provides detailed instructions for the safe and proper installation and operation of your Barkan Full Motion TV Wall Mount, Model 3300.B. This articulating wall mount is designed for 13-65 inch flat and curved screen televisions, supporting a maximum weight of 88 lbs (40 kg). Please read all instructions carefully before beginning installation.
Safety Information
- Weight Capacity: Do not exceed the maximum weight capacity of 88 lbs (40 kg). Exceeding this limit may result in serious injury or property damage.
- Screen Size: This mount is compatible with 13-65 inch screens. Ensure your TV's VESA pattern and weight are within the specified limits.
- Wall Type: Install the mount only on solid concrete walls, concrete block walls, or wood stud walls. DO NOT install on drywall, gypsum, or plaster without wood studs.
- Professional Installation: If you are unsure about the installation process or wall type, consult a qualified professional.
- Tools: Use appropriate tools and wear safety glasses during installation.
- Children: Keep children away from the installation area.
- Check Connections: Regularly check that all screws and connections are secure.
Package Contents
Verify that all components are present before installation. If any parts are missing or damaged, do not proceed with installation and contact Barkan support.
- TV Wall Mount Assembly
- Assembly Instructions (this document)
- Hardware Kit (various screws, anchors, washers, spacers)
- Safety Instructions

Image: Barkan Full Motion TV Wall Mount and its retail packaging.

Image: Detailed view of the Barkan Hardware Kit, including wall screws, wall anchors, M8, M6, M4 TV mounting screws, metal washers, and plastic spacers.
Specifications
| Model Number | 3300.B |
| Screen Size Compatibility | 13 - 65 inches |
| Maximum Load Capacity | 88 lbs (40 kg) |
| VESA Compatibility | 75x75mm to 400x400mm |
| Mounting Type | Wall Mount |
| Movement Type | Articulating (Full Motion) |
| Tilt Angle | 0° to 15° |
| Swivel Angle | 180° |
| Screen Leveling | ±5° |
| Extension from Wall | Min. 2.6" (6.5 cm) / Max. 10.4" (26.5 cm) |
| Product Dimensions | 10.83 x 7.17 x 2.36 inches (Mount only) |
| Item Weight | 5.1 pounds |
| Material | Metal |
| Color | Black |

Image: Diagram illustrating the mount's full motion capabilities, including tilt, swivel, leveling, and extension from the wall, with key dimensions.

Image: Detailed specifications and a diagram showing VESA backscreen connection points and mount dimensions.
Setup and Installation
Required Tools
- Drill (1/4" - 6mm, 3/8" - 10mm bits for concrete/wood, 5/32" - 4mm for wood)
- Level
- Safety Glasses
- Stud Finder (for wood stud installation)
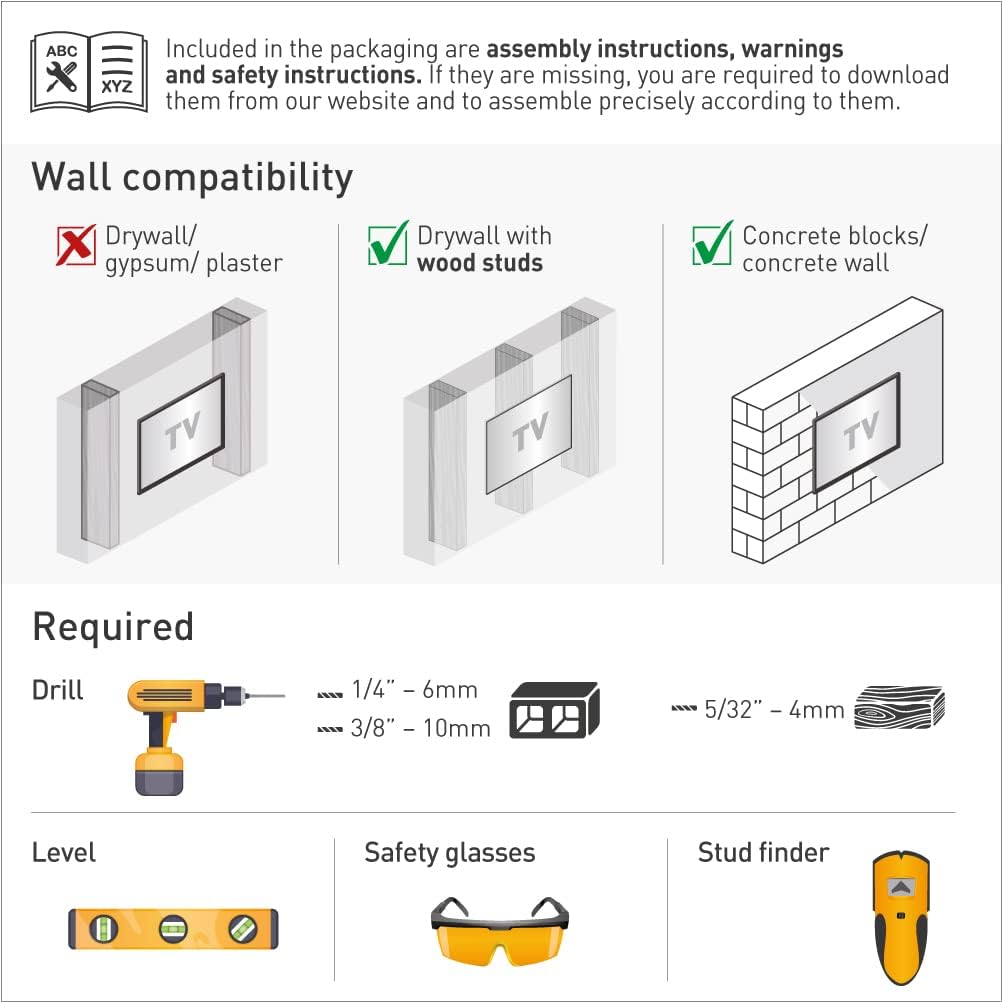
Image: Illustration of required tools for installation and diagrams showing compatible wall types.
Wall Compatibility
Ensure your wall is suitable for mounting. This mount is compatible with:
- Drywall with wood studs
- Concrete blocks / Concrete wall
NOT compatible with: Drywall / gypsum / plaster without wood studs.
Assembly Steps (1-2-3)
- Connect the TV plate to the back of the TV: Attach the TV plate to the VESA mounting holes on the back of your television using the appropriate screws, washers, and spacers from the hardware kit. Ensure a secure fit.
- Install the bracket on the wall: Locate the desired mounting position. Use a stud finder for wood studs or mark drill points for concrete. Drill pilot holes and securely fasten the wall bracket to the wall using the provided wall screws and anchors. Use a level to ensure the bracket is straight.
- Snap the TV onto the bracket: Carefully lift the television (with the attached TV plate) and align it with the wall bracket. Snap the TV plate onto the wall bracket. Ensure the safety mechanism is engaged to prevent accidental disengagement.

Image: Visual guide for the three-step assembly process: attaching the TV plate, installing the wall bracket, and snapping the TV onto the bracket.
Backscreen Connection Positioning
The mount supports various VESA patterns. Refer to the diagram to determine the correct positioning for your TV's backscreen connections. Adapters may be required for certain configurations.

Image: Multiple diagrams illustrating different VESA backscreen connection patterns and how the mount's arms can be configured.
Screen Type Compatibility
This mount is designed to accommodate both flat and curved screen televisions.

Image: Illustrations demonstrating how the mount fits both flat and curved screen televisions.
Operating Instructions
Once installed, your Barkan Full Motion TV Wall Mount allows for flexible viewing adjustments:
- Tilt Adjustment (0° to 15°): Loosen the tilt adjustment screws on the TV plate, adjust the screen to your desired vertical angle, and then securely tighten the screws.
- Swivel Adjustment (180°): Gently push or pull the TV to rotate it horizontally to the left or right. The mount allows for a 180-degree swivel range.
- Screen Leveling (±5°): If the screen appears slightly unlevel after installation, adjust the leveling mechanism on the TV plate to achieve a perfectly horizontal display.
- Extension from Wall (2.6" to 10.4"): Extend or retract the TV from the wall by gently pulling or pushing the arm assembly.
Image: Visual representation of the mount's adjustable features, including distance from wall, tilt, and screen leveling.
Maintenance
To ensure the longevity and safe operation of your TV wall mount:
- Regular Inspection: Periodically check all mounting screws and connections to ensure they remain tight and secure.
- Cleaning: Wipe the mount with a soft, dry cloth. Avoid using abrasive cleaners or solvents that could damage the finish.
- Lubrication: The articulating joints are designed for smooth movement. If movement becomes stiff, a small amount of silicone-based lubricant can be applied to the pivot points.
Troubleshooting
- TV is not level: Use the screen leveling adjustment feature (±5°) to correct the horizontal alignment. Ensure the wall bracket was installed level.
- Difficulty moving the TV: Check if any cables are snagged or if the tilt/swivel screws are overtightened. Apply a small amount of silicone lubricant to the joints if necessary.
- Mount feels unstable: Immediately remove the TV from the mount. Re-check all wall and TV connections. Ensure the mount is installed on a compatible wall type and that all screws are fully tightened. Do not re-mount the TV until stability is confirmed.
- Missing hardware: Refer to the package contents list. If parts are missing, contact Barkan customer support.
Warranty and Support
Barkan products are designed for quality and durability. This product includes a Lifetime Warranty. For technical assistance, missing parts, or warranty claims, please visit the official Barkan website or contact their customer service team. Detailed contact information can typically be found on the Barkan website or on the product packaging.

Image: Features highlighting the lifetime warranty, patented design, and safety aspects of the Barkan mount.


