1. Introduction
This manual provides comprehensive instructions for the REV Ritter 0025300103 Digital Programmable Timer. This device is designed to automate the switching of electrical appliances, offering convenience and potential energy savings. It supports up to 20 daily or 140 weekly programs, with a minimum interval of 1 minute. Key features include a timer function, a random function, and manual override capabilities. This timer is intended for indoor use only.
2. Safety Instructions
- Read all instructions carefully before using the device.
- This product is designed for indoor use only. Do not use it outdoors or in damp environments.
- Do not immerse the device in water or any other liquid.
- Ensure the timer is properly plugged into a grounded 230V, 50Hz electrical outlet.
- Do not exceed the maximum load capacity of 8(2) A or 1800W. Overloading can cause damage or fire.
- Keep the device out of reach of children.
- Do not attempt to open or repair the casing. Refer all servicing to qualified personnel.
- Unplug the timer from the wall socket before cleaning or when not in use for extended periods.
3. Product Overview
The REV Ritter 0025300103 Digital Programmable Timer features a clear LCD display and intuitive buttons for setting programs and controlling connected devices.

Figure 3.1: Angled view of the timer, showing the display, control buttons, and the integrated socket.

Figure 3.2: Front view of the timer, highlighting the LCD display and the array of control buttons.
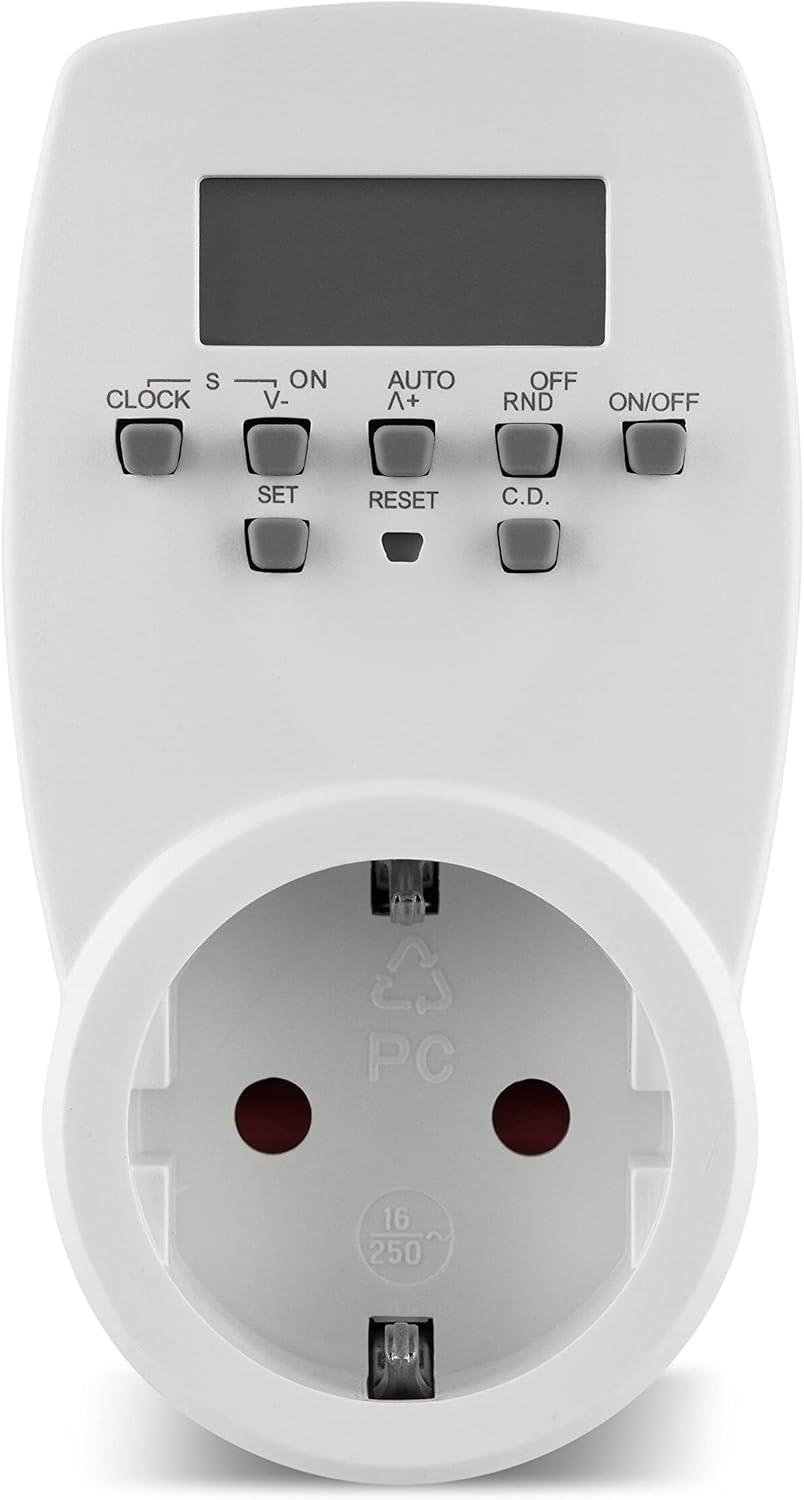
Figure 3.3: Close-up of the timer's integrated Schuko socket, designed for Type F plugs.

Figure 3.4: Detailed view of the control panel, showing buttons like CLOCK, SET, ON/OFF, AUTO, RND, and RESET.
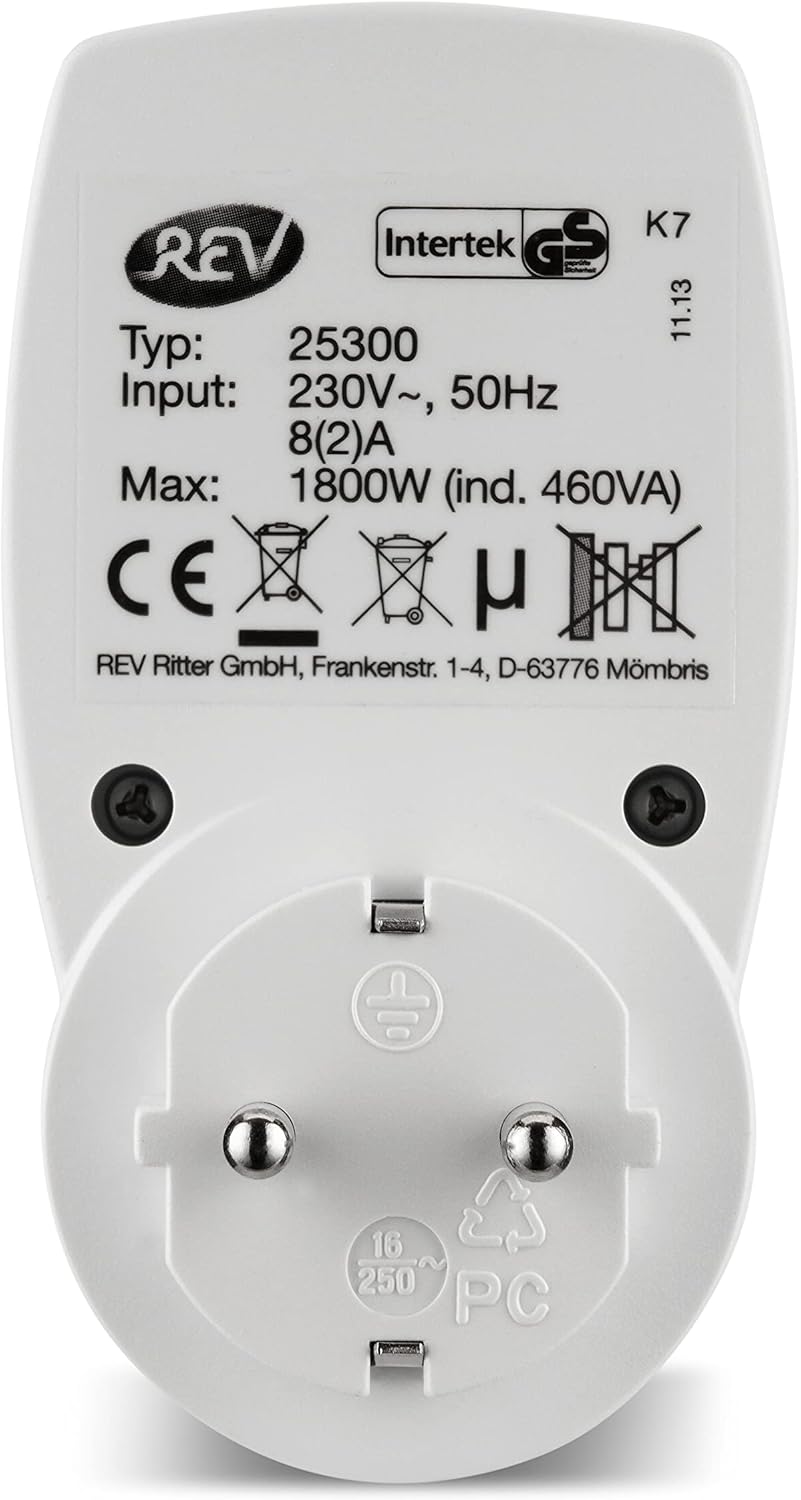
Figure 3.5: Back view of the timer, displaying the product label with electrical specifications and certifications.

Figure 3.6: The timer plugged into a wall socket, ready for use.
Controls and Display:
- LCD Display: Shows current time, day, and program status.
- CLOCK Button: Used to set the current time and day.
- SET Button: Used to confirm settings during programming.
- ON/OFF Button: Manually switches the timer output ON or OFF.
- AUTO Button: Activates automatic program execution.
- RND (Random) Button: Activates the random switching function.
- RESET Button: Resets all settings to factory defaults.
- V-/Λ+ Buttons: Used to adjust values (time, program numbers) up or down.
4. Setup
4.1 Initial Charging
Before first use, plug the timer into a standard 230-volt wall socket for approximately 14 hours. This charges the internal battery, which powers the clock and retains program settings during power outages or when the timer is unplugged.
4.2 Resetting the Timer
If the display is blank or shows erratic characters, or if you wish to clear all previous settings, press the RESET button using a pointed object (e.g., a pen tip). This will clear all programs and reset the clock to default.
4.3 Setting Current Time and Day
- Press and hold the CLOCK button.
- While holding CLOCK, press the V- or Λ+ buttons to set the current day of the week (e.g., MO for Monday, TU for Tuesday).
- Continue holding CLOCK and press V- or Λ+ to set the current hour.
- Continue holding CLOCK and press V- or Λ+ to set the current minute.
- Release the CLOCK button. The time and day are now set.
5. Operating Instructions
5.1 Programming ON/OFF Times
The timer allows for up to 20 ON/OFF programs per day, totaling 140 programs per week. The minimum interval between programs is 1 minute.
- Press the SET button once to enter program mode. The display will show "1 ON".
- Use the V- or Λ+ buttons to select the desired day(s) for this program (e.g., MO, TU, WE, TH, FR, SA, SU, or combinations like MO-FR, SA-SU, MO-SU).
- Press SET to confirm the day selection.
- Use V- or Λ+ to set the desired ON hour. Press SET to confirm.
- Use V- or Λ+ to set the desired ON minute. Press SET to confirm.
- The display will now show "1 OFF". Repeat steps 2-5 to set the desired OFF time for the same program.
- After setting the OFF time, press SET to move to the next program ("2 ON").
- Repeat the process for all desired programs. To exit program mode at any time, press the CLOCK button.
5.2 Manual Override (ON/AUTO/OFF Modes)
Press the ON/OFF button repeatedly to cycle through the operating modes:
- ON: The connected appliance is continuously ON, overriding all programs.
- AUTO: The connected appliance operates according to the programmed ON/OFF times. This is the standard operating mode for automated control.
- OFF: The connected appliance is continuously OFF, overriding all programs.
5.3 Random Function (RND)
The random function can be used to simulate presence, for example, when you are away from home. When activated, the timer will randomly switch the connected appliance ON and OFF within certain timeframes.
- To activate: Press the RND button. The "RND" indicator will appear on the display.
- To deactivate: Press the RND button again. The "RND" indicator will disappear.
Note: The random function typically operates within a window around your programmed ON/OFF times or during specific hours, depending on the model's internal logic. Consult the display for specific indications.

Figure 5.1: The timer in an indoor setting, controlling Christmas tree lights.

Figure 5.2: The timer connected to a lamp, demonstrating its use for automated lighting.
6. Maintenance
6.1 Cleaning
To clean the timer, first unplug it from the wall socket. Wipe the exterior with a soft, dry cloth. Do not use abrasive cleaners, solvents, or immerse the device in water.
6.2 Storage
When not in use for extended periods, store the timer in a cool, dry place, away from direct sunlight and extreme temperatures.
7. Troubleshooting
- Display is blank or erratic: The internal battery may be depleted. Plug the timer into a live 230V socket for at least 14 hours to recharge it. If the issue persists, perform a reset using the RESET button.
- Programs are not executing:
- Ensure the timer is in AUTO mode (check the display).
- Verify that the current time and day are set correctly.
- Check that the programmed ON/OFF times are correct and active.
- Ensure the connected appliance is functioning correctly when plugged directly into a wall socket.
- Timer does not fit my wall socket: This timer is designed with a Type F (Schuko) plug, which grounds via side clips. If your wall socket uses a Type E (French) standard with a male grounding pin, this timer will not be compatible. Ensure your socket type matches the timer's plug type.
- Connected appliance does not turn ON/OFF: Check the timer's mode (ON/AUTO/OFF) and ensure the appliance's power switch is in the ON position. Verify the appliance is not exceeding the timer's maximum load capacity.
8. Specifications
| Feature | Specification |
|---|---|
| Brand | REV Ritter |
| Model Number | 0025300103 |
| Color | White |
| Dimensions (L x W x H) | 7 x 6 x 11 cm |
| Weight | 110 g |
| Voltage | 230 Volts |
| Frequency | 50 Hz |
| Max Load | 8(2) A, 1800W |
| Material | Plastic |
| Number of Programs | Up to 20 daily / 140 weekly |
| Minimum Program Interval | 1 minute |
| Usage Environment | Indoor only |
9. Warranty and Support
For warranty information, technical support, or service inquiries, please contact your retailer or the manufacturer directly. It is recommended to retain your proof of purchase for warranty claims.
Manufacturer: REV Ritter GmbH


