1. Introduction
The SINGER 1507WC is an eight-stitch sewing machine designed for ease of use, making it suitable for beginners and simple sewing projects. This manual provides essential information for setting up, operating, maintaining, and troubleshooting your machine to ensure optimal performance.
Key features include eight built-in stitches for various sewing tasks, quick and easy threading, adjustable stitch length and zigzag width, an automatic four-step buttonhole, and a handy free arm for difficult-to-reach areas. The machine also comes with a canvas cover for protection and built-in accessory storage.
2. Setup
2.1 Power Connection
Ensure the machine is placed on a stable surface. Connect the power cord to the machine and then to a 110-volt power outlet. This machine is designed for use in the United States and Canada only.
2.2 Bobbin Winding
To wind the bobbin, place a spool of thread on the spool pin. Guide the thread through the tension disc and around the bobbin. Place the bobbin onto the bobbin winder spindle and push it to the right. Start the machine, and the bobbin will wind automatically. The needle bar automatically disengages during bobbin winding for safety. Use only Class 15 bobbins.

Image: Top view of the machine, highlighting the spool pin and bobbin winding mechanism.
2.3 Threading the Machine
The SINGER 1507WC features numbered guides directly on the machine for quick and easy threading. Follow the arrows and numbers to guide the upper thread from the spool, through the tension discs, take-up lever, and down to the needle. Once the upper thread is in place, thread the needle from front to back.
Video: This video demonstrates the quick and easy threading process for the SINGER 1507WC sewing machine, following the numbered guides on the machine.

Image: Close-up view of the bobbin area, showing the bobbin and its housing. Ensure the bobbin is correctly inserted and the thread is properly routed.
2.4 Needle Installation
Always use SINGER needles, specifically types 2020 and 2045. Ensure the flat side of the needle faces the back of the machine when inserting. Tighten the needle clamp screw securely.
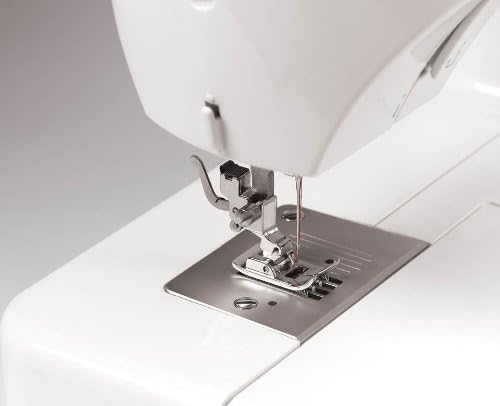
Image: Detailed view of the needle and presser foot, illustrating the correct threading path through the needle eye.
3. Operating Instructions
3.1 Stitch Selection
The machine offers eight built-in stitches for various sewing applications. Use the stitch selector dial to choose the desired stitch pattern. Refer to the stitch chart for visual guidance on each stitch type.
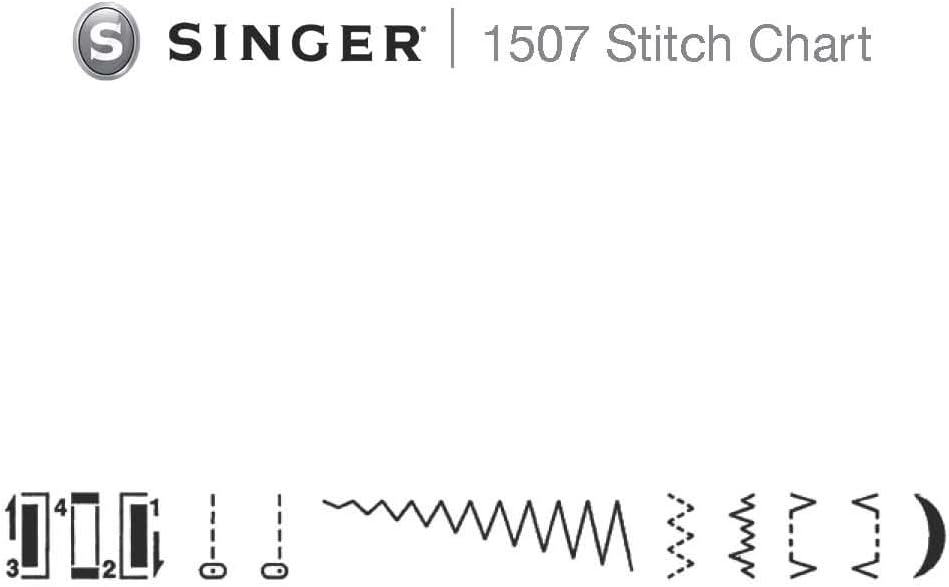
Image: The SINGER 1507 Stitch Chart, showing the available stitch patterns and their corresponding settings.
3.2 Adjustable Stitch Length and Zigzag Width
Customize your stitches using the adjustable stitch length and zigzag width controls. This allows for strong seams and prevents fabric bunching. The zigzag width can be set up to 5mm for bolder stitches.
3.3 Automatic Four-Step Buttonhole
Create professional-looking buttonholes with the automatic four-step buttonhole feature. Follow the instructions in the full manual for precise execution of each step.

Image: The buttonhole foot in action, demonstrating the creation of a buttonhole on fabric.
3.4 Handy Free Arm
The free arm provides easy access for sewing cuffs, collars, pant hems, and other cylindrical or difficult-to-reach areas. Simply remove the accessory storage compartment to expose the free arm.

Image: The free arm of the sewing machine, exposed by removing the accessory storage, ideal for circular sewing.
3.5 Snap-On Presser Feet
The machine includes four snap-on presser feet: zipper foot, zigzag foot, button foot, and buttonhole foot. These feet can be changed effortlessly without the need for screwdrivers, expanding your creative sewing possibilities.
3.6 Adjustable Tension
Adjust the needle tension to achieve stable stitch quality on various fabric types. Tension can also be modified for specific project requirements.
3.7 Variable Needle Position
The needle position can be adjusted for individual projects, which is useful for tasks such as inserting zippers, cording, and topstitching.
4. Maintenance
4.1 Cleaning
Regularly clean lint and dust from the bobbin area and feed dogs using the included seam ripper/brush. Ensure the machine is unplugged before cleaning.
4.2 Lubrication
Use the provided oil bottle for lubrication as instructed in the comprehensive manual. Proper lubrication ensures smooth operation and extends the machine's lifespan.
4.3 Storage
When not in use, protect your machine from dust and debris with the included gray canvas cover. The built-in carry handle makes transportation easy.

Image: The SINGER 1507WC sewing machine shown with its protective gray canvas cover.
5. Troubleshooting
If you encounter issues with your sewing machine, consider the following general troubleshooting steps:
- Thread Jamming: Ensure the machine is correctly threaded, both upper and bobbin threads. Verify that the bobbin is inserted correctly and the thread is not tangled. Avoid starting stitches directly on thick seams.
- Skipped Stitches: Check if the needle is inserted correctly and is not bent or dull. Ensure you are using the appropriate needle type and size for your fabric.
- Uneven Stitches: Adjust the tension settings for both upper and bobbin threads. Test on a scrap piece of fabric.
- Machine Noise: Excessive noise can indicate a need for cleaning or lubrication. Refer to the maintenance section.
For detailed troubleshooting specific to your issue, please consult the comprehensive instruction manual that came with your machine or contact SINGER customer support.
6. Specifications
| Feature | Detail |
|---|---|
| Model Number | 1507WC |
| Product Dimensions | 15 x 8 x 12 inches (12"D x 15"W x 12"H) |
| Item Weight | 13 pounds |
| Power Source | Corded Electric (110V for US/Canada) |
| Material | Metal Frame |
| Color | White |
| Bobbin Class | 15 Only |
| Needle Types | 2020 and 2045 |
| Light Bulb | 120V 10-Watt Light |

Image: Dimensional diagram of the SINGER 1507WC, indicating its height, width, and depth.
7. Included Accessories
The SINGER 1507WC comes with a convenient on-board accessory storage compartment containing the following items:
- Zipper foot
- Zigzag foot
- Button foot
- Buttonhole foot
- Screwdriver
- Seam ripper/brush
- Oil bottle
- Needles
- Bobbins (3)
- Seam guide
- Darning plate
- Large and small spool caps
- Dust cover (Canvas Cover)
- Power cord
- Foot pedal
- Instruction manual (printed)
8. Warranty
The SINGER 1507WC sewing machine is backed by a Limited 25-year warranty. Please refer to the warranty card included with your product for specific terms and conditions.
9. Support
For further assistance, technical support, or to inquire about replacement parts, please contact SINGER customer service. Contact information can typically be found in the full instruction manual or on the official SINGER website.


