
1. Product Overview
The celexon Multicel 3040Pro is an adjustable projector ceiling mount designed for secure and flexible projector installation. Constructed from durable steel and aluminum, it supports projectors weighing up to 15 kg. This mount offers variable ceiling distances from 30 to 40 cm and features precise adjustment capabilities for optimal projection alignment.

Image 1.1: Overview of the celexon Multicel 3040Pro Projector Ceiling Mount.
2. Safety Instructions
- Read all instructions: Before installation and use, carefully read and understand all instructions.
- Weight capacity: Do not exceed the maximum load capacity of 15 kg (33 lbs). Overloading can cause serious injury or damage.
- Ceiling structure: Ensure the mounting surface (ceiling) can safely support the combined weight of the mount and the projector. Consult a structural engineer if unsure.
- Professional installation: If you are not confident in your ability to install the mount safely, seek assistance from a qualified professional.
- Tools: Use appropriate tools for installation. Ensure all fasteners are securely tightened.
- Cable management: Route all cables safely to prevent tripping hazards or damage to the projector.
- Maintenance: Periodically check the mount for any signs of wear, damage, or loose connections.
3. Package Contents
Please verify that all components are present before beginning installation. Refer to the product packaging for a complete and detailed list of included components. Typically, the package includes:
- Projector ceiling mount assembly
- Mounting hardware (screws, anchors, washers)
- Projector attachment arms
- Instruction manual
4. Setup and Installation
Follow these steps for proper installation of your celexon Multicel 3040Pro projector ceiling mount.
4.1. Preparing the Ceiling
- Identify mounting location: Choose a location on the ceiling that is structurally sound and provides the desired projection angle.
- Mark drill holes: Use the ceiling plate of the mount as a template to mark the drill holes on the ceiling. Ensure the marks are accurate and level.
- Drill holes: Drill pilot holes according to the marked positions and the type of mounting hardware provided for your ceiling material.
4.2. Attaching the Mount to the Ceiling
- Secure ceiling plate: Attach the ceiling plate to the ceiling using the appropriate screws and anchors. Ensure it is firmly secured.
- Assemble extension pole: Connect the extension pole to the ceiling plate. The mount allows for an adjustable ceiling distance between 30 cm and 40 cm (12 to 15.7 inches). Adjust the pole to your desired length and secure it with the provided fasteners.

Image 4.1: Illustration of adjustable ceiling distance (300-400mm) and projector arm spread (50-360mm).
4.3. Attaching the Projector to the Mount
- Attach projector arms: Secure the four adjustable projector arms to the projector's mounting points. The mounting range for the projector arms is between 5 cm and 36 cm (2 to 14 inches). Adjust the arms to fit your projector's specific mounting pattern.
- Connect projector to mount: Carefully lift the projector and attach the projector arms assembly to the main mounting plate at the end of the extension pole. Secure it with the provided screws.
- Cable routing: Utilize the internal cable management system within the extension pole to route your projector cables neatly.

Image 4.2: Detail of the adjustable projector arm mechanism.
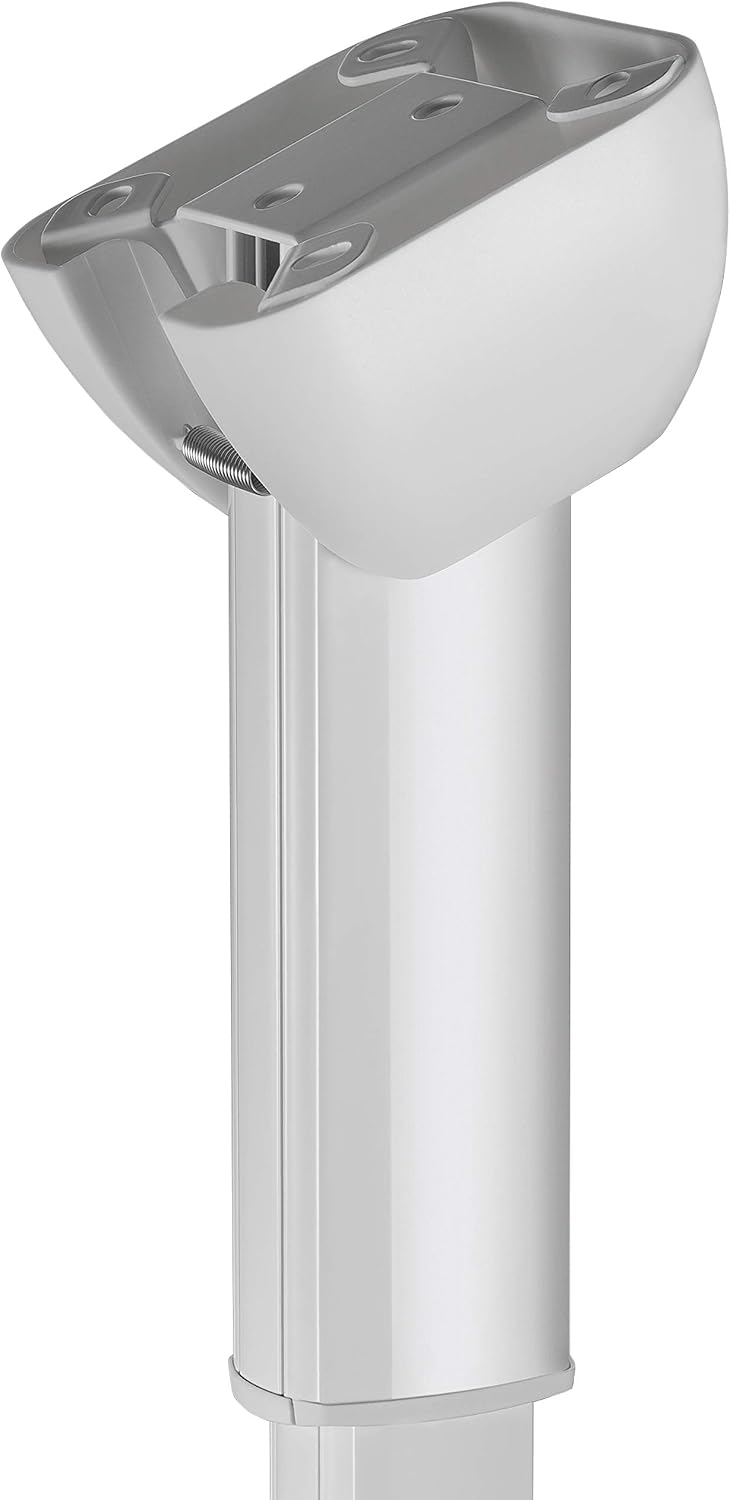
Image 4.3: Detail of the ceiling plate and integrated cable management.
5. Operating Instructions (Adjustments)
The celexon Multicel 3040Pro offers flexible adjustments to achieve the perfect projection angle.
5.1. Adjusting Tilt and Swivel
The mount allows for horizontal tilt/swivel of +/- 8% and vertical tilt of +/- 15°. These adjustments are typically made using a standard screwdriver to loosen and tighten the corresponding adjustment screws on the mount's head.
- Loosen adjustment screws: Gently loosen the screws responsible for tilt and swivel adjustments. Do not remove them completely.
- Position projector: Carefully adjust the projector to the desired horizontal and vertical angle.
- Tighten screws: Once the desired position is achieved, securely tighten all adjustment screws to lock the projector in place.

Image 5.1: Visual representation of the +/- 8° horizontal and +/- 15° vertical adjustment capabilities.
5.2. Adjusting Ceiling Distance
The extension pole allows for height adjustment between 30 cm and 40 cm. To adjust the height:
- Loosen locking mechanism: Locate and loosen the locking mechanism on the extension pole.
- Adjust height: Carefully extend or retract the pole to the desired ceiling distance.
- Secure locking mechanism: Once the desired height is set, securely tighten the locking mechanism to prevent movement.
6. Maintenance
Regular maintenance ensures the longevity and safe operation of your projector mount.
- Cleaning: Wipe the mount with a soft, dry cloth to remove dust. For stubborn dirt, use a slightly damp cloth and mild detergent, then dry thoroughly. Avoid abrasive cleaners or solvents.
- Periodic checks: Every 6-12 months, inspect all screws and fasteners to ensure they are tight. Check for any signs of wear, corrosion, or damage to the mount components.
- Lubrication: Moving parts typically do not require lubrication. If any part feels stiff, consult celexon support before applying any lubricants.
7. Troubleshooting
If you encounter issues with your projector mount, refer to the following common problems and solutions:
| Problem | Possible Cause | Solution |
|---|---|---|
| Projector is not stable or sags | Loose mounting screws or overloaded mount. | Ensure all screws are tightened. Verify projector weight does not exceed 15 kg. |
| Difficulty adjusting tilt/swivel | Adjustment screws are too tight or mechanism is stiff. | Loosen adjustment screws slightly before attempting to reposition. Do not force adjustments. |
| Mount feels wobbly on the ceiling | Ceiling plate not securely fastened or ceiling structure is inadequate. | Re-check all ceiling mounting screws. Ensure the ceiling can support the weight. Consult a professional if necessary. |
| Cables are visible and untidy | Cable management not utilized. | Route cables through the internal channel of the extension pole. |
8. Specifications
- Model Name: Multicel 3040Pro
- Model Number: 1090123
- Brand: celexon
- Color: White
- Material: Steel, Aluminum
- Mounting Type: Ceiling Mount
- Adjustable Ceiling Distance: 30 - 40 cm (12 - 15.7 inches)
- Projector Mounting Range: 5 - 36 cm (2 - 14 inches)
- Maximum Load Capacity: 15 kg (33 lbs)
- Horizontal Tilt/Swivel: +/- 8%
- Vertical Tilt: +/- 15°
- Special Features: Rotatable, Cable Management
- Compatible Devices: Projectors
9. Warranty and Support
9.1. Warranty Information
Warranty terms and conditions for the celexon Multicel 3040Pro Projector Ceiling Mount are typically provided with the product packaging or can be found on the official celexon website. Please retain your proof of purchase for warranty claims.
9.2. Customer Support
For technical assistance, troubleshooting beyond this manual, or inquiries regarding parts and service, please contact celexon customer support. Visit the official celexon website for contact details, FAQs, and additional resources.
celexon Official Website: www.celexon.com
