
1. Introduction
Thank you for choosing the Digipower TC-500KFC Travel Charger. This compact and efficient charger is designed to power up your digital camera's Li-ion batteries quickly and safely. Featuring a one-hour charge time, CPU control for over-charge and over-heat protection, and auto-voltage switching for international use, it's an ideal companion for photographers on the go. Its universal base accommodates changeable battery plates, and the folding plug ensures easy transport.
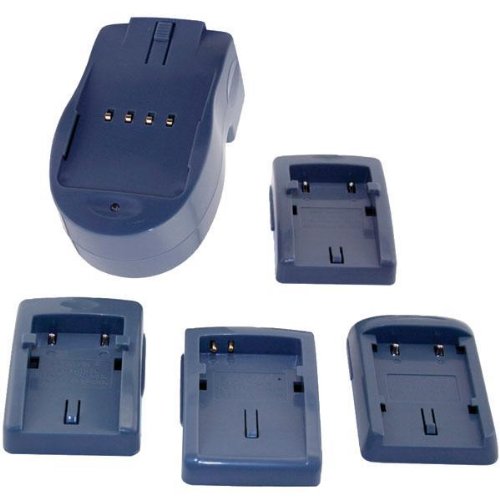
Image 1.1: The Digipower TC-500KFC Travel Charger, showcasing its compact design and folding plug.
2. Safety Information
- Read all instructions before use.
- This charger is designed for indoor use only. Do not expose to rain or moisture.
- Do not attempt to disassemble or modify the charger. Refer all servicing to qualified personnel.
- Use only with specified Li-ion batteries. Charging other battery types may cause explosion, rupture, or leakage, leading to personal injury or property damage.
- Keep out of reach of children.
- Unplug the charger from the power outlet when not in use.
- Avoid operating the charger in extremely hot or cold environments.
3. Package Contents
The Digipower TC-500KFC Travel Charger package typically includes:
- Digipower TC-500KFC Travel Charger Unit
- Dedicated Battery Plates (specific to compatible battery models)
4. Setup
- Unfold the AC Plug: Gently pull out the folding AC plug from the charger unit until it locks into place.
- Attach the Correct Battery Plate: Select the battery plate that matches your camera battery. Align the plate with the charger's universal base and slide it into position until it clicks securely.
- Insert the Battery: Carefully insert your digital camera's Li-ion battery into the attached battery plate, ensuring proper polarity and a snug fit.
5. Operating Instructions
- Connect to Power: Plug the charger's AC plug into a standard wall outlet. The charger features auto-voltage switching, making it suitable for use in over 150 countries (100-240V AC, 50/60Hz).
- Observe Charging Indicator: The 2-color LED indicator on the charger will illuminate to show the charging status. Typically, a red light indicates charging in progress, and a green light indicates a full charge. Refer to the specific battery plate's instructions for exact LED behavior if different.
- Charging Time: The charger is designed for a rapid one-hour charge time for most compatible batteries. Actual charging time may vary based on battery capacity and discharge level.
- Remove Battery: Once the LED indicates a full charge, unplug the charger from the wall outlet and remove the fully charged battery.
The built-in CPU control provides over-charge and over-heat protection, ensuring the safety and longevity of your batteries.
6. Maintenance
- Cleaning: Disconnect the charger from the power source before cleaning. Use a soft, dry cloth to wipe the exterior of the charger. Do not use liquid cleaners or solvents.
- Storage: Store the charger in a cool, dry place away from direct sunlight and extreme temperatures. Ensure the AC plug is folded for compact storage.
- Battery Plates: Keep battery plates clean and free of debris to ensure proper contact with batteries.
7. Troubleshooting
- Charger Not Powering On:
- Ensure the charger is securely plugged into a working wall outlet.
- Check if the AC plug is fully unfolded and locked into position.
- Battery Not Charging:
- Verify that the correct battery plate is attached and securely connected to the charger.
- Ensure the battery is inserted correctly into the battery plate, making proper contact with the terminals.
- Confirm the battery is a compatible Li-ion type and not damaged.
- LED Indicator Not Working as Expected:
- Refer to the specific battery plate's instructions for expected LED behavior.
- If the issue persists after checking connections and battery, contact customer support.
8. Specifications
| Brand | DigiPower |
| Model Number | TC-500KFC |
| Input Voltage | 100-240 Volts AC |
| Charging Time | Approximately 1 Hour |
| Item Weight | 0.6 Pounds |
| Number of Ports | 2 (for battery and AC plug) |
| Color | Black |
9. Compatible Batteries and Cameras
The Digipower TC-500KFC Travel Charger is compatible with a wide range of digital camera batteries and models. Please ensure you use the correct dedicated battery plate for your specific battery.
Compatible Batteries:
- Kodak: KLIC-7005, KLIC-5000, KLIC-7001
- Casio: NP-20, NP-40
- Fuji: NP-40, NP60
- Digipower: BP-NP20, BP-CNP40, BP-NP40, BP-NP60, BP-KD71
Compatible Digital Cameras:
- Casio: EX-M2, EX-M20, EX-P505, EX-P505Pro, EX-P600Pro, EX-P700Pro, EX-S1, EX-S100, EX-S2, EX-S20, EX-S20U, EX-S2BU, EX-S2PW, EX-S3, EX-S500, EX-S600, EX-S770, EX-S880, EX-V8, EX-Z100, EX-Z1000, EX-Z1050, EX-Z1080, EX-Z1200, EX-Z200, EX-Z3, EX-Z30, EX-Z4U, EX-Z40, EX-Z5, EX-Z50, EX-Z500, EX-Z55, EX-Z57, EX-Z6, EX-Z60, EX-Z65, EX-Z600, EX-Z7, EX-Z70, EX-Z700, EX-Z75, EX-Z750, EX-Z77, EX-Z850
- Fuji: F402, F470, F480, F610, F650, F700, F710, F810, V10, Z1, Z3, Z5fd
- HP Photosmart: R717, R727, R742, R817, R818, R847, R927, R937, R967
- Kodak EasyShare: C763
- Pentax: A10, A20, A30, S, S4, S4i, S5i, S5Z, S6, S7, SV, Svi, T10, T20, T30, W10, W20, W30, WP, Wpi, X
- Panasonic Lumix: DMC-FX7, DMC-FX7K
- Samsung Digimax: I5, I6, I7, V700, V800
10. Warranty and Support
Warranty: The Digipower TC-500KFC Travel Charger comes with a 1-Year Limited Warranty from the date of purchase. This warranty covers manufacturing defects under normal use. Please retain your proof of purchase for warranty claims.
Customer Support: For technical assistance, troubleshooting, or warranty inquiries, please contact Digipower customer support through their official website or the retailer where the product was purchased. Please have your model number (TC-500KFC) and purchase information ready when contacting support.