
Eltako R12-100-24VDC
Contents
Instruction Manual
Eltako 24V DC Relay, Automatic, 10A, Normally Open, DIN Rail Mount
Model: R12-100-24VDC
1. Introduction
This manual provides essential information for the safe and efficient installation, operation, and maintenance of the Eltako R12-100-24VDC 24V DC Relay. Please read this manual thoroughly before using the product and retain it for future reference.
2. Safety Information
Always observe the following safety precautions to prevent injury or damage to the product:
- Ensure power is disconnected before installation or maintenance.
- Installation should only be performed by qualified personnel.
- Do not exceed the specified voltage and current ratings (24V DC coil, 10A/250V AC switching).
- Protect the device from moisture, dust, and extreme temperatures.
- Verify all connections are secure before applying power.
3. Product Overview
3.1 Description
The Eltako R12-100-24VDC is a compact, automatic 24V DC relay designed for DIN rail mounting. It features a normally open (NO) contact configuration, capable of switching up to 10 Amperes at 250 Volts AC. This relay is suitable for various control applications in electrical systems.
3.2 Features
- 24V DC Coil Voltage
- 10A Switching Capacity (250V AC)
- Normally Open (NO) Contact
- DIN Rail Mountable
- Automatic Operation Mode
- Compact Design
3.3 Components
The relay consists of a coil, a movable armature, and electrical contacts. The coil, when energized by 24V DC, creates a magnetic field that pulls the armature, closing the normally open contact.

Figure 1: Front view of the Eltako R12-100-24VDC relay. This image displays the main body of the relay, including the Eltako branding, model number R12-100, 16A 250V~ rating, and 24V=== coil voltage. The terminals for connection are visible at the top and bottom.
4. Installation
Follow these steps for proper installation:
- Disconnect Power: Ensure all power to the circuit is turned off at the main breaker before beginning installation.
- Mounting: Snap the relay onto a standard 35mm DIN rail. Ensure it is securely seated.
- Wiring the Coil (Control Circuit): Connect the 24V DC control voltage to the A1 (+) and A2 (-) terminals of the relay. Observe polarity.
- Wiring the Contacts (Load Circuit): Connect the load circuit to the normally open contacts (typically labeled 1 and 2 or similar, as indicated on the relay diagram). Ensure the load current does not exceed 10A and the voltage does not exceed 250V AC.
- Verify Connections: Double-check all wiring for correctness and secure connections.
- Restore Power: Once installation is complete and verified, restore power to the circuit.
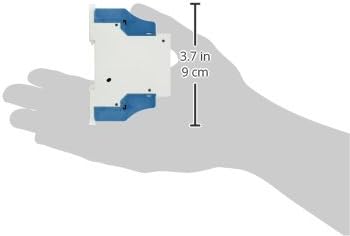
Figure 2: Side view of the Eltako R12-100-24VDC relay demonstrating its compact size. The image shows the relay held in a hand, with an overlay indicating its height as 3.7 inches (9 cm), illustrating its suitability for space-constrained DIN rail installations.
5. Operation
The Eltako R12-100-24VDC relay operates automatically based on the presence or absence of the 24V DC control voltage applied to its coil terminals (A1 and A2).
- Energizing the Coil: When 24V DC is applied to the coil, the relay will energize, causing the normally open (NO) contacts to close. This completes the load circuit, allowing current to flow to the connected device.
- De-energizing the Coil: When the 24V DC control voltage is removed from the coil, the relay will de-energize, and the normally open (NO) contacts will return to their open state. This breaks the load circuit, turning off the connected device.
The relay acts as a switch, controlled by a low-power DC signal to manage a higher-power AC load.
6. Maintenance
The Eltako R12-100-24VDC relay is designed for long-term, maintenance-free operation under normal conditions. However, periodic checks are recommended:
- Visual Inspection: Periodically inspect the relay and its connections for any signs of damage, discoloration, or loose wiring.
- Cleaning: If necessary, gently clean the exterior of the relay with a dry, soft cloth. Do not use liquid cleaners or solvents.
- Environmental Conditions: Ensure the operating environment remains within specified temperature and humidity ranges to prevent premature failure.
If any issues are observed, disconnect power immediately and consult a qualified electrician.
7. Troubleshooting
If the relay is not functioning as expected, consider the following:
| Problem | Possible Cause | Solution |
|---|---|---|
| Relay does not energize when 24V DC is applied. |
|
|
| Load does not turn on when relay energizes. |
|
|
| Relay makes clicking sound but load doesn't activate. |
|
|
If troubleshooting steps do not resolve the issue, contact a qualified electrician or Eltako customer support.
8. Specifications
| Attribute | Value |
|---|---|
| Model Number | R12-100-24VDC |
| Brand | Eltako |
| Coil Voltage | 24 Volts DC |
| Switching Capacity | 10 Amperes at 250 Volts AC |
| Contact Configuration | Normally Open (NO) |
| Operation Mode | Automatic |
| Mounting Type | DIN Rail Mount |
| Connector Type | Through Hole |
| Wattage | 1.9 watts |
| Item Weight | 3.2 ounces |
| Product Dimensions | 3.54 x 2.36 x 0.98 inches |
9. Warranty and Support
For warranty information or technical support regarding your Eltako R12-100-24VDC relay, please contact Eltako customer service or refer to the official Eltako website. Keep your purchase receipt for warranty claims.
Note: Unauthorized modifications or improper installation will void the product warranty.
Ask a question about this manual
Ask about setup, troubleshooting, compatibility, parts, safety, or missing instructions. Manuals+ will review the question and use this page’s manual context to help answer it.