1. Introduction
This user manual provides detailed instructions for the installation, operation, and maintenance of your HP W2007 20-inch Widescreen Flat Panel LCD Monitor. The HP W2007 is designed to deliver a clear and vibrant visual experience with its BrightView wide panel, 1680 x 1050 resolution, and support for High Bandwidth Digital Content Protection (HDCP). It features dual input capabilities for both digital (DVI-D) and analog (VGA) signals, offering versatility for various computing environments. Please read this manual thoroughly to ensure proper use and to maximize the performance of your monitor.

Figure 1.1: Front view of the HP W2007 20-inch Widescreen LCD Monitor, showcasing its design and display area.
2. Safety Information
- Ensure the monitor is placed on a stable, level surface to prevent accidental falls.
- Do not block ventilation openings. Proper airflow is essential to prevent overheating.
- Use only the power cord and adapter supplied with the monitor.
- Avoid exposing the monitor to moisture, rain, or extreme temperatures.
- Disconnect the power cord from the wall outlet before cleaning the monitor.
- Refer all servicing to qualified service personnel. Do not attempt to repair the monitor yourself.
3. Package Contents
Verify that all items are present in the package:
- HP W2007 20-inch Widescreen LCD Monitor
- Monitor Stand Base
- Power Cord
- VGA Cable (15-pin D-Sub)
- DVI-D Cable
- Audio Cable (if applicable for built-in speakers)
- Documentation (Quick Setup Guide, Warranty Information)
4. Setup
4.1 Assembling the Monitor Stand
- Carefully remove the monitor and stand components from the packaging.
- Place the monitor face down on a soft, clean cloth to prevent scratching the screen.
- Align the monitor stand base with the neck of the monitor.
- Secure the base to the monitor neck using the provided screw, typically located on the underside of the base. Tighten until firm.
- Gently lift the assembled monitor and place it upright on your desired stable surface.
4.2 Connecting the Monitor
The HP W2007 monitor supports both digital (DVI-D) and analog (VGA) video inputs. Choose the appropriate cable for your computer.
- Power Connection: Connect the power cord to the monitor's power input, then plug the other end into a grounded electrical outlet.
- Video Connection (DVI-D): Connect one end of the DVI-D cable to the DVI-D port on the monitor and the other end to the DVI-D port on your computer's graphics card.
- Video Connection (VGA): Alternatively, connect one end of the VGA cable to the VGA port on the monitor and the other end to the VGA port on your computer's graphics card.
- Audio Connection: If using the monitor's built-in speakers, connect the audio cable from your computer's audio output jack to the audio input jack on the monitor.

Figure 4.2.1: Rear view of the HP W2007 monitor, illustrating the location of the power, DVI-D, VGA, and audio input ports for connecting to a computer.
5. Operating Instructions
5.1 Powering On/Off
Press the power button, typically located on the front bezel of the monitor, to turn the monitor on or off. The power indicator light will illuminate when the monitor is on.
5.2 Using the On-Screen Display (OSD) Menu
The OSD menu allows you to adjust various monitor settings. Access the OSD menu using the buttons on the front panel.
- Press the Menu button to open the OSD menu.
- Use the + and - buttons to navigate through menu options.
- Press the Select button to confirm a selection or enter a sub-menu.
- Press the Menu button again to exit the OSD menu.
5.3 Adjusting Display Settings
Within the OSD menu, you can adjust settings such as:
- Brightness: Controls the overall luminance of the screen.
- Contrast: Adjusts the difference between the lightest and darkest areas of the image.
- Color: Fine-tune color temperature and individual RGB levels.
- My Display: Provides one-touch adjustment for brightness, color, and contrast.
- Quick View Modes: Allows for quick switching between predefined display settings optimized for different tasks (e.g., text, movie, gaming).
- Input Selection: Manually switch between DVI-D and VGA inputs if auto-detection does not occur.
5.4 Physical Adjustments and Features
- Tilt Adjustment: Gently tilt the monitor screen forward or backward to achieve your preferred viewing angle.
- Swivel Function: The monitor can be swiveled from side to side on its base, facilitating screen sharing or adjusting your viewing position.
- Easy Clip: Utilize the Easy Clip feature to attach photo holders, webcams, or other compatible accessories directly to the monitor.
6. Maintenance
6.1 Cleaning the Monitor
- Always unplug the monitor from the power outlet before cleaning.
- Use a soft, lint-free cloth lightly dampened with water or a non-abrasive screen cleaner.
- Do not spray cleaner directly onto the screen or into the monitor's vents.
- Wipe the screen and exterior surfaces gently. Avoid using harsh chemicals or abrasive materials.
6.2 Storage
If storing the monitor for an extended period, disconnect all cables and store it in a cool, dry place, preferably in its original packaging to protect it from dust and physical damage.
7. Troubleshooting
| Problem | Possible Cause | Solution |
|---|---|---|
| No image on screen | Monitor not powered on; video cable disconnected; incorrect input selected. | Ensure power cord is securely connected and monitor is turned on. Check video cable connections to both monitor and computer. Use the OSD menu to select the correct input source (DVI-D or VGA). |
| "No Signal" message | Video cable not connected or loose; computer not sending signal; incorrect input selected. | Verify video cable connections. Ensure computer is powered on and not in sleep mode. Manually select the correct input source via the OSD menu. |
| Image is blurry or distorted | Incorrect resolution; loose video cable; graphics driver issue. | Set the display resolution to 1680 x 1050. Ensure video cable is securely connected. Update your computer's graphics drivers. |
| Screen jiggles or wobbles | Unstable desk surface; loose stand connection. | Ensure the monitor is on a solid, stable desk. Check that the monitor stand base is securely attached to the monitor neck. |
| No audio from speakers | Audio cable disconnected; volume too low; incorrect audio output selected on computer. | Verify the audio cable connection between the computer and monitor. Adjust monitor volume via OSD. Check computer's audio settings to ensure output is directed to the monitor. |
8. Specifications
| Model Name | HP W2007 |
| Display Type | Thin-Film Transistor (TFT), Liquid Crystal Display (LCD), Active Matrix |
| Screen Size | 20 Inches (diagonal) |
| Native Resolution | 1680 x 1050 @ 60 Hz |
| Aspect Ratio | 16:10 (Widescreen) |
| Contrast Ratio | 1000:1 (typical) |
| Inputs | 1 x DVI-D (with HDCP support), 1 x VGA (15-pin D-Sub) |
| Color Support | 16.7 Million Colors |
| Dimensions (WxDxH) | 19.29 x 6.88 x 15.63 inches (49.0 x 17.5 x 39.7 cm) |
| Weight | 13 pounds (5.9 kg) |
| Color | Silver |
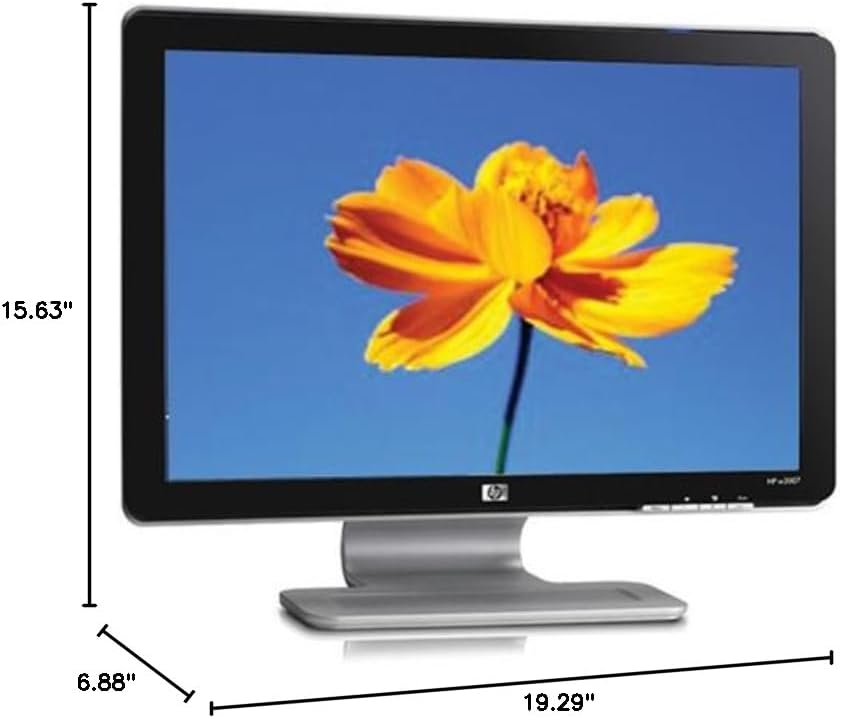
Figure 8.1: Diagram illustrating the physical dimensions of the HP W2007 monitor, including width, height, and depth.
9. Warranty and Support
For information regarding your product's warranty, please refer to the warranty card included in your original product packaging or visit the official HP support website. For technical assistance, driver downloads, or further support, please contact HP customer service or visit www.hp.com/support.