1. Introduction and Safety Information
This manual provides essential instructions for the safe and effective operation, maintenance, and troubleshooting of your Sealey SA2 Air Impact Wrench. Please read and understand all instructions before using the tool.
General Safety Warnings:
- Always wear appropriate personal protective equipment, including eye protection, hearing protection, and gloves.
- Ensure the air supply is disconnected before changing accessories, performing maintenance, or when the tool is not in use.
- Do not exceed the maximum operating pressure specified for the tool.
- Keep hands and clothing clear of moving parts.
- Use only genuine Sealey replacement parts and accessories.
- Maintain the tool in good working condition and check for damage before each use.

Figure 1: Sealey SA2 Air Impact Wrench. This image shows the overall design of the impact wrench, highlighting its robust construction and ergonomic grip.
2. Product Overview
The Sealey SA2 Air Impact Wrench is a powerful pneumatic tool designed for various fastening and loosening tasks in garage, tire shop, and general workshop environments. It features a durable rocking-dog hammer mechanism and a hardened impact anvil for reliable performance.
Key Features:
- Fitted with a standard 1/2" Sq drive anvil.
- Equipped with a robust rocking-dog hammer mechanism.
- Hardened impact anvil for extended durability.
- Four-position adjustable air/torque control.
- Reversible action for both tightening and loosening applications.
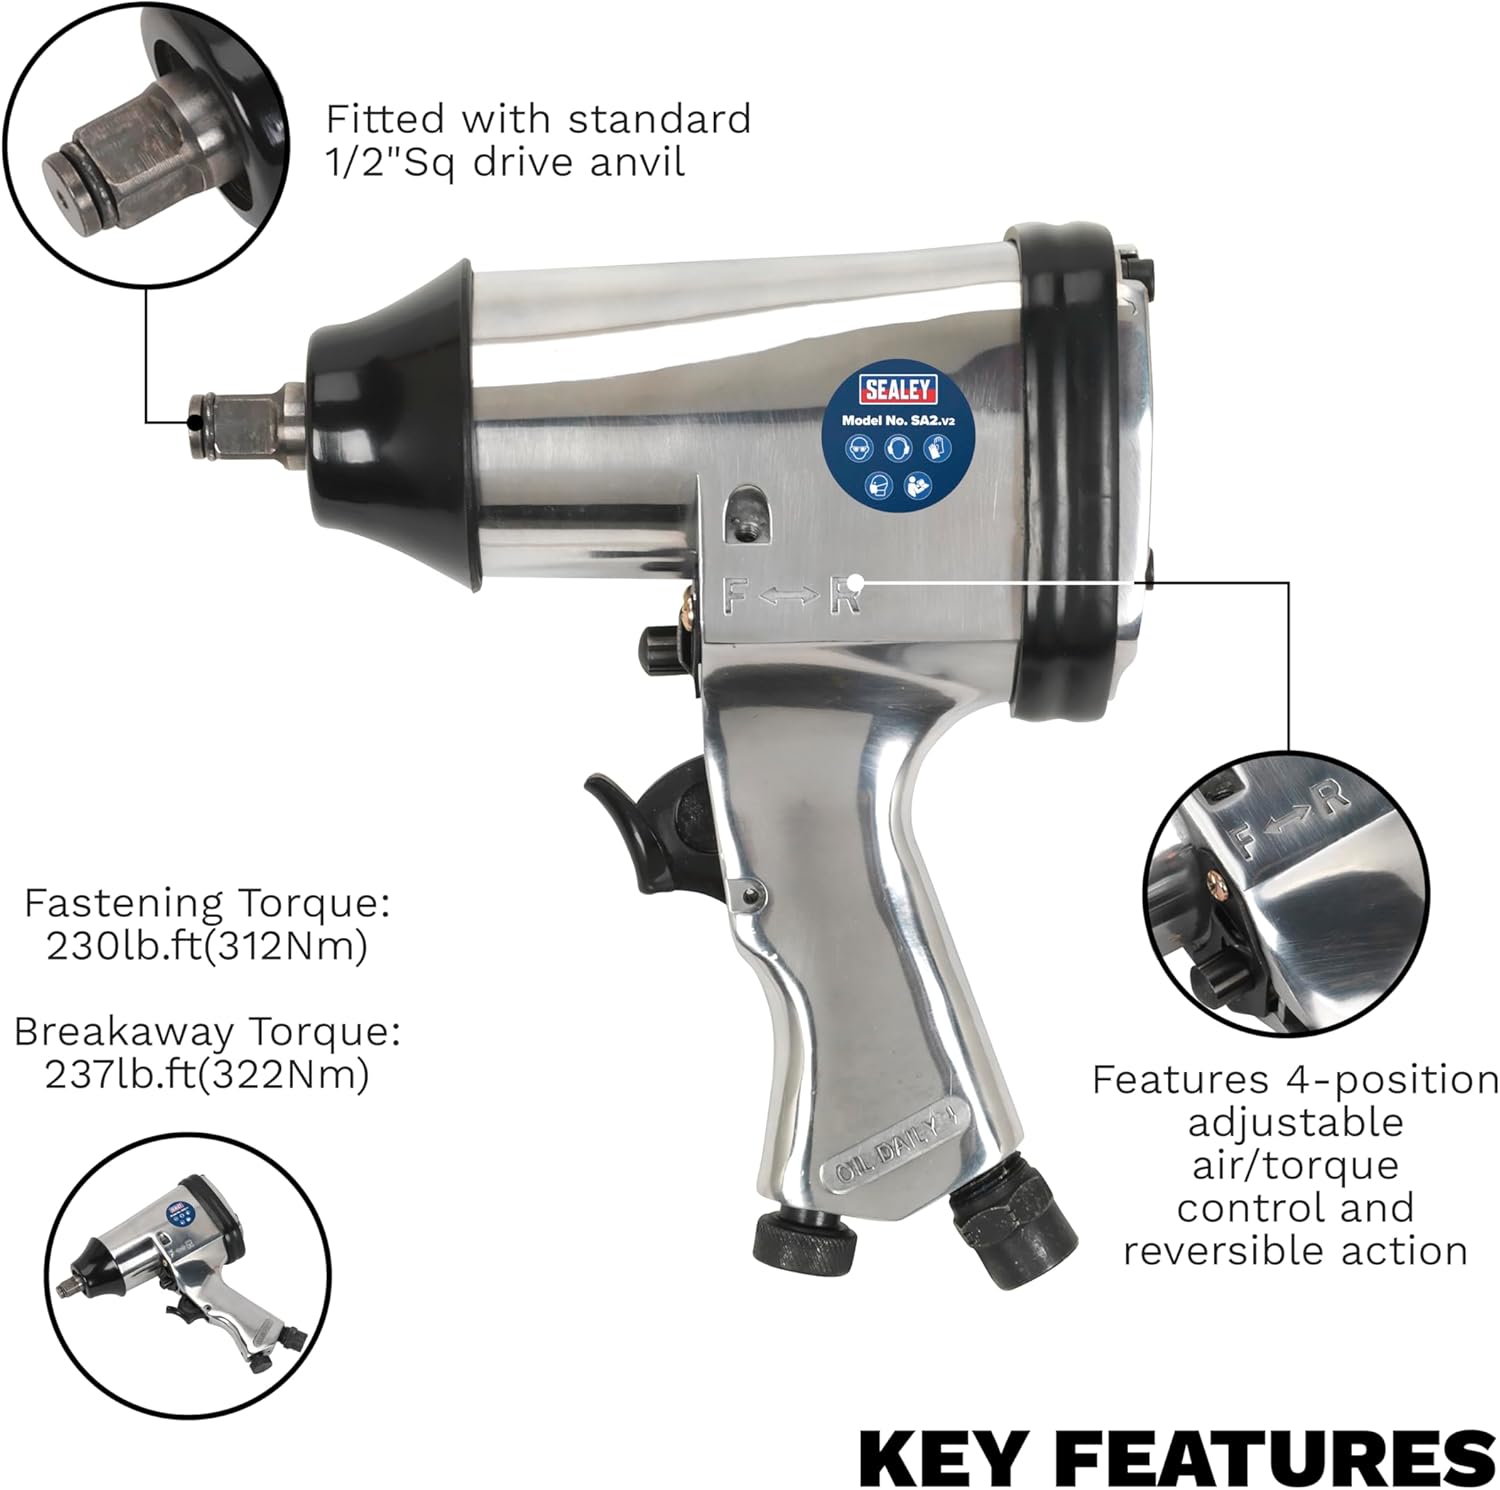
Figure 2: Key features of the Sealey SA2 Air Impact Wrench. This diagram illustrates the 1/2" Sq drive anvil, fastening and breakaway torque specifications, and the 4-position adjustable air/torque control with reversible action.
3. Setup
- Air Supply Connection: Connect the impact wrench to a clean, dry, regulated air supply. Ensure the air hose has an internal diameter of at least 3/8 inch (10 mm) and is fitted with a suitable quick-release coupling. The recommended operating pressure is 90 psi (6.2 bar).
- Lubrication: Before first use and daily thereafter, add a few drops of air tool oil into the air inlet. This is crucial for the longevity and performance of the tool. The tool is marked "OIL DAILY!" as a reminder.
- Initial Check: Before connecting to the air supply, ensure the trigger is not depressed. Once connected, briefly run the tool to confirm proper operation and lubrication.
- Socket Attachment: Select the appropriate 1/2" Sq drive impact socket for your application and firmly attach it to the anvil.
4. Operating Instructions
- Direction Selection: Use the F/R (Forward/Reverse) selector switch, typically located near the trigger, to choose the desired direction of rotation. "F" is for fastening (clockwise), and "R" is for loosening (counter-clockwise).
- Torque Adjustment: The tool features a four-position adjustable air/torque control. This allows you to regulate the power output for different applications. Start with a lower setting and increase as needed to prevent overtightening or damage to fasteners.
- Fastening:
- Set the direction to "F" (Forward).
- Place the socket firmly onto the fastener.
- Depress the trigger to operate the tool. Release the trigger to stop.
- For critical applications, always use a torque wrench to achieve the final specified torque.
- Loosening:
- Set the direction to "R" (Reverse).
- Place the socket firmly onto the fastener.
- Depress the trigger to operate the tool. Release the trigger to stop.
5. Maintenance
Regular maintenance ensures the longevity and optimal performance of your Sealey SA2 Air Impact Wrench.
- Daily Lubrication: Add a few drops of high-quality air tool oil into the air inlet before each use. This lubricates the internal components and prevents corrosion.
- Air Line Maintenance: Ensure your air compressor's drain valve is opened daily to release accumulated moisture. Regularly check and clean the air filter and lubricator (if installed) in your air supply system.
- General Cleaning: Keep the tool clean and free from debris. Wipe down the exterior with a clean cloth. Do not use solvents that may damage the rubber or plastic components.
- Inspection: Periodically inspect the tool for any signs of wear, damage, or loose fasteners. Pay close attention to the anvil, trigger, and air connections. Replace worn or damaged parts immediately.
- Storage: When not in use, store the impact wrench in a clean, dry, and secure location, away from direct sunlight and extreme temperatures.
6. Troubleshooting
If you encounter issues with your Sealey SA2 Air Impact Wrench, refer to the following common troubleshooting steps:
| Problem | Possible Cause | Solution |
|---|---|---|
| Tool not operating or low power |
|
|
| Air leaking from tool |
|
|
| Excessive vibration |
|
|
For issues not covered here, or if problems persist, please contact Sealey customer support or an authorized service center.
7. Specifications
| Specification | Value |
|---|---|
| Model No. | SA2 |
| Drive Size | 1/2" Sq |
| Working Torque | 200 lb.ft (271 Nm) |
| Fastening Torque | 230 lb.ft (312 Nm) |
| Breakaway Torque | 237 lb.ft (322 Nm) |
| Operation Mode | Pneumatic |
| Item Weight | 4.53 lbs (2.06 kg) |
| Material | Rubber (grip), Metal |
| Included Components | Air Impact Wrench 1/2"Sq Drive |
8. Warranty and Support
The Sealey SA2 Air Impact Wrench comes with a 1-Year Guarantee. This warranty covers defects in materials and workmanship under normal use. Please refer to the official Sealey website or your purchase documentation for full terms and conditions.

Figure 3: Sealey 1 Year Guarantee. This image indicates the product is covered by a one-year warranty, with terms and conditions applying.
For technical support, warranty claims, or to purchase genuine replacement parts, please contact Sealey customer service through their official channels. Always provide your product model number (SA2) and proof of purchase when seeking support.
Contact Information: Please visit the official Sealey website for the most up-to-date contact details and support resources.


