1. Introduction
This manual provides detailed instructions for the installation, operation, and maintenance of your KOHLER K-T197-CP Falling Water Wall-Mount Lavatory Faucet Trim. Please read all instructions thoroughly before beginning installation to ensure proper function and to prevent damage.
The KOHLER K-T197-CP features a distinctive wall-mount design with a single-control handle and a 10-1/4 inch spout, offering a modern aesthetic and reliable performance. Its solid brass construction ensures durability, and the KOHLER finish resists corrosion and tarnishing.
2. Safety Information
- Always turn off the main water supply before installing or servicing the faucet.
- Wear appropriate personal protective equipment, such as safety glasses, during installation.
- If you are unsure about any part of the installation process, consult a qualified plumber.
- Ensure all connections are secure to prevent leaks.
- Do not overtighten components, as this may cause damage.
3. Package Contents
Verify that all components are present before beginning installation:
- Falling Water Wall-Mount Lavatory Faucet Spout
- Single-Control Handle Assembly
- Mounting Hardware
- Instruction Manual (this document)
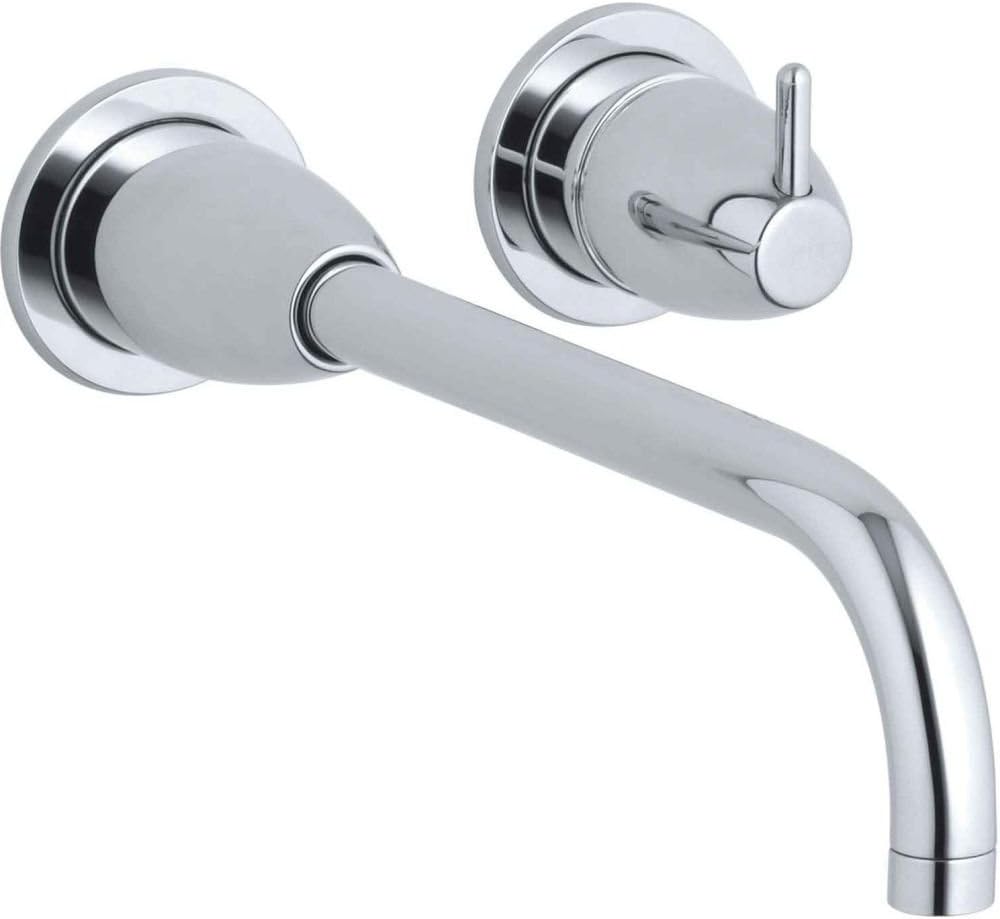
Image 3.1: The KOHLER K-T197-CP Falling Water Wall-Mount Lavatory Faucet Trim, featuring a polished chrome finish, a curved spout, and a single control handle.
4. Tools Required
The following tools are typically required for installation:
- Adjustable Wrench
- Phillips Head Screwdriver
- Flat Head Screwdriver
- Plumber's Putty or Silicone Sealant
- Thread Seal Tape (PTFE)
- Tape Measure
- Level
- Drill (with appropriate bits for wall material)
5. Setup and Installation
This faucet trim requires a wall-mount valve (sold separately). Install the wall-mount valve according to its specific installation guide before proceeding with the trim installation.
5.1 Rough-in Dimensions and Requirements
Refer to the technical drawings for precise rough-in dimensions and hole requirements. A finished wall is required for proper installation.
- One 1-7/8 inch (48 mm) diameter cutout hole is required for the spout.
- One 1-7/8 inch (48 mm) diameter cutout hole is required for the handle.
- Ensure adequate spacing between the hot and cold supply lines as indicated in the diagrams.
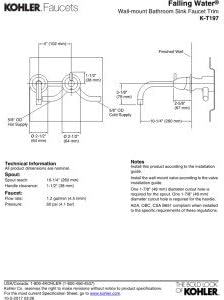
Image 5.1: Technical drawing illustrating the required dimensions and spacing for the wall-mount installation of the faucet trim, including the hot and cold water supply connections.
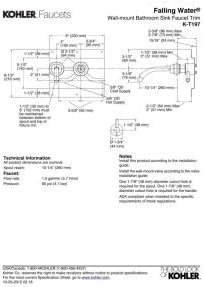
Image 5.2: Technical drawing providing additional detailed dimensions for the handle and spout components, crucial for accurate wall-mount positioning.
5.2 Trim Installation Steps
- Prepare the Wall: Ensure the finished wall surface is clean and dry. The rough-in valve should be securely installed and tested for leaks according to its own instructions.
- Install the Spout: Apply a bead of silicone sealant around the base of the spout where it meets the wall. Insert the spout into the designated wall opening, ensuring it is level. Secure the spout from behind the wall if necessary, following the valve's instructions.
- Install the Handle Assembly: Connect the handle assembly to the valve body according to the valve's instructions. Ensure the handle operates smoothly and the cartridge is properly seated. Apply sealant around the escutcheon if required.
- Connect Water Supplies: Ensure hot and cold water supply lines are correctly connected to the valve.
- Test for Leaks: Slowly turn on the main water supply. Check all connections for leaks. If leaks are detected, turn off the water, tighten connections, and retest.
- Flush the System: Remove the aerator from the spout. Turn on the water and let it run for a few minutes to flush out any debris from the supply lines. Turn off the water, reinstall the aerator, and tighten securely.
6. Operating Instructions
The KOHLER K-T197-CP features a single-control handle for both water flow and temperature adjustment.
- To Turn On/Off: Lift the handle to turn on the water. Push the handle down to turn off the water.
- To Adjust Water Flow: The further the handle is lifted, the greater the water flow.
- To Adjust Temperature: Rotate the handle left for hotter water and right for colder water.
7. Maintenance
Proper care and cleaning will maintain the finish and performance of your KOHLER faucet.
- Cleaning: Clean the faucet with a soft, damp cloth. Do not use abrasive cleaners, harsh chemicals, or scouring pads, as these can damage the finish.
- Aerator Maintenance: Periodically unscrew the aerator from the spout and rinse it to remove any mineral deposits or debris that may restrict water flow.
- Finish Protection: KOHLER finishes are designed to resist corrosion and tarnishing. Regular cleaning with mild soap and water is sufficient to maintain its appearance.
8. Troubleshooting
| Problem | Possible Cause | Solution |
|---|---|---|
| Low Water Flow | Clogged aerator; partially closed stopcock; debris in supply line. | Clean aerator; ensure stopcocks are fully open; flush supply lines. |
| Leaking at Connections | Loose connections; worn washers/O-rings. | Tighten connections; replace washers/O-rings if damaged. |
| Stiff Handle Operation | Cartridge not properly seated or installed with incorrect tension. | Refer to the valve installation guide to ensure the cartridge is correctly installed and tensioned. |
| Water Temperature Issues | Incorrect hot/cold supply connections; valve cartridge issue. | Verify supply line connections; consult valve manual for cartridge adjustment or replacement. |
9. Specifications
- Model: K-T197-CP
- Brand: Kohler
- Mounting Type: Wall Mount
- Finish: Polished Chrome (Brass base material)
- Material: Solid Brass construction
- Number of Handles: 1
- Hole Count: 2
- Special Feature: Falling Water Design
- Style: Modern
- Maximum Flow Rate: 1.5 Gallons Per Minute (GPM)
- Spout Reach: 10.25 Inches
- Handle Location: Wall-mount
- Spout Design: Waterfall
- Item Weight: 2.6 pounds
- Product Dimensions: 12.25 x 9.5 x 3.25 inches
- Certification: WaterSense
10. Warranty and Support
This KOHLER product is covered by a Lifetime Limited Warranty. This warranty covers defects in material and workmanship for the duration of the original consumer purchaser's ownership, provided the product is installed, used, and maintained according to the instructions in this manual.
For detailed warranty information, technical assistance, or replacement parts, please visit the official KOHLER website or contact KOHLER customer service directly. Contact information can typically be found on the KOHLER website or product packaging.


