
1. Introduction
This manual provides comprehensive instructions for the installation, operation, and maintenance of your SpeeCo S16100500 One-Way Lockable Gate Latch. This latch is specifically designed for securing gates in agricultural environments, such as ranches, pastures, and farms. It is compatible with round tube gates ranging from 1-5/8 inches to 2 inches in diameter. The one-way design facilitates easy, one-handed operation and contributes to preventing gate sagging and unwanted swinging.
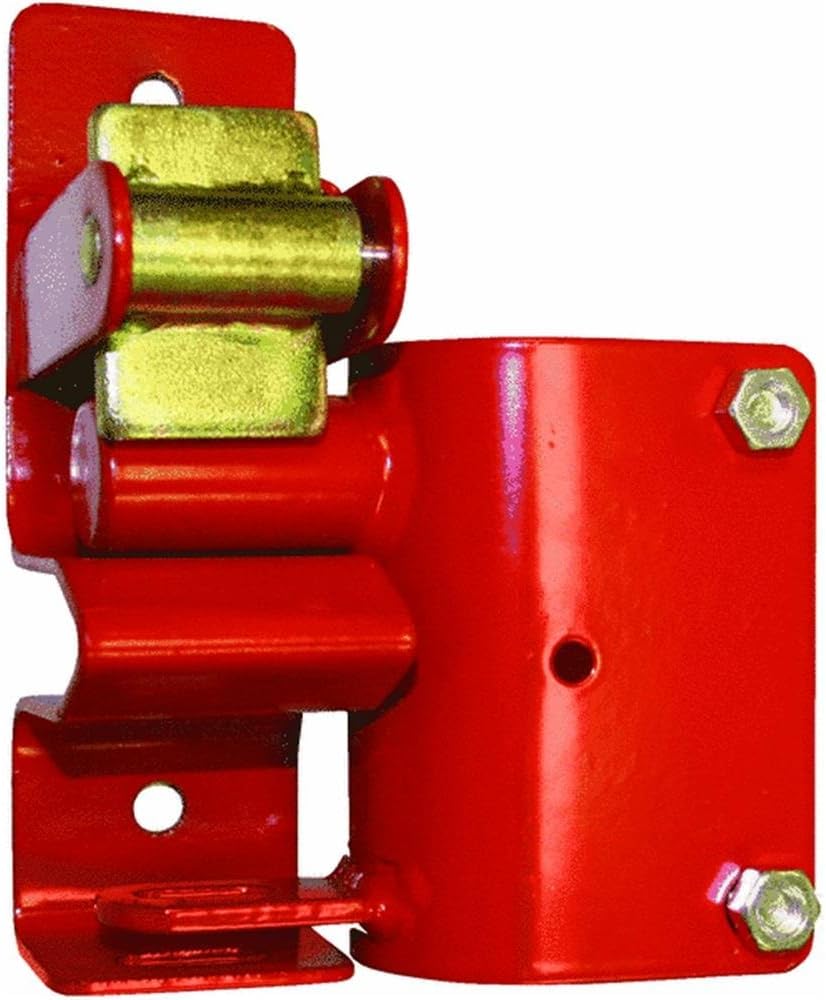
Image showing the SpeeCo S16100500 One-Way Lockable Gate Latch. The latch features a red alloy steel body with a gold-colored pivot mechanism and visible mounting holes for installation.
2. Safety Information
- Always wear appropriate personal protective equipment, including eye protection and gloves, during the installation process.
- Ensure that the gate and its supporting post are stable and securely anchored before proceeding with latch installation.
- Avoid overtightening fasteners, as this can lead to damage to the latch components or the mounting surface.
- Regularly inspect the latch for any signs of wear, damage, or corrosion. Replace any compromised components promptly to maintain optimal security and functionality.
3. Package Contents
Verify that all components are present before beginning installation:
- One (1) SpeeCo S16100500 One-Way Lockable Gate Latch (Red, Alloy Steel)
- Mounting hardware for the gate striker (nuts and bolts)
Note: Hardware required for attaching the main latch component to the fence post is not included and must be acquired separately, suitable for your specific post material and type.
4. Specifications
| Feature | Detail |
|---|---|
| Brand | SpeeCo |
| Model Number | S16100500 |
| Material | Alloy Steel |
| Color | Red |
| Lock Type | Padlock (lockable feature) |
| Dimensions (L x W x H) | 7.5 x 6 x 2.5 inches |
| Item Weight | 3 pounds |
| Gate Compatibility | Fits 1-5/8 to 2-inch round tube gates |
| Mounting Type | Plate Mount |
5. Setup and Installation
Follow these steps to properly install your gate latch:
- Identify Mounting Locations: Determine the optimal height and position on your gate and fence post for the latch and striker. Ensure the gate can swing freely and the latch will engage securely when closed.
- Attach Striker to Gate: Position the striker component on the gate's frame. Use the provided nuts and bolts to securely fasten the striker to the round tube gate. Ensure it is level and aligned with where the main latch body will be mounted on the post.
- Attach Latch Body to Post: Position the main latch body on the fence post. Mark the drilling points for the mounting holes. Drill appropriate pilot holes if necessary, depending on your post material (e.g., wood, metal). Secure the latch body to the post using suitable hardware (not included). Ensure the latch is firmly attached and does not wobble.
- Test Alignment and Operation: With both components installed, slowly close the gate to verify that the latch mechanism aligns correctly with the striker. The latch should engage smoothly and hold the gate firmly in the closed position without excessive play. Adjust the position of either component slightly if necessary to achieve optimal alignment.
6. Operating Instructions
- To Open the Gate: Simply lift the latch mechanism upwards. The ergonomic design allows for easy, one-handed operation, which is convenient when carrying items or riding.
- To Close the Gate: Push the gate shut. The latch is designed to automatically engage with the striker as the gate closes, securing it in place.
- To Lock the Gate: For enhanced security, a padlock (not included) can be inserted through the designated hole on the latch mechanism when the gate is closed. This prevents unauthorized opening.
7. Maintenance
Regular maintenance will ensure the longevity and reliable performance of your SpeeCo gate latch:
- Cleaning: Periodically clean the latch to remove accumulated dirt, dust, and debris. A damp cloth is usually sufficient. Avoid abrasive cleaners that could damage the finish.
- Lubrication: Apply a suitable lubricant (e.g., silicone spray or light grease) to the moving parts of the latch mechanism every few months, or more frequently in harsh environments, to ensure smooth operation.
- Hardware Inspection: Routinely inspect all mounting hardware for tightness and signs of corrosion. Tighten any loose bolts or screws. Replace corroded or damaged hardware immediately.
- Damage Check: Examine the latch body and components for any signs of wear, cracks, bends, or other damage. If significant damage is observed, the entire unit should be replaced to maintain security and functionality.
8. Troubleshooting
Here are solutions to common issues you might encounter:
- Issue: Latch does not engage smoothly or jams.
Solution: Check for any physical obstructions preventing the latch from moving freely. Ensure proper alignment between the latch body on the post and the striker on the gate. Apply lubricant to the moving parts. - Issue: Gate sags or swings excessively after latch installation.
Solution: While the latch is designed to help prevent sagging, ensure it is installed correctly and securely. Verify that the gate hinges are functioning properly and that the gate itself is not damaged or warped. The latch supports the gate, but cannot correct underlying structural issues. - Issue: Latch feels loose or insecure.
Solution: Inspect all mounting hardware for tightness. Tighten any loose bolts or screws on both the latch body and the striker. If the mounting surface (post or gate) is compromised, reinforce it or consider relocating the latch if possible.
9. Warranty and Support
For specific warranty information, product support, or to inquire about replacement parts, please refer to the documentation provided at the time of purchase or visit the official SpeeCo website. You may also contact SpeeCo customer service directly for assistance.