
1. Introduction
This manual provides essential instructions for the safe and effective use of the Max HN120 PowerLite Concrete Nailer. The HN120 is designed for attaching wood and metal materials to concrete and steel beams up to 3/8 inch thick. This tool offers a powerful alternative to powder-actuated nailers, requiring no special certification for operation.
Key features include an extremely powerful 186 ft-lbs driving energy, a unique tangle-free swivel fitting, and a lightweight design at approximately 6.4 pounds. The nailer comes with a plastic carry case for convenient transport and storage.
2. Safety Information
WARNING: Read and understand all safety warnings, instructions, illustrations, and specifications provided with this power tool. Failure to follow all instructions listed below may result in electric shock, fire, and/or serious injury.
- Always wear eye protection that conforms to ANSI Z87.1 and hearing protection when operating the nailer.
- Do not operate the nailer if you are tired or under the influence of drugs, alcohol, or medication.
- Keep children and bystanders away while operating a power tool. Distractions can cause you to lose control.
- Ensure the work area is well-lit and clear of obstructions.
- Never point the nailer at yourself or others.
- Disconnect the air supply before making adjustments, clearing jams, or servicing the tool.
- Use only fasteners recommended by the manufacturer for this tool.
- Do not overreach. Maintain proper footing and balance at all times.
- Inspect the tool before each use for damaged parts or loose components.
- Never use oxygen, combustible gases, or bottled gases as a power source for this tool.
3. Product Overview
The Max HN120 PowerLite Concrete Nailer is a robust tool designed for heavy-duty fastening applications. Familiarize yourself with its components before operation.
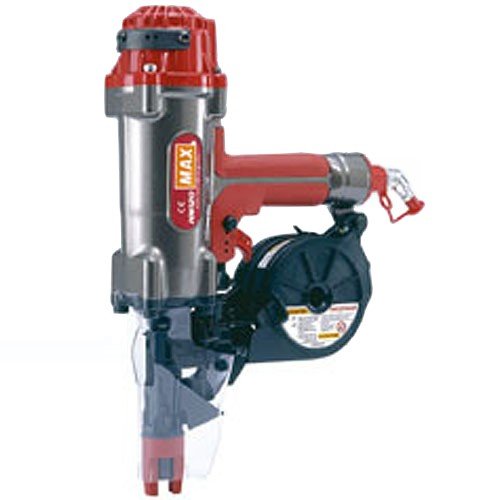
Image showing the Max HN120 PowerLite Concrete Nailer, a powerful tool designed for attaching wood and metal to concrete and steel beams.
Typical components include:
- Magazine: Holds the fasteners.
- Trigger: Activates the firing mechanism.
- Depth Adjustment: (If applicable) Controls the depth of fastener penetration.
- Air Inlet: Connection point for the air hose. Features a unique tangle-free swivel fitting.
- Nosepiece: Guides the fastener to the work surface.
- Handle: Ergonomic grip for user comfort and control.
4. Setup
4.1. Unpacking
Carefully remove the nailer and all accessories from the plastic carry case. Inspect the tool for any signs of damage that may have occurred during shipping. Do not operate a damaged tool.
4.2. Connecting to Air Supply
- Ensure your air compressor is capable of providing the required operating pressure (refer to specifications).
- Connect a suitable air hose to the nailer's air inlet. The HN120 features a tangle-free swivel fitting for ease of use.
- Ensure all connections are secure to prevent air leaks.
- Set the air compressor regulator to the recommended operating pressure. Do not exceed the maximum allowable pressure for the tool.
4.3. Loading Fasteners
- Disconnect the air supply before loading fasteners.
- Open the magazine according to the instructions specific to the HN120 model.
- Insert the appropriate fasteners into the magazine. Ensure they are correctly oriented and seated.
- Close the magazine securely.
- Reconnect the air supply.
5. Operating Instructions
5.1. Basic Operation
- Ensure all safety precautions are followed, including wearing appropriate personal protective equipment.
- Connect the nailer to the air supply and ensure the pressure is set correctly.
- Place the nosepiece of the nailer firmly against the work surface where the fastener is to be driven.
- Depress the trigger to drive the fastener.
- Release the trigger after each fastener is driven.
5.2. Driving Fasteners into Concrete and Steel
The HN120 is capable of driving fasteners into concrete and steel beams up to 3/8 inch thick. For optimal performance:
- Ensure the work surface is clean and free of debris.
- Apply firm, consistent pressure to the nailer against the material to prevent misfires or incomplete fastener penetration.
- Test on a scrap piece of material first to determine the correct air pressure and technique for your specific application.
- Avoid driving fasteners too close to the edge of the material to prevent splitting or cracking.
6. Maintenance
WARNING: Always disconnect the air supply before performing any maintenance or cleaning on the nailer.
6.1. Daily Maintenance
- Cleaning: Wipe down the exterior of the tool with a clean, dry cloth. Remove any dust or debris from the nosepiece and magazine area.
- Lubrication: Apply a few drops of pneumatic tool oil into the air inlet at the beginning of each workday or after every few hours of continuous use. Do not over-lubricate.
- Inspection: Check for loose screws, worn parts, or air leaks. Address any issues before operating the tool.
6.2. Storage
When not in use, store the Max HN120 PowerLite Concrete Nailer in its plastic carry case in a clean, dry environment, away from direct sunlight and extreme temperatures. Disconnect the air hose and ensure the tool is free of fasteners before storage.
7. Troubleshooting
This section addresses common issues you might encounter with your Max HN120 PowerLite Concrete Nailer.
| Problem | Possible Cause | Solution |
|---|---|---|
| Nailer does not fire or fires weakly |
|
|
| Fasteners not driven to full depth |
|
|
| Air leaks from tool |
|
|
For issues not listed above, or if solutions do not resolve the problem, contact an authorized Max service center.
8. Specifications
| Feature | Detail |
|---|---|
| Model | HN120 |
| Brand | Max |
| Driving Energy | 186 ft-lbs |
| Weight | Approximately 6.4 pounds |
| Material | Metal |
| Fastener Compatibility | Designed for concrete and steel beams up to 3/8 inch |
| Special Features | Unique tangle-free swivel fitting, plastic carry case included |
| Date First Available | January 1, 2007 |
9. Warranty & Support
For information regarding the product warranty, please refer to the warranty card included with your purchase or visit the official Max website. Keep your purchase receipt as proof of purchase for any warranty claims.
For technical support, service, or to order replacement parts, please contact Max customer service or an authorized service center. Contact details can typically be found on the manufacturer's website or in the documentation provided with the tool.


