Introduction
This manual provides essential information for the safe and effective operation, maintenance, and troubleshooting of your Factory-Reconditioned SKIL 2887-06-RT 3/8-Inch 18V Drill/Driver Kit. Please read this manual thoroughly before using the tool.
The SKIL 2887-06-RT is an 18V cordless drill/driver designed for various drilling and driving applications. It features a two-speed gearbox, a 25-position clutch, a single-sleeve chuck, and an integrated worklight. This kit includes two batteries, a 1-hour charger, and a carrying case.
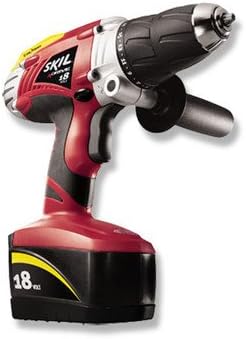
Image: The SKIL 2887-06-RT 3/8-Inch 18V Drill/Driver Kit, showing the red and black drill with an 18V battery attached, and a side handle.
Key Features:
- 18-volt power for extended run time.
- Removable stud finder for locating studs.
- High torque (0-400 RPM) and high speed (0-1,250 RPM) settings.
- Built-in worklight to illuminate the work area.
- Soft grip handle for comfortable use.
- Battery level indicator light.
- 25-position clutch for precise torque control.
Setup
- Battery Charging:
Before first use, fully charge the 18V battery. Insert the battery into the 1-hour charger. The charger indicator light will show the charging status. Ensure the battery is securely seated. Do not overcharge the battery; remove it once fully charged.
- Battery Installation:
Align the charged battery with the base of the drill handle and slide it in until it clicks securely into place. To remove, press the release buttons on the sides of the battery and slide it out.
- Bit Installation:
To install a drill bit or screwdriver bit, twist the chuck counter-clockwise to open the jaws. Insert the bit fully into the chuck, then twist the chuck clockwise to tighten the jaws securely around the bit. Ensure the bit is centered and firmly gripped.
- Attaching Side Handle (if applicable):
If your model includes a side handle, attach it by sliding it over the chuck housing and tightening it into position for improved control during high-torque applications.
Operating Instructions
1. Speed Selection:
The drill/driver features a two-speed gearbox. Use the speed selector switch located on top of the drill:
- Low Speed (0-400 RPM): Ideal for high-torque applications such as driving screws or drilling large diameter holes in wood or metal.
- High Speed (0-1,250 RPM): Suitable for fast drilling in softer materials or smaller diameter holes.
2. Clutch Setting:
The 25-position clutch allows you to adjust the torque output to prevent over-driving screws or damaging materials. Rotate the clutch collar to the desired setting:
- Lower numbers (1-5): For small screws or soft materials.
- Medium numbers (6-15): For medium screws or general drilling.
- Higher numbers (16-24): For large screws or hard materials.
- Drill symbol: For drilling applications, providing maximum torque without clutch slippage.
3. Forward/Reverse Switch:
The forward/reverse switch is located above the trigger. Push it to the left for forward rotation (drilling/driving) and to the right for reverse rotation (removing screws or backing out bits). Center position locks the trigger for safety.
4. Trigger and Worklight:
Squeeze the trigger to activate the drill. The integrated worklight will illuminate the work area when the trigger is pressed. The trigger is variable speed; apply more pressure for higher speed.
5. Using the Stud Finder:
The removable stud finder attachment helps locate studs behind drywall. Follow the instructions provided with the stud finder for accurate use. Once a stud is located, you can mark the position for drilling or fastening.
Maintenance
- Cleaning: Regularly clean the tool's ventilation openings to prevent dust and debris buildup, which can affect motor performance. Use a soft, dry cloth. Do not use water or chemical cleaners.
- Battery Care: Store batteries in a cool, dry place away from direct sunlight. Do not store fully discharged batteries for extended periods. Charge batteries before long-term storage and periodically during storage to maintain their life.
- Chuck Maintenance: Keep the chuck jaws clean and free of debris to ensure proper bit gripping.
- General Inspection: Periodically inspect the power cord of the charger for damage. Check all screws and fasteners on the tool for tightness.
Troubleshooting
| Problem | Possible Cause | Solution |
|---|---|---|
| Drill does not turn on. | Battery not charged or not properly inserted. Trigger lock engaged. | Charge battery fully and ensure it is clicked into place. Disengage the forward/reverse switch from the center (locked) position. |
| Battery not charging. | Charger not plugged in. Faulty battery or charger. | Ensure charger is securely plugged into a working outlet. Try another outlet. If problem persists, contact customer support for battery/charger replacement. |
| Drill lacks power or stops during use. | Battery low on charge. Overload protection activated. | Recharge the battery. Reduce pressure on the tool or use a lower speed/higher torque setting. Allow the tool to cool down if it has been used continuously. |
| Bit slips in chuck. | Chuck not tightened sufficiently. Bit shank is dirty or damaged. | Ensure the chuck is tightened firmly. Clean the bit shank. Replace damaged bits. |
Specifications
| Feature | Detail |
|---|---|
| Model Number | 2887-06-RT |
| Chuck Size | 3/8-Inch |
| Voltage | 18V |
| Speed (Low) | 0-400 RPM |
| Speed (High) | 0-1,250 RPM |
| Clutch Settings | 25 Positions + Drill Mode |
| Power Source | Battery Powered |
| Included Components | Drill/Driver, 2 Batteries, 1-Hour Charger, Case |
| Item Weight | 11.95 pounds |
| Package Dimensions | 15.9 x 14 x 4.6 inches |
| UPC | 039725024398 |
Warranty Information
Factory-Reconditioned SKIL products, including this 2887-06-RT Drill/Driver Kit, come with a One-year warranty. This warranty is provided through the SKIL factory or an authorized service center. Please retain your proof of purchase for warranty claims.
For detailed warranty terms and conditions, please refer to the documentation included with your product or contact SKIL customer support.
Support
For technical assistance, replacement parts, or service inquiries, please contact SKIL customer support. You can also visit the official SKIL website for additional resources and product information.
Visit the SKIL Store on Amazon for more products and information.


