
DeVilbiss 802342
DeVilbiss 802342 StartingLine HVLP Gravity Spray Gun Kit User Manual
Model: 802342 | Brand: DeVilbiss
Introduction
The DeVilbiss 802342 StartingLine HVLP Gravity Spray Gun Kit is a comprehensive system designed for auto painting and touch-up applications. This kit includes a full-size HVLP spray gun with a 1.3mm fluid tip, a mini HVLP detail gun with a 1.0mm fluid tip, an air adjusting valve, and a 1.8mm primer set-up. All components are conveniently organized within a durable molded case, providing a complete solution for various painting needs.
Safety Information
Always prioritize safety when operating spray painting equipment. Failure to follow safety guidelines can result in serious injury or property damage.
- Ventilation: Use in a well-ventilated area to prevent the accumulation of hazardous fumes. If adequate ventilation is not available, use appropriate respiratory protection.
- Personal Protective Equipment (PPE): Always wear appropriate PPE, including safety glasses or goggles, gloves, and a respirator suitable for paint fumes.
- Flammable Materials: Many paints and solvents are flammable. Keep away from open flames, sparks, and other ignition sources. Do not smoke while operating the spray gun.
- Pressure Safety: Never exceed the maximum recommended air pressure for the spray gun. Always release air pressure from the system before performing maintenance or cleaning.
- Chemical Exposure: This product can expose you to chemicals including lead, which is known to the State of California to cause cancer and birth defects or other reproductive harm. For more information go to www.P65Warnings.ca.gov.
- Electrical Safety: Ensure all electrical connections for air compressors or other equipment are properly grounded and in good condition.
- Children and Pets: Keep children and pets away from the work area and equipment.
Product Overview and Components
The DeVilbiss 802342 kit provides a versatile set of tools for various painting tasks. Familiarize yourself with the components before use.

Figure 1: DeVilbiss 802342 StartingLine HVLP Gravity Spray Gun Kit, showing the full-size HVLP spray gun, mini HVLP detail gun, air adjusting valve, and various cleaning accessories neatly organized in a molded case.
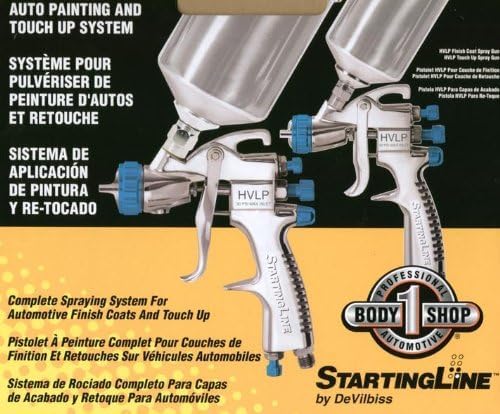
Figure 2: Contents of the DeVilbiss StartingLine Spray Gun Kit, including two spray guns, fluid cups, and cleaning tools.
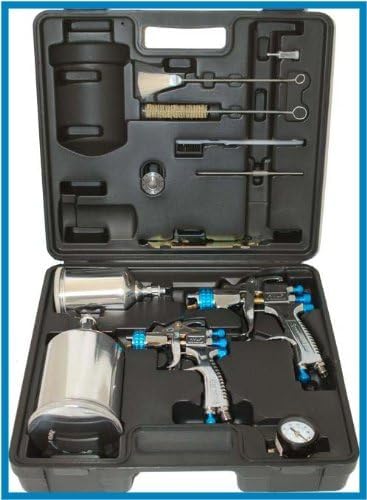
Figure 3: Another view of the DeVilbiss StartingLine Spray Gun Kit components, highlighting the full-size and mini spray guns along with accessories.
Kit Contents:
- Full-Size HVLP Gravity Spray Gun: Equipped with a 1.3mm fluid tip, suitable for general painting applications.
- Mini HVLP Detail Gun: Features a 1.0mm fluid tip, ideal for touch-ups and fine detail work.
- Air Adjusting Valve: For precise control over air pressure at the gun.
- 1.8mm Primer Set-up: An additional fluid tip and needle for spraying thicker materials like primers.
- Molded Case: Provides organized storage and protection for the kit components.
- Cleaning Accessories: Various brushes and tools for proper maintenance.
Setup
- Unpack Components: Carefully remove all items from the molded case and inspect for any damage.
- Select Fluid Tip: Choose the appropriate fluid tip (1.0mm, 1.3mm, or 1.8mm) based on the viscosity of the material you intend to spray. Ensure the corresponding needle and air cap are installed.
- Attach Fluid Cup: Securely attach the gravity-feed fluid cup to the top of the spray gun.
- Connect Air Supply: Connect the air adjusting valve to the spray gun's air inlet, then connect your air hose from the compressor to the air adjusting valve. Ensure all connections are tight to prevent air leaks.
- Initial Cleaning: Before first use, clean the spray gun thoroughly with an appropriate cleaning solvent to remove any manufacturing residues.
Operating Instructions
- Prepare Material: Mix and thin your paint or coating material according to the manufacturer's instructions. Strain the material to remove any particles that could clog the gun.
- Fill Fluid Cup: Pour the prepared material into the gravity-feed fluid cup. Do not overfill.
- Set Air Pressure: With the air adjusting valve, set the air pressure at the gun to the recommended PSI for your material. For HVLP guns, this is typically between 10-30 PSI (Maximum Pressure: 30 PSI).
- Adjust Spray Pattern:
- Fan Control Knob: Adjust this knob to change the width of the spray pattern, from a narrow round pattern to a wide fan.
- Fluid Control Knob: Controls the amount of material flowing through the gun. Turn clockwise to decrease flow, counter-clockwise to increase.
- Test Spray: Always perform a test spray on a piece of scrap material to verify the spray pattern and material atomization before applying to your actual workpiece. Adjust settings as needed.
- Spraying Technique:
- Maintain a consistent distance (typically 6-8 inches) from the surface.
- Move the gun at a steady, even speed, overlapping each pass by about 50%.
- Trigger the gun fully at the beginning of each pass and release at the end to avoid excessive material buildup.
Maintenance
Proper cleaning and maintenance are essential for the longevity and optimal performance of your spray guns.
- Immediate Cleaning: Clean the spray gun immediately after each use. Do not allow paint to dry inside the gun.
- Empty Fluid Cup: Empty any remaining material from the fluid cup.
- Flush Gun: Pour a small amount of appropriate cleaning solvent into the cup and spray it through the gun until clear solvent emerges.
- Disassemble and Clean:
- Remove the air cap, fluid tip, and needle.
- Use the provided cleaning brushes and solvent to thoroughly clean all internal and external parts. Pay special attention to the air cap holes and fluid passages.
- Do not use metal objects to clean the fluid tip or air cap holes, as this can damage them.
- Lubrication: Lightly lubricate the needle packing and air valve packing with a non-silicone lubricant designed for spray guns.
- Reassembly and Storage: Reassemble the gun carefully. Store the clean and dry spray gun in its molded case to protect it from dust and damage.
Troubleshooting
This section addresses common issues you might encounter and provides potential solutions.
| Problem | Possible Cause | Solution |
|---|---|---|
| Pulsating Spray / Inconsistent Flow |
|
|
| Poor Atomization / Orange Peel Finish |
|
|
| Fan Pattern Distorted (Heavy Top/Bottom) |
|
|
| Leaks from Fluid Tip |
|
|
Specifications
| Feature | Detail |
|---|---|
| Brand | DeVilbiss |
| Model Name | StartingLine |
| Item Model Number | 802342 |
| Product Type | Auto Accessory / HVLP Gravity Spray Gun Kit |
| Fluid Tip Sizes Included | 1.0mm (Mini Gun), 1.3mm (Full-Size Gun), 1.8mm (Primer Set-up) |
| Maximum Pressure | 30 PSI (Pound per Square Inch) |
| Power Source | External Air Compressor |
| Item Weight | 5.01 Pounds (approx. 2.27 kg) |
| Package Dimensions | 12.19 L x 30 W x 31.6 H (Cm) |
| Material | Solid construction (chrome finish) |
| Recommended Uses | Painting (Automotive Finish Coats and Touch Up) |
| Origin | Made In Taiwan |
Warranty and Support
For detailed warranty information, technical support, or to purchase replacement parts, please refer to the official DeVilbiss website or contact their customer service.
An official Installation Manual (PDF) is available for further reference:
Related documents802342


Ask a question about this manual
Ask about setup, troubleshooting, compatibility, parts, safety, or missing instructions. Manuals+ will review the question and use this page’s manual context to help answer it.