1. Introduction
This manual provides essential information for the safe and efficient operation of your Singer Tiny Tailor Mending Sewing Machine, Model TT600. Designed for quick mending tasks, this compact and portable machine offers a durable lockstitch for various fabric repairs.

Image 1.1: The Singer Tiny Tailor Mending Sewing Machine shown in its original packaging. This image provides a general overview of the product as it appears when unboxed.
2. Safety Instructions
Please read all instructions before using this appliance to reduce the risk of fire, electric shock, or injury to persons.
- Always unplug the machine from the electrical outlet immediately after using and before cleaning, making any adjustments, or removing/attaching any parts.
- Do not operate the machine with a damaged cord or plug, or if it has been dropped or damaged.
- Keep fingers away from all moving parts. Special care is required around the sewing machine needle.
- Use only attachments recommended by the manufacturer.
- Never drop or insert any object into any opening.
- Do not use outdoors.
- Do not operate where aerosol (spray) products are being used or where oxygen is being administered.
3. Package Contents
Verify that all items are present in the package:
- Singer Tiny Tailor Mending Sewing Machine (Model TT600)
- Foot Control
- Power Adapter
- Extra Needle
- Bobbins (pre-wound or empty)
- Needle Threader
- Seam Opener/Thread Trimmer
- Instruction Manual (this document)
4. Parts Identification
Familiarize yourself with the components of your sewing machine:
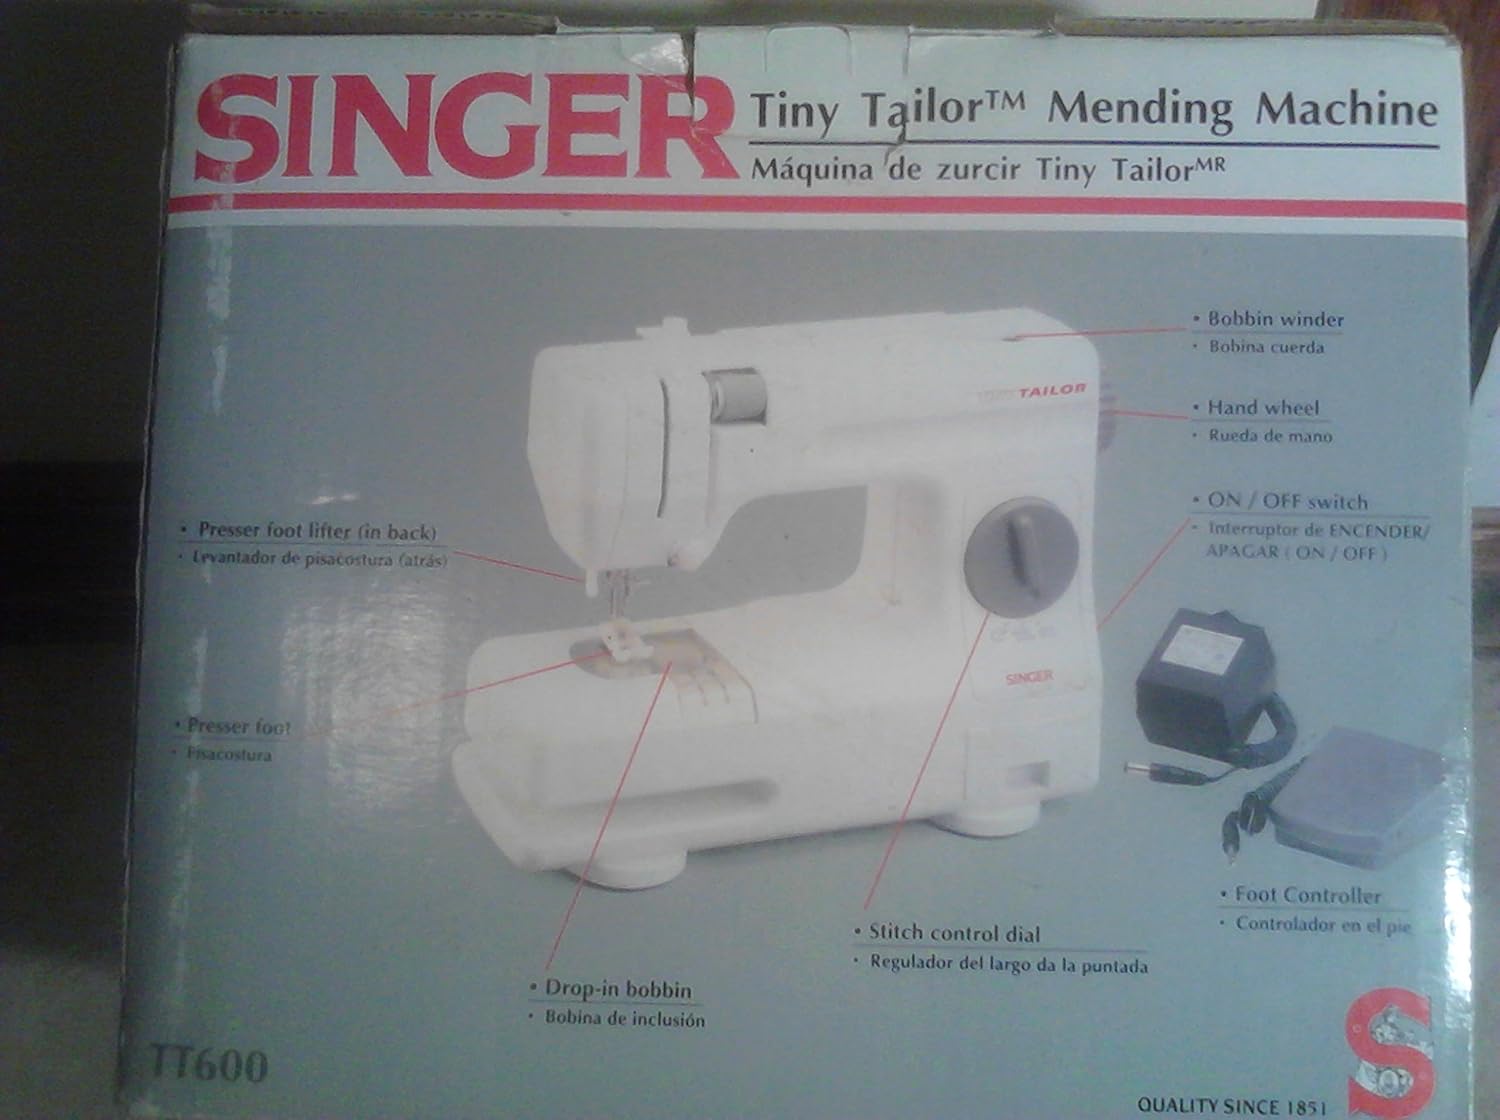
Image 4.1: Diagram illustrating the key parts of the Singer Tiny Tailor Mending Sewing Machine, including the bobbin winder, hand wheel, ON/OFF switch, presser foot lifter, presser foot, drop-in bobbin, stitch control dial, and foot controller.
- Bobbin Winder: Used to wind thread onto bobbins.
- Hand Wheel: Manually raises and lowers the needle.
- ON/OFF Switch: Powers the machine on or off.
- Presser Foot Lifter: Raises and lowers the presser foot.
- Presser Foot: Holds fabric firmly in place while sewing.
- Drop-in Bobbin: Easy access bobbin system.
- Stitch Control Dial: Adjusts the length of the stitch.
- Foot Controller: Controls the sewing speed, freeing hands for fabric guidance.
5. Setup
5.1 Power Connection
- Ensure the ON/OFF switch is in the "OFF" position.
- Insert the power adapter plug into the machine's power jack.
- Plug the power adapter into a standard electrical outlet.
5.2 Foot Control Connection
- Locate the foot control jack on the machine.
- Insert the foot control plug firmly into the jack.
5.3 Winding the Bobbin
- Place a spool of thread on the spool pin.
- Guide the thread through the tension disc for bobbin winding.
- Place an empty bobbin onto the bobbin winder spindle.
- Wrap the thread around the bobbin a few times, then push the bobbin winder spindle to the right.
- Turn on the machine and gently press the foot control until the bobbin is sufficiently wound.
- Push the bobbin winder spindle back to the left and trim the thread.
5.4 Inserting the Drop-in Bobbin
- Open the bobbin cover plate.
- Insert the wound bobbin into the bobbin case, ensuring the thread unwinds in the correct direction (usually counter-clockwise).
- Guide the bobbin thread through the tension spring and into the thread guide slot.
- Close the bobbin cover plate.
5.5 Threading the Upper Thread
- Raise the presser foot lifter.
- Place a spool of thread on the spool pin.
- Guide the thread through the upper thread guides and tension discs as indicated by the machine's markings.
- Thread the needle from front to back using the needle threader or manually.
- Pull about 6 inches of thread through the needle eye.
5.6 Bringing Up the Bobbin Thread
- Hold the upper thread lightly with your left hand.
- Turn the hand wheel towards you to lower the needle into the needle plate and then raise it again.
- The needle thread will catch the bobbin thread, forming a loop.
- Pull the loop to bring the bobbin thread up through the needle plate opening.
- Pull both upper and bobbin threads under the presser foot and towards the back of the machine.
6. Operating the Machine
6.1 Basic Stitching
- Place the fabric under the presser foot, aligning the edge with a seam guide if available.
- Lower the presser foot using the presser foot lifter.
- Turn on the machine using the ON/OFF switch.
- Gently press the foot control to start sewing. The harder you press, the faster the machine will sew.
- Guide the fabric gently with both hands, ensuring it feeds evenly. Do not pull or push the fabric forcefully.
- To stop sewing, release the foot control.
- Raise the needle to its highest position by turning the hand wheel.
- Raise the presser foot and pull the fabric away from the machine.
- Trim the threads using the seam opener/thread trimmer or scissors.
6.2 Adjusting Stitch Length
The Stitch Control Dial allows you to adjust the length of your stitches. Turn the dial to select the desired stitch length. Experiment on scrap fabric to find the appropriate setting for your project.
6.3 Mending Techniques
The Tiny Tailor is ideal for quick mending. For tears, align the edges of the fabric and stitch across the tear, overlapping the stitches slightly for reinforcement. For seams, simply stitch along the original seam line. For delicate fabrics, use a finer needle and thread and a shorter stitch length.
7. Maintenance
7.1 Cleaning
Regular cleaning helps maintain your machine's performance:
- Always unplug the machine before cleaning.
- Use a soft brush or lint brush to remove lint and dust from the bobbin area and under the needle plate.
- Wipe the exterior of the machine with a soft, dry cloth. Do not use liquid cleaners or harsh chemicals.
7.2 Needle Replacement
Replace the needle regularly, especially if it becomes bent, dull, or if you experience skipped stitches or thread breakage.
- Ensure the machine is unplugged.
- Loosen the needle clamp screw.
- Remove the old needle.
- Insert a new needle with the flat side facing the back of the machine, pushing it up as far as it will go.
- Tighten the needle clamp screw securely.
8. Troubleshooting
| Problem | Possible Cause | Solution |
|---|---|---|
| Machine not turning on | Power cord not plugged in; ON/OFF switch off. | Check power connections; ensure switch is ON. |
| Skipped stitches | Bent or dull needle; incorrect needle size; improper threading. | Replace needle; ensure correct needle for fabric; re-thread machine. |
| Thread breakage | Incorrect tension; poor quality thread; needle bent or dull; improper threading. | Adjust tension; use good quality thread; replace needle; re-thread machine. |
| Fabric not feeding | Presser foot not lowered; lint under needle plate. | Lower presser foot; clean bobbin area. |
| Bobbin thread tangling | Improper bobbin insertion; incorrect bobbin winding. | Re-insert bobbin correctly; re-wind bobbin evenly. |
9. Specifications
| Model Number | TT600 |
| Brand | SINGER |
| ASIN | B000KGIHVI |
| UPC | 037431203144 |
| Color | White |
| Is Electric | Yes |
| Batteries Required | No |
| Item Weight | 6.05 pounds |
| Package Dimensions | 13.4 x 10.3 x 8.5 inches |
10. Warranty and Support
For warranty information, product registration, or technical support, please refer to the official SINGER website or contact their customer service directly. Keep your purchase receipt as proof of purchase.
Note: Specific warranty terms may vary by region and retailer.


