Introduction
This instruction manual provides detailed guidance for the installation and maintenance of the E-Flite Main Frame Set, designed for use with Blade CX, CX2, and CX3 remote-controlled helicopters. Proper installation ensures optimal performance and longevity of your RC helicopter.
Product Overview
The E-Flite Main Frame Set (EFLH1254) is a critical structural component for Blade CX series helicopters. It provides the primary mounting points for the motor, servos, landing gear, and other essential components. The set typically includes the main frame chassis and associated small parts required for assembly.
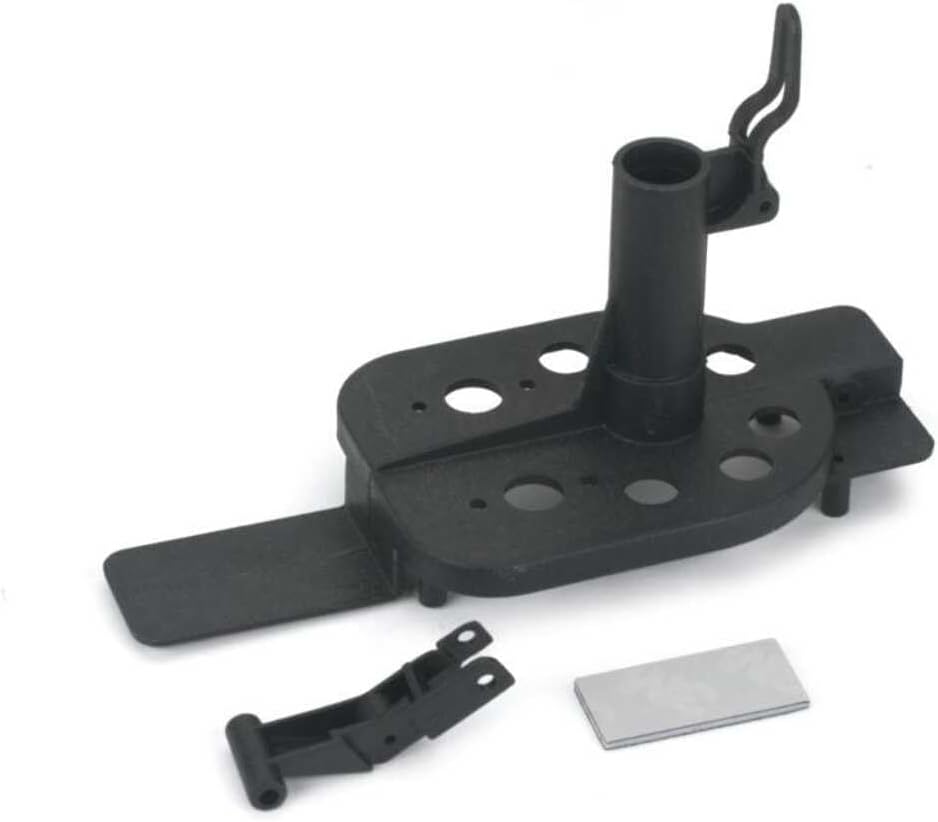
Figure 1: Components of the E-Flite Main Frame Set. This image displays the primary black plastic main frame, a smaller black plastic component (likely a landing skid mount or similar), and a small rectangular adhesive pad. These parts form the structural core for the Blade CX series helicopters.
Setup and Installation
Before beginning installation, ensure your workspace is clean and organized. Refer to your helicopter's original manual for specific disassembly instructions if replacing an existing frame.
- Disassembly: Carefully remove all components from the old main frame, including motors, servos, circuit board, battery tray, and landing gear. Keep track of all screws and small parts.
- Component Transfer: Begin transferring components to the new E-Flite Main Frame.
- Motors: Mount the main motors securely into their designated slots on the new frame. Ensure wiring is routed correctly and not pinched.
- Servos: Install the servos into their respective positions. Connect the pushrods to the swashplate and servo horns.
- Circuit Board: Attach the main control board to the frame using the appropriate mounting hardware. Ensure all connections (motors, servos, battery) are correctly made.
- Battery Tray: Secure the battery tray to the underside of the frame.
- Landing Gear: Attach the landing skids to the designated mounting points on the frame.
- Rotor Head Assembly: Reattach the main shaft and rotor head assembly to the top of the main frame. Ensure all linkages are free-moving and correctly aligned.
- Final Checks: Before powering on, double-check all screw connections for tightness. Verify that all wires are clear of moving parts and that components are securely mounted.
Post-Installation Checks
After completing the installation, perform the following checks to ensure proper function:
- Power On Test: Connect the battery and power on the helicopter. Observe for any unusual noises or vibrations.
- Control Surface Check: Test all control inputs (elevator, aileron, rudder, throttle) to ensure servos respond correctly and smoothly.
- Rotor Blade Clearance: Confirm that rotor blades have adequate clearance from the frame and other components.
- Balance Check: Ensure the helicopter feels balanced. An unbalanced helicopter can lead to unstable flight.
Maintenance
Regular maintenance of your helicopter's main frame can extend its lifespan and ensure consistent performance.
- Visual Inspection: Periodically inspect the main frame for cracks, stress marks, or deformation, especially after hard landings.
- Screw Tightness: Check all screws securing components to the frame. Vibrations during flight can cause screws to loosen over time.
- Cleaning: Keep the frame clean from dirt, dust, and debris, which can accumulate and affect component function. Use a soft brush or compressed air.
Troubleshooting
If you encounter issues after installing the new main frame, consider the following:
- Unusual Vibrations:
- Check for loose screws on motors or other components.
- Ensure main shaft is straight and not bent.
- Verify rotor blades are balanced and undamaged.
- Controls Not Responding:
- Confirm all servo connections to the circuit board are secure.
- Check pushrod connections to servos and swashplate.
- Ensure battery is fully charged and connected.
- Frame Damage After Minor Impact:
- While the frame is designed for durability, severe impacts can cause damage. Inspect for cracks, especially around mounting points. Replace if structural integrity is compromised.
Specifications
- Product Name: E-Flite Main Frame Set
- Model Compatibility: Blade CX, Blade CX2, Blade CX3
- Part Number: EFLH1254
- Product Dimensions: 3.7 x 1.8 x 0.7 inches
- Item Weight: 0.319 ounces
- Manufacturer: E-flite
Warranty and Support
E-flite products are manufactured to high standards. For specific warranty information or technical support, please refer to the official E-flite website or contact their customer service directly. Keep your purchase receipt as proof of purchase.
For further assistance, visit the E-flite Store on Amazon.


