1. Introduction
This instruction manual provides essential information for the proper installation, operation, and maintenance of the Cometic C7201-EST Hi-Performance ATV Gasket/Seal set. Designed for professionals and enthusiasts, this set ensures a reliable seal for high-performance ATV engines. Please read this manual thoroughly before proceeding with any installation or maintenance.
2. Product Overview
The Cometic C7201-EST is a comprehensive gasket and seal kit specifically engineered for ATV applications. Each component in this set is manufactured to precise specifications, ensuring optimal sealing and durability in demanding conditions. This kit is suitable for both high-performance machine builds and as an original equipment (OE) replacement.
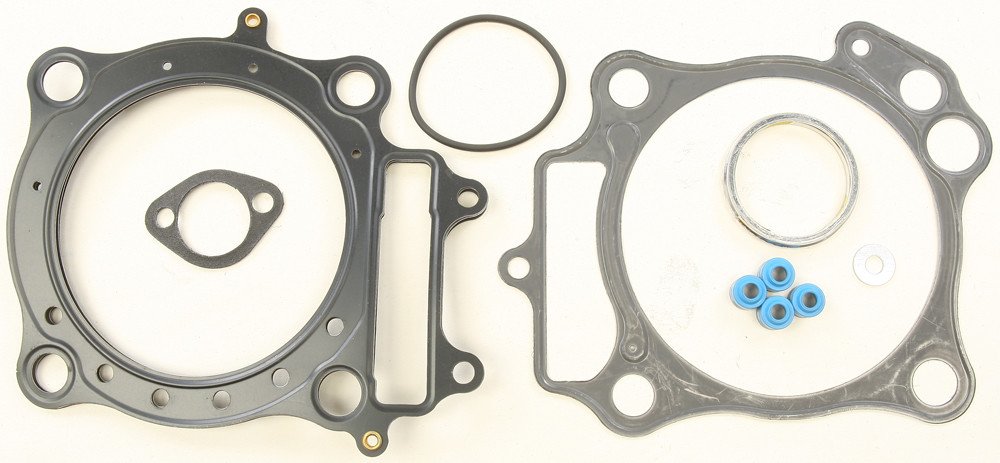
Figure 2.1: The Cometic C7201-EST Hi-Performance ATV Gasket/Seal set, showing various gaskets and seals for engine components.
The set typically includes head gaskets, base gaskets, exhaust gaskets, valve stem seals, and various O-rings, providing all necessary sealing components for a complete engine rebuild or top-end service for one application.
3. Safety Information
Always prioritize safety when working with engine components. Failure to follow safety precautions can result in injury or damage to the vehicle.
- Wear appropriate personal protective equipment (PPE), including safety glasses and gloves.
- Ensure the engine is cool before beginning work.
- Disconnect the battery to prevent accidental starting.
- Work in a well-ventilated area.
- Refer to your ATV's service manual for specific torque specifications and disassembly/assembly procedures.
- Keep all parts clean and free of debris during installation.
4. Installation (Setup)
Proper installation is crucial for the longevity and performance of your gaskets. This section provides general guidelines; always consult your specific ATV's service manual for detailed instructions.
- Preparation:
- Thoroughly clean all mating surfaces on the engine block, cylinder head, and other components. Remove all old gasket material, carbon deposits, and oil residue.
- Inspect surfaces for nicks, scratches, or warpage. Any imperfections can compromise the seal.
- Ensure all bolt holes are clean and free of debris.
- Gasket Placement:
- Carefully align and place each gasket onto its respective component. Ensure correct orientation.
- Do not use any sealants or adhesives unless specifically recommended by the engine manufacturer or Cometic. Cometic gaskets are designed to seal dry.
- Assembly and Torque:
- Reassemble engine components according to your ATV's service manual.
- Use a calibrated torque wrench to tighten all fasteners to the manufacturer's specified torque values and sequence. Incorrect torque can lead to gasket failure or component damage.
- Pay particular attention to cylinder head bolts, tightening them in stages and in the correct pattern.
- Final Checks:
- Double-check all connections and ensure no tools or foreign objects are left in the engine bay.
- Refill all necessary fluids (oil, coolant) to the correct levels.
5. Initial Operation and Break-in
After gasket installation, a proper break-in procedure is recommended to ensure optimal sealing and engine longevity.
- First Start: Start the engine and allow it to reach operating temperature. Monitor for any leaks (oil, coolant, exhaust) or unusual noises.
- Initial Run: Avoid sustained high RPMs or heavy loads for the first few hours of operation. Vary engine speed and load to help components seat properly.
- Re-torque (if applicable): Some engine manufacturers recommend re-torquing cylinder head bolts after the first heat cycle. Consult your ATV's service manual.
- Fluid Levels: Regularly check fluid levels (oil, coolant) during the initial break-in period and top up as needed.
6. Maintenance
While gaskets are designed for long-term sealing, regular engine maintenance contributes to their lifespan and overall engine health.
- Periodically inspect the engine for any signs of fluid leaks around gasketed areas.
- Maintain proper engine cooling system function to prevent overheating, which can damage gaskets.
- Ensure engine oil and coolant are changed according to the manufacturer's recommendations.
7. Troubleshooting
If you experience issues after gasket installation, consider the following common problems and their potential causes:
| Problem | Possible Cause | Solution |
|---|---|---|
| Fluid Leak (Oil/Coolant) | Improper surface preparation, incorrect torque, damaged gasket during installation, warped mating surface. | Re-inspect surfaces, re-torque bolts (if applicable), replace gasket if damaged, machine or replace warped components. |
| Exhaust Leak | Improper exhaust gasket installation, loose exhaust bolts, damaged exhaust flange. | Check gasket alignment, tighten exhaust bolts, inspect and repair exhaust components. |
| Engine Overheating | Head gasket failure (rare if installed correctly), air in cooling system, other cooling system issues. | Check for coolant leaks, bleed cooling system, diagnose cooling system components. |
If issues persist, it is recommended to consult a qualified mechanic or contact Cometic customer support.
8. Specifications
Key specifications for the Cometic C7201-EST Hi-Performance ATV Gasket/Seal set:
- Model: C7201-EST
- Brand: COMETIC
- Material: 100% Cometic proprietary materials
- Color: Black (gaskets), various for seals
- Item Weight: Approximately 2.72 ounces (77 grams)
- Product Dimensions: Approximately 7 x 6 x 0.25 inches (17.78 x 15.24 x 0.64 cm)
- UPC: 191070014704
- Application: Hi-Performance ATV Gasket/Seal (OE replacement and performance builds)
- Manufactured: In the U.S.A.
9. Warranty Information
Cometic Gasket products are manufactured to high standards. For specific warranty terms and conditions, please refer to the official Cometic Gasket website or contact their customer service directly. Keep your proof of purchase for any warranty claims.
10. Customer Support
For technical assistance, product inquiries, or warranty support, please contact Cometic Gasket directly:
- Website: www.cometic.com (Note: This is a placeholder URL, please verify the actual website.)
- Phone: Refer to the official website for contact numbers.
- Email: Refer to the official website for email contact.
When contacting support, please have your product model (C7201-EST) and purchase details ready.


