1. Important Safety Information
Please read and understand all instructions before beginning installation. Failure to do so may result in electric shock, fire, or other injuries that could be hazardous or fatal. This product must be installed in accordance with the applicable installation code by a person familiar with the construction and operation of the product and the hazards involved.
- WARNING: Risk of electric shock. Disconnect power at the circuit breaker or fuse box before installation or servicing.
- All electrical connections must be in accordance with local codes, ordinances, or the National Electric Code (NEC).
- Consult a qualified electrician if you are unsure about wiring procedures.
- Do not exceed the maximum wattage specified for the bulbs.
- This fixture is intended for indoor use only.
2. Package Contents
Carefully unpack your new fixture and lay out all parts on a clear area. Ensure all components listed below are present before discarding any packaging materials.
- A. Fixture Body (Chandelier)
- B. Mounting Hardware Kit (Crossbar, mounting screws, wire nuts, ground screw)
- C. Canopy and Collar Ring
- D. Chain and Quick Links
- E. Instruction Manual
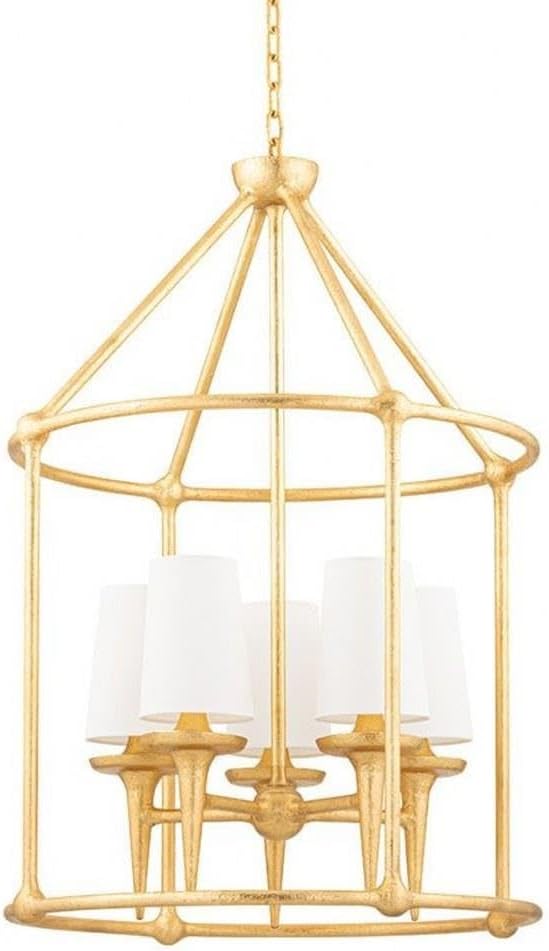
Image 1: The Hudson Valley Lighting 6625-GL Torch 5 Light Lantern, showcasing its gold leaf finish and five light sources within a decorative cage structure.
3. Setup and Installation
3.1 Tools Required (Not Included)
- Phillips Head Screwdriver
- Flat Head Screwdriver
- Wire Strippers
- Pliers
- Electrical Tape
- Ladder
3.2 Installation Steps
- Turn Off Power: Before starting, ensure the power to the junction box is turned off at the circuit breaker or fuse box.
- Prepare Mounting: Attach the mounting crossbar to the junction box using the provided mounting screws. Ensure the crossbar is securely fastened.
- Adjust Chain Length: Determine the desired hanging height for your fixture. Use pliers to open and remove excess chain links. Attach one quick link to the top loop of the fixture and the other to the mounting loop on the canopy.
- Wire Connections: Carefully connect the fixture's electrical wires to the corresponding wires from the junction box.
- Connect the bare copper (ground) wire from the fixture to the ground wire from the junction box (or to the green ground screw on the crossbar).
- Connect the ribbed or white fixture wire to the white (neutral) wire from the junction box.
- Connect the smooth or black fixture wire to the black (hot) wire from the junction box.
- Secure Canopy: Carefully push the canopy up against the ceiling, covering the junction box. Secure it in place using the collar ring, twisting it onto the threaded nipple on the crossbar until snug.
- Install Bulbs: Insert five (5) E12 candelabra base bulbs (not included) into the sockets. Do not exceed the maximum wattage of 40 watts per bulb.
- Restore Power: Once installation is complete and all connections are secure, restore power at the circuit breaker.
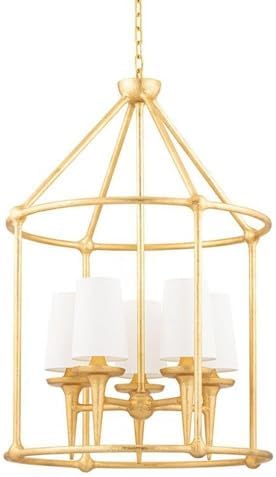
Image 2: Illustrative view of typical mounting hardware and wiring connections for a ceiling fixture. Always refer to specific diagrams if provided with your product.
4. Operating Instructions
The Hudson Valley Lighting 6625-GL Torch Lantern operates via a standard wall switch connected to the circuit. Ensure the wall switch is in the 'ON' position for the fixture to illuminate.
- Bulb Type: Uses E12 Candelabra base bulbs.
- Maximum Wattage: Do not exceed 40 watts per bulb. Using higher wattage bulbs can cause overheating and damage the fixture or create a fire hazard.
- Bulb Replacement: To replace bulbs, first turn off power at the wall switch and, if necessary, at the circuit breaker. Allow bulbs to cool before unscrewing and replacing them.
5. Maintenance
Proper care and maintenance will ensure the longevity and appearance of your lighting fixture.
- Cleaning: Always disconnect power before cleaning. To clean the fixture, wipe it with a soft, dry cloth. Do not use abrasive cleaners, solvents, or polishes as they may damage the finish.
- Inspection: Periodically inspect the fixture for any signs of wear, loose connections, or damage. If any issues are found, disconnect power and consult a qualified electrician or the manufacturer.
6. Troubleshooting
If you experience issues with your fixture, refer to the following common problems and solutions:
| Problem | Possible Cause | Solution |
|---|---|---|
| Fixture does not light | No power to the fixture Loose wire connections Faulty bulb | Check circuit breaker/fuse. Ensure wall switch is ON. Verify all wire connections are secure (with power off). Replace bulb with a new one. |
| Lights flicker | Loose bulb Loose wire connection Incorrect dimmer switch (if applicable) | Tighten bulb securely. Check wire connections (with power off). Ensure dimmer switch is compatible with incandescent bulbs. |
| Humming noise | Incompatible dimmer switch Loose components | Replace dimmer with a high-quality, compatible model. Check for any loose parts within the fixture. |
7. Specifications
| Feature | Detail |
|---|---|
| Model Number | 6625-GL |
| Brand | Hudson Valley Lighting |
| Dimensions (L x W x H) | 25"L x 25"W x 36.75"H |
| Item Weight | 23.1 Pounds |
| Finish | Gold Leaf |
| Material | Alloy Steel, Linen (Shade) |
| Number of Lights | 5 |
| Bulb Base | E12 Candelabra |
| Max Wattage per Bulb | 40 Watts |
| Power Source | Corded Electric |
| Assembly Required | Yes |
| Room Type | Living Room (Recommended) |
8. Warranty and Support
Hudson Valley Lighting products are manufactured to high standards and are backed by a manufacturer's warranty. For specific warranty details, please refer to the documentation included with your purchase or visit the official Hudson Valley Lighting website.
For technical assistance, replacement parts, or any questions regarding your 6625-GL Torch Lantern, please contact Hudson Valley Lighting customer support directly. Contact information can typically be found on their official website or on the product packaging.
Online Support: www.hudsonvalleylighting.com


