
1. Introduction
This manual provides essential information for the safe and efficient operation of your CHAUVET DJ LEDsplash Jr LED Washlight. Please read and understand all instructions before installing or using this product. Retain this manual for future reference.
The CHAUVET DJ LEDsplash Jr is a compact and powerful LED washlight designed for various lighting applications, featuring DMX-512 control, vibrant RGB color mixing, and built-in automated programs.
2. Safety Information
WARNING: To reduce the risk of fire or electric shock, do not expose this fixture to rain or moisture.
- Always connect the fixture to a grounded circuit.
- Ensure the voltage of the power source matches the fixture's requirements (115V/230V switchable).
- Do not open the housing. There are no user-serviceable parts inside. Refer all servicing to qualified personnel.
- Avoid direct eye exposure to the light source.
- Ensure adequate ventilation around the fixture. Do not block ventilation openings.
- Mount the fixture securely using appropriate hardware.
- Disconnect from power before cleaning or servicing.
- Do not operate if the power cord is damaged.
3. Product Features
The CHAUVET DJ LEDsplash Jr offers a range of features for versatile lighting control:
- 4-channel DMX-512 LED washlight capability.
- Equipped with 86 ultra-bright LEDs: 44 Red, 21 Green, and 21 Blue diodes.
- Functions include blackout, dimmer, and strobe effects.
- Individual control of Red, Green, and Blue diodes for precise RGB color mixing.
- Built-in color change programs for automated operation.
- Low power consumption for energy efficiency.
- Master/Slave mode for synchronized operation of multiple units.
- Long-life LEDs with an estimated lifespan of 100,000 hours.
- Switchable power input: 115V/230V.
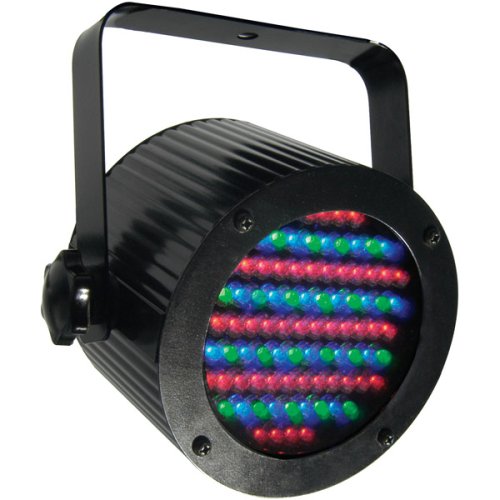
Figure 1: Front view of the CHAUVET DJ LEDsplash Jr LED Washlight. This image shows the compact black metal housing and the array of red, green, and blue LEDs.
4. Setup
4.1. Unpacking
Carefully unpack the fixture and check the contents to ensure all parts are present and in good condition. If any parts are damaged or missing, contact your vendor immediately.
4.2. Mounting
The LEDsplash Jr can be mounted in various positions (floor, truss, wall) using its adjustable mounting bracket. Ensure the mounting surface or structure can support the weight of the fixture. Always use a safety cable when mounting overhead.
- Attach the mounting bracket securely to the fixture.
- Use appropriate clamps or screws to fix the bracket to your desired surface.
- Adjust the angle of the fixture as needed.
4.3. Power Connection
Connect the fixture to a suitable power outlet. The LEDsplash Jr features switchable power (115V/230V). Ensure the switch on the back of the unit is set to the correct voltage for your region before plugging in. The fixture includes a power input and power output for daisy-chaining multiple units.
CAUTION: Do not exceed the maximum power output when daisy-chaining fixtures.
5. Operating Instructions
The LEDsplash Jr can be operated in several modes: Standalone (manual settings), Master/Slave, and DMX-512 control.
5.1. Standalone Operation (Dip Switches)
The fixture features DIP switches on the rear panel for manual configuration without a DMX controller. These switches allow you to select static colors, color change programs, blackout, dimmer, and strobe functions.
- Refer to the DIP switch chart (usually printed on the unit or in a separate quick start guide) for specific settings.
- To select a static color, set the corresponding DIP switches.
- To activate built-in color change programs, set the appropriate DIP switches.
- Adjust brightness or strobe speed using designated DIP switch combinations.
5.2. Master/Slave Mode
To synchronize multiple LEDsplash Jr units, connect them in a daisy chain using DMX cables. One unit acts as the Master, controlling the others (Slaves).
- Connect a DMX cable from the DMX OUT of the Master unit to the DMX IN of the first Slave unit.
- Continue connecting DMX OUT to DMX IN for all subsequent Slave units.
- Set the Master unit to your desired standalone mode (e.g., a color program).
- Set all Slave units to DMX mode with the same DMX address as the Master (or a specific slave address if the master is also in DMX mode and controlling slaves). Consult the DMX chart for setting slave units.
5.3. DMX Control
The LEDsplash Jr uses 4 DMX channels for advanced control via a DMX-512 controller.
- Channel 1: Red Intensity (0-255)
- Channel 2: Green Intensity (0-255)
- Channel 3: Blue Intensity (0-255)
- Channel 4: Master Dimmer / Strobe / Programs (0-255, specific values trigger different functions)
To use DMX control:
- Connect a DMX cable from your DMX controller's OUT port to the DMX IN port of the first LEDsplash Jr unit.
- Daisy-chain additional units by connecting DMX OUT to DMX IN.
- Set a unique DMX starting address for each fixture using the DIP switches. Ensure no two fixtures have overlapping addresses if you want individual control.
- Configure your DMX controller to send signals to the assigned channels.
IMPORTANT: Always use a DMX terminator at the end of a DMX chain to prevent signal reflection and ensure reliable operation.
6. Maintenance
Regular maintenance ensures optimal performance and extends the lifespan of your LEDsplash Jr.
6.1. Cleaning
- Disconnect the fixture from power before cleaning.
- Clean the exterior casing and lens with a soft, lint-free cloth.
- Do not use alcohol-based cleaners or solvents, as they may damage the finish or optics.
- Periodically clean the ventilation openings to prevent dust buildup.
6.2. Storage
When not in use, store the fixture in a dry, dust-free environment, preferably in its original packaging or a protective case.
7. Troubleshooting
If you encounter issues with your LEDsplash Jr, consult the following table before contacting support.
| Problem | Possible Cause | Solution |
|---|---|---|
| Fixture does not turn on. | No power, incorrect voltage switch setting, damaged power cord. | Check power connection, verify voltage switch (115V/230V), inspect power cord for damage. |
| No DMX control. | Incorrect DMX address, faulty DMX cable, no DMX terminator, DMX controller issue. | Verify DMX address settings, check DMX cable connections, ensure DMX terminator is used, test with another DMX controller if possible. |
| Colors are incorrect or inconsistent. | Incorrect DMX channel values, faulty internal wiring (rare). | Check DMX channel values for Red, Green, and Blue. If in standalone mode, verify DIP switch settings. |
| Fixture is unresponsive in Master/Slave mode. | Incorrect Master/Slave configuration, faulty DMX cable between units. | Ensure Master is set to a standalone program and Slaves are correctly addressed for DMX input. Check DMX cable connections. |
8. Specifications
| Attribute | Detail |
|---|---|
| Model Number | LEDsplash 86B |
| Brand | CHAUVET DJ |
| Light Source Type | LED (Light Emitting Diode) |
| Number of Light Sources | 86 (44 Red, 21 Green, 21 Blue) |
| Light Source Lifespan | Approximately 100,000 hours |
| DMX Channels | 4 |
| Power Source | Corded Electric |
| Voltage | 115V/230V (Switchable) |
| Material | Metal |
| Finish Type | Black |
| Mounting Type | Floor Mount (with bracket for other mounting options) |
| Item Weight | 1.8 Pounds (0.82 kg) |
| Item Dimensions (L x W x H) | 4.9"L x 6"W x 6.6"H (12.45 cm x 15.24 cm x 16.76 cm) |
| GTIN / UPC | 781462204570, 781462001582 |
| Manufacturer | Chauvet Lighting |
9. Warranty and Support
9.1. Manufacturer's Warranty
The CHAUVET DJ LEDsplash Jr comes with a 2-year warranty covering parts and labor from the date of purchase. This warranty covers manufacturing defects and malfunctions under normal use. Please retain your proof of purchase for warranty claims.
NOTE: The warranty does not cover damage caused by misuse, unauthorized modifications, accidents, or improper installation.
9.2. Technical Support
For technical assistance, service, or warranty inquiries, please contact CHAUVET DJ customer support. Visit the official CHAUVET DJ website for contact information and additional resources.
CHAUVET DJ Official Website: www.chauvetdj.com