
1. Product Overview
The Sangean DT-120 is a compact AM/FM stereo pocket receiver designed for portable listening. It features PLL digital tuning for precise station selection, 15 preset stations (10 FM, 5 AM), and an auto search function. The radio includes a Deep Bass Boost (DBB) feature for enhanced audio and an automatic shut-off timer to conserve battery life. Its small size and lightweight design make it ideal for on-the-go use.
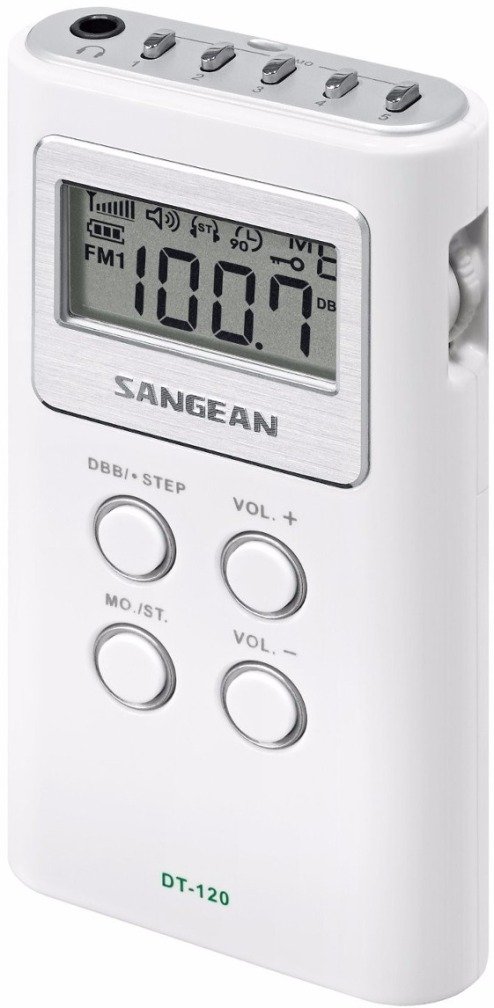
Image 1.1: Front view of the Sangean DT-120 pocket radio, showcasing its compact design and white casing.
2. Safety Information
- Do not expose the unit to extreme temperatures, direct sunlight, dust, or humidity.
- Avoid dropping the unit or subjecting it to strong impacts.
- Do not attempt to disassemble or modify the unit. Refer all servicing to qualified personnel.
- Remove batteries if the unit will not be used for an extended period to prevent leakage.
- Dispose of used batteries according to local regulations.
3. Package Contents
Verify that all items are present in the package:
- Sangean DT-120 AM/FM Stereo PLL Synthesized Pocket Receiver
- Carrying Strap
- Owner's Manual (this document)
4. Controls and Display
Familiarize yourself with the buttons and LCD display on your DT-120 radio.

Image 4.1: Detailed view of the Sangean DT-120's front panel, highlighting the LCD screen and button layout.
Button Functions:
- Power On/Off Button (Top edge): Turns the radio on or off.
- DBB / STEP Button (Front, top left): Activates/deactivates Deep Bass Boost; also used for tuning step adjustment.
- VOL + Button (Front, top right): Increases volume.
- MO./ST. Button (Front, bottom left): Switches between stereo and mono reception.
- VOL - Button (Front, bottom right): Decreases volume.
- Band Selector Button (Front, below display): Switches between AM and FM bands.
- Tuning Buttons (Front, below display): Used for manual tuning.
- Preset Buttons (Top edge, small buttons): Store and recall favorite stations.
LCD Display Indicators:
- Frequency Display: Shows the current radio frequency.
- Band Indicator: Displays AM or FM.
- Battery Indicator: Shows remaining battery life.
- Stereo Indicator: Lights up when FM stereo signal is received.
- DBB Indicator: Lights up when Deep Bass Boost is active.
- Preset Number: Indicates the currently selected preset station.
5. Setup
5.1 Battery Installation
- Locate the battery compartment cover on the back of the radio.
- Slide the cover open in the direction indicated by the arrow.
- Insert two (2) AAA batteries (not included) into the compartment, ensuring the correct polarity (+ and -) as marked.
- Close the battery compartment cover securely.
- The battery indicator on the LCD display will show the current battery level.
5.2 Connecting Earbuds/Headphones
The DT-120 uses your earbuds or headphones as its antenna for FM reception. For optimal performance, ensure they are properly connected.
- Locate the headphone jack (3.5mm) on the side of the radio.
- Insert the stereo earbuds or headphones (not included) firmly into the jack.
- For AM reception, the radio uses a built-in ferrite bar antenna.
6. Operation
6.1 Power On/Off
- To turn the radio ON, press the Power On/Off button on the top edge.
- To turn the radio OFF, press the Power On/Off button again.
6.2 Tuning AM/FM Stations
- Press the Band Selector button to choose between AM and FM bands.
- Manual Tuning: Press the Tuning Up or Tuning Down buttons repeatedly to adjust the frequency step by step.
- Auto Search System (ATS): Press and hold the Tuning Up or Tuning Down button for a few seconds. The radio will automatically scan and stop at the next strong station.
6.3 Setting and Recalling Presets
The DT-120 allows you to store up to 15 stations (10 FM, 5 AM) for quick access.
To Store a Station:
- Tune to the desired station using manual or auto tuning.
- Press and hold one of the small Preset Buttons (P1-P5 for AM, P1-P10 for FM) on the top edge until the preset number flashes on the display, indicating the station is saved.
To Recall a Stored Station:
- Briefly press the corresponding Preset Button (P1-P5/P1-P10) to instantly tune to the saved station.
6.4 Volume Control
- Press the VOL + button to increase the listening volume.
- Press the VOL - button to decrease the listening volume.
6.5 Deep Bass Boost (DBB)
- Press the DBB / STEP button to activate or deactivate the Deep Bass Boost function.
- When active, the DBB indicator will appear on the LCD display, enhancing low-frequency audio.
6.6 Stereo/Mono Switch
- For FM reception, press the MO./ST. button to toggle between stereo and mono modes.
- Switching to mono can improve reception clarity in areas with weak FM stereo signals.
6.7 Key Lock Function
To prevent accidental button presses, the DT-120 features a key lock function.
- To activate the key lock, press and hold the Band Selector button until a key lock icon appears on the display.
- To deactivate the key lock, press and hold the Band Selector button again until the icon disappears.
6.8 Auto Shut-Off
The radio is equipped with a 90-minute auto shut-off timer to conserve battery power.
- The radio will automatically turn off after 90 minutes of continuous operation.
- To override the auto shut-off and keep the radio on for longer, press and hold the Power On/Off button for a few extra seconds when turning the unit on.
7. Maintenance
7.1 Cleaning
- Wipe the radio's exterior with a soft, slightly damp cloth.
- Do not use abrasive cleaners, waxes, or solvents, as these can damage the finish.
- Ensure no liquids enter the unit's openings.
7.2 Battery Care
- Replace batteries when the low battery indicator appears on the display.
- Always replace both AAA batteries at the same time. Do not mix old and new batteries or different types of batteries.
- If the radio will not be used for an extended period (e.g., more than a month), remove the batteries to prevent potential leakage and damage.
8. Troubleshooting
| Problem | Possible Cause | Solution |
|---|---|---|
| Radio does not turn on. | Batteries are dead or incorrectly inserted. | Replace with fresh AAA batteries, ensuring correct polarity. |
| Poor FM reception or static. | Earbuds/headphones not fully inserted or acting as antenna. Weak signal. | Ensure earbuds are fully plugged in. Try repositioning the radio or switching to mono mode using the MO./ST. button. |
| Poor AM reception. | Interference or weak signal. | Rotate the radio for better reception, as the AM antenna is internal. Move away from electronic devices that may cause interference. |
| No sound. | Volume is too low. Earbuds/headphones faulty. | Increase volume using VOL + button. Test with different earbuds/headphones. |
| Buttons are unresponsive. | Key lock function is active. | Deactivate key lock by pressing and holding the Band Selector button. |
| Radio freezes or behaves erratically. | Temporary software glitch. | Remove batteries for a few minutes, then reinsert them to reset the unit. |
9. Specifications
| Feature | Specification |
|---|---|
| Brand | Sangean |
| Model | DT-120 |
| Dimensions (L x W x H) | 1.93" x 0.69" x 3.64" (4.9 cm x 1.75 cm x 9.25 cm) |
| Weight | 0.14 Pounds (approx. 63.5 grams) |
| Power Source | 2 x AAA Batteries (3V) |
| Tuner Technology | PLL Digital Tuning |
| Radio Bands Supported | AM/FM |
| Frequency Range | FM: 87.5 - 108 MHz (typical) |
| Audio Output Mode | Mono, Stereo (via headphones) |
| Display Type | LCD |
| Connectivity Technology | Auxiliary (Headphone Jack) |
| Special Features | Built-In Clock, Portable, Deep Bass Boost (DBB), Auto Shut-Off (90 min), 15 Presets (10 FM, 5 AM), Auto Search System (ATS) |
| Included Components | Carrying Strap, Owner's Manual |
| Enclosure Material | Plastic |
10. Warranty Information
The Sangean DT-120 Pocket Receiver comes with a limited warranty of NINETY DAYS from the date of purchase. This warranty covers defects in materials and workmanship under normal use.
The warranty does not cover damage caused by misuse, accident, unauthorized modification, or normal wear and tear. Please retain your proof of purchase for warranty claims.
11. Support
For further assistance, technical support, or warranty inquiries, please contact Sangean customer service or visit their official website.
- Sangean Official Website: www.sangean.com
- Sangean Store on Amazon: Visit the Sangean Store


