1. Introduction
The TASCAM HD-P2 is a professional portable high-definition stereo audio recorder designed for demanding live and on-location recording applications. It offers high-resolution recording capabilities and robust features for audio professionals.
2. Setup and Connections
2.1 Unpacking and Initial Inspection
Carefully remove the HD-P2 from its packaging. Inspect the unit for any signs of damage during transit. Ensure all accessories are present.
2.2 Powering the Unit
The HD-P2 can be powered using either the included AC adapter or compatible batteries (not included). Connect the AC adapter to the DC IN port on the side of the unit. For battery operation, refer to the battery compartment instructions.
2.3 Inserting Compact Flash Media
The HD-P2 records to Compact Flash (CF) media. Locate the CF card slot on the side of the unit. Insert the CF card with the correct orientation until it clicks into place. Ensure the card is properly formatted before recording.
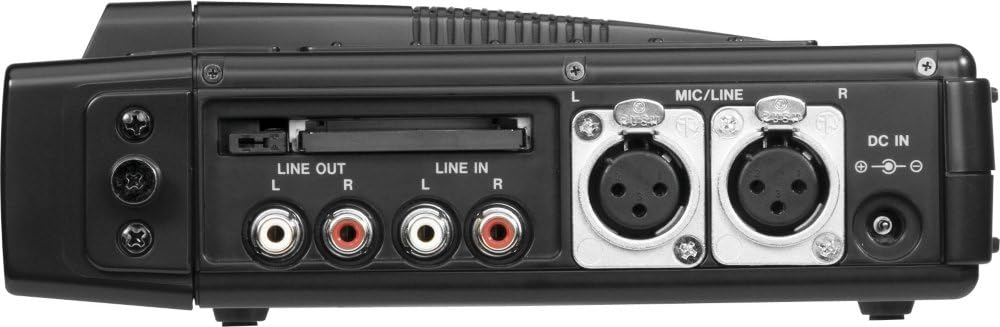
Figure 2.3: Side view of the TASCAM HD-P2, highlighting the Compact Flash slot, analog audio inputs/outputs, and DC power input.
2.4 Audio and Data Connections
The HD-P2 features various input and output connections:
- XLR Mic Inputs: Two XLR inputs with phantom power for connecting professional microphones. These are located on the side of the unit.
- Analog Line Inputs/Outputs: RCA connectors for line-level audio signals.
- Digital I/O: Coaxial digital input and output.
- FireWire (IEEE 1394): For high-speed data transfer to a computer.
- SMPTE Timecode Input: For synchronization with external devices.
- PS/2 Keyboard Input: For easier file naming and control.
- Headphones Output: 3.5mm jack for monitoring audio.

Figure 2.4: Rear view of the TASCAM HD-P2, illustrating various input/output ports including FireWire and Timecode.
3. Operating Instructions
3.1 Basic Recording
To begin recording, ensure a formatted Compact Flash card is inserted and audio sources are connected to the inputs. Adjust input levels using the dedicated knobs and monitor levels on the LCD. Press the REC button to start recording. Press STOP to end the recording.
3.2 Monitoring Audio
Connect headphones to the PHONES jack to monitor the input and recorded audio. Adjust the headphone volume using the PHONES knob.
3.3 Playback
To play back a recorded file, navigate to the desired file using the navigation buttons. Press the PLAY button to start playback. Use the FFWD and REW buttons for fast forwarding and rewinding.
3.4 Retake Function
The HD-P2 features a convenient RETAKE button. Pressing this button allows you to delete the last recorded take and immediately prepare for a new recording, streamlining the workflow for quick corrections.
3.5 File Management and Transfer
Recorded audio is saved as Broadcast WAVE files directly to the Compact Flash card. Files can be named via the front panel interface or by connecting a PS/2 keyboard. To transfer files to a computer, connect the HD-P2 via the FireWire port. The unit will appear as an external drive, allowing for fast transfer of your audio files.

Figure 3.1: Front view of the TASCAM HD-P2, showing the main controls and LCD display during operation.
4. Maintenance
4.1 Cleaning
To clean the unit, use a soft, dry cloth. For stubborn dirt, a slightly damp cloth with mild detergent can be used, ensuring no liquid enters the unit. Avoid abrasive cleaners or solvents.
4.2 Storage
When not in use for extended periods, store the HD-P2 in a cool, dry place away from direct sunlight and extreme temperatures. Remove batteries if storing for a long time to prevent leakage.
5. Troubleshooting
5.1 No Power
- Check if the AC adapter is securely connected and the power outlet is functional.
- If using batteries, ensure they are correctly inserted and fully charged.
5.2 No Recording or Poor Audio Quality
- Verify that the input sources are properly connected and active.
- Check input level settings; ensure they are not too low or too high (clipping).
- Confirm that the Compact Flash card is inserted, formatted, and has sufficient free space.
- Ensure phantom power is enabled for condenser microphones if required.
- Check microphone and cable integrity.
5.3 File Transfer Issues
- Ensure the FireWire cable is securely connected to both the HD-P2 and the computer.
- Verify that your computer's operating system recognizes the HD-P2 as an external storage device.
- Try restarting both the HD-P2 and the computer.
6. Specifications
| Feature | Description |
|---|---|
| Recording Resolution | 16/24-bit, 44.1kHz to 192kHz |
| File Format | Broadcast WAVE (BWF) |
| Storage Media | Compact Flash (CF) |
| Microphone Inputs | 2 x XLR with Phantom Power and Analog Peak Limiter |
| Digital Recording Time | Up to 5120 minutes (with 32 GB media, format dependent) |
| Hardware Interface | FireWire (USB 2.0 compatible for data transfer) |
| Dimensions (L x W x H) | 1 x 1 x 1 inches (approximate) |
| Item Weight | 1.6 pounds |
| Timecode | SMPTE Timecode Input |
7. Warranty and Support
For detailed warranty information, please refer to the warranty card included with your product or visit the official Tascam website. For technical support, product registration, or service inquiries, please contact Tascam customer support directly through their official channels.
Tascam Official Website: www.tascam.com


