1. Introduction
This manual provides detailed instructions for the proper use and maintenance of your Vivitar VIVICAM-X30 10.0 MegaPixel Slim Camera. Please read this manual thoroughly before operating the camera to ensure optimal performance and longevity.
The Vivitar VIVICAM-X30 features a 10.0 megapixel sensor, 3x optical zoom, and an 8x digital zoom, allowing for high-resolution images and versatile shooting. It includes a 2.5-inch color LTPS screen for convenient viewing and playback. Key features include electronic image stabilization, AVI movie recording at 640x480 at 30fps, and a compact design.
2. Product Overview
Familiarize yourself with the various components of your Vivitar VIVICAM-X30 camera.
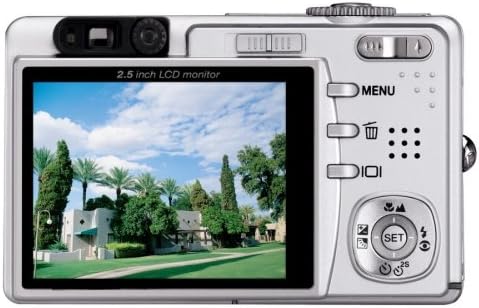
Figure 2.1: Front view of the Vivitar VIVICAM-X30, showing the lens, flash, and Vivitar branding.
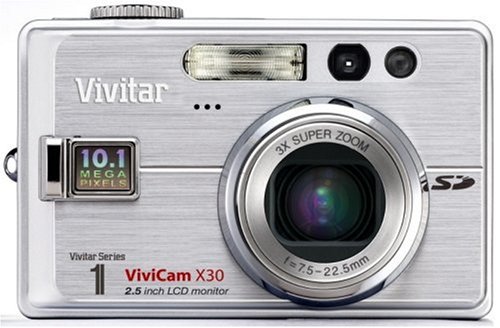
Figure 2.2: Rear view of the Vivitar VIVICAM-X30, showing the 2.5-inch LCD monitor, control buttons (MENU, delete, playback), and a directional pad with SET button. The zoom rocker is visible at the top right.
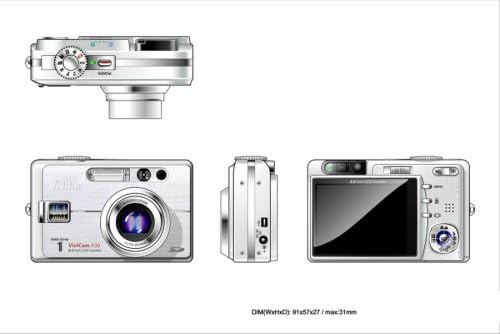
Figure 2.3: Multi-view diagram of the Vivitar VIVICAM-X30. This includes a top view with the mode dial, a front view showing the lens and flash, a side view with the USB port, and a rear view with the LCD and controls. Dimensions are indicated as 91x57x27 / max 31mm.
2.4 Camera Components
- Lens: 3x optical zoom lens.
- Flash: Built-in flash for low-light conditions.
- LCD Monitor: 2.5-inch color LTPS screen for viewing and playback.
- Control Buttons: MENU, Delete, Playback, and directional pad with SET button.
- Zoom Lever: Controls optical and digital zoom.
- Mode Dial: Selects shooting modes (e.g., Auto, Movie, Scene).
- Shutter Button: Captures photos.
- Power Button: Turns the camera on/off.
- USB Port: For connecting to a computer.
- Battery Compartment: Houses the Li-Ion battery.
- SD Card Slot: For memory card insertion.
3. Setup
3.1 Charging the Battery
- Insert the supplied Li-Ion battery into the battery charger.
- Connect the charger to a power outlet.
- The charging indicator light will show the charging status. Charge the battery fully before first use.
Note: A fully charged battery is essential for optimal camera performance.
3.2 Installing the Battery
- Open the battery compartment cover located on the bottom of the camera.
- Insert the charged Li-Ion battery according to the polarity indicators inside the compartment.
- Close the battery compartment cover securely until it clicks into place.
3.3 Inserting a Memory Card
The Vivitar VIVICAM-X30 uses SD (Secure Digital) memory cards (not included). A memory card is required to store photos and videos.
- Locate the SD card slot, typically on the side or bottom of the camera.
- Insert the SD card with the metal contacts facing the correct direction (refer to the diagram near the slot).
- Push the card gently until it clicks into place. To remove, push the card again until it springs out.
Note: Ensure the camera is powered off before inserting or removing the memory card.
4. Operating the Camera
4.1 Powering On/Off
Press the Power button to turn the camera on or off. The LCD screen will illuminate upon power-on.
4.2 Basic Photography
- Select a Mode: Rotate the mode dial to select your desired shooting mode (e.g., Auto for general use, SCN for scene modes).
- Frame Your Shot: Use the 2.5-inch LCD monitor to compose your image.
- Zoom: Use the zoom lever to adjust the optical (3x) and digital (8x) zoom.
- Focus: The camera will automatically focus when the shutter button is half-pressed.
- Capture: Fully press the shutter button to take a picture.
The camera features an Image Stabilizer to help prevent blur, especially in challenging conditions.
4.3 Scene Modes (SCN)
The VIVICAM-X30 offers various scene modes to optimize settings for specific shooting conditions. These may include Sport, Portrait, Night, and Candelight. Access these modes via the mode dial or the camera's menu system.
4.4 Video Recording
The camera can record AVI format movie clips up to 640 x 480 resolution at 30 frames per second.
- Rotate the mode dial to the Movie mode icon.
- Press the shutter button to start recording.
- Press the shutter button again to stop recording.
4.5 Playback
To view your captured photos and videos:
- Press the Playback button (often indicated by a triangle icon).
- Use the directional pad to navigate through your images and videos.
- Press the SET button to play videos.
4.6 Connecting to a Computer
To transfer photos and videos to your computer:
- Ensure the camera is powered off.
- Connect the camera to your computer using the supplied USB cable.
- Power on the camera. It should be recognized as a removable disk or mass storage device.
- Access the camera's memory card contents through your computer's file explorer.
5. Maintenance
5.1 Cleaning the Camera
- Lens: Use a soft, lint-free cloth specifically designed for camera lenses. Do not use abrasive materials or harsh chemicals.
- LCD Screen: Gently wipe with a soft, dry cloth. For stubborn smudges, use a screen cleaner designed for electronics.
- Camera Body: Wipe with a soft, dry cloth. Avoid moisture near ports and buttons.
5.2 Battery Care
- Store the battery in a cool, dry place when not in use.
- Avoid fully discharging the battery frequently to prolong its lifespan.
- If the camera will not be used for an extended period, remove the battery.
5.3 Storage
When storing the camera, especially for long periods, ensure it is clean, dry, and the battery is removed. Store it in the supplied storage case or a protective bag to prevent dust and scratches.
6. Troubleshooting
If you encounter issues with your Vivitar VIVICAM-X30, refer to the following common problems and solutions:
| Problem | Possible Cause / Solution |
|---|---|
| Camera does not power on. |
|
| Camera shuts off automatically too quickly. |
|
| Photos are too bright or washed out (especially with flash). |
|
| Cannot save photos/videos. |
|
| Camera not recognized by computer. |
|
7. Specifications
Below are the technical specifications for the Vivitar VIVICAM-X30 digital camera:
| Feature | Detail |
|---|---|
| Model Name | VIVICAM X30 |
| Effective Still Resolution | 10 MP |
| Optical Zoom | 3x |
| Digital Zoom | 8x |
| Screen Size | 2.5 Inches (LTPS TFT LCD) |
| Image Stabilization | Electronic |
| Video Resolution | 480p (640 x 480 at 30fps) |
| Video Capture Format | AVI |
| Supported File Format | AVI (Video), JPEG (Still Image) |
| Connectivity Technology | USB |
| Battery Type | Lithium Ion |
| Minimum Focal Length | 7.5 mm |
| Maximum Focal Length | 22.5 mm |
| Auto Focus Technology | Contrast Detection |
| White Balance Settings | Auto |
| Expanded ISO Maximum | 3200 |
| Item Weight | 2.22 Pounds |
| Dimensions (W x H x D) | 91 x 57 x 27 mm (max 31mm) |
8. Warranty and Support
8.1 Warranty Information
The Vivitar VIVICAM-X30 comes with a 1-Year Limited Warranty from the date of purchase. This warranty covers manufacturing defects and workmanship under normal use. Please retain your proof of purchase for warranty claims.
For specific terms and conditions of the warranty, please refer to the warranty card included with your product or visit the official Vivitar website.
8.2 Customer Support
If you require further assistance, have questions not covered in this manual, or need technical support, please contact Vivitar customer service. Contact information can typically be found on the Vivitar official website or on the product packaging.
When contacting support, please have your camera model (VIVICAM-X30) and serial number (if applicable) ready.