
1. Product Overview
The Crown XTi family of amplifiers sets the standard for portable PA systems, offering performance, technology, and affordability. The XTi Series features integrated DSP for configuring crossovers, EQ, limiting, and delay, along with tools like a pink noise generator, subharmonic synthesizer, and a universal tracking switch-mode power supply. This design reduces power draw and waste heat. Utilizing Icepak™ thermal modeling software, these amplifiers achieve thermal efficiency and lightweight portability.
Key Features
- 650 watts per channel at 8 ohms, 1200 watts per channel at 4 ohms, 3200 watts per channel at 4 ohms bridged.
- Provides up to 6000 watts of power in a 2RU 24lb package.
- Integrated Speaker Management System includes crossovers, EQ, delay, limiting, subharmonic synth, and pink noise generator.
- USB HiQnet Band Manager interface for system setup, control, and monitoring.
- Compatible with JBL factory speaker tunings for JRX, MRX, SRX, and VRX.
2. Safety Information
- Always connect the amplifier to a grounded power outlet.
- Ensure proper ventilation to prevent overheating. Do not block ventilation openings.
- Avoid exposing the unit to moisture or extreme temperatures.
- Do not attempt to service the unit yourself. Refer all servicing to qualified personnel.
- Use only specified power cords and accessories.
3. Unpacking and Initial Inspection
Carefully unpack the amplifier and inspect it for any signs of damage that may have occurred during transit. Retain the packing materials for future use. Verify that all components listed in the packing list are present.
4. Front Panel Controls and Indicators
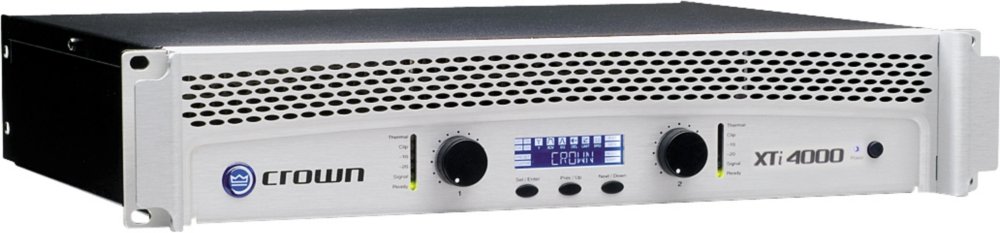
Figure 1: Front Panel of the Crown XTI 4000 Amplifier
- Power Switch: Turns the amplifier on or off.
- Channel 1/2 Gain Controls: Rotary knobs to adjust the input sensitivity for each channel.
- Signal Indicator: Green LED illuminates when an audio signal is present.
- Clip Indicator: Red LED illuminates when the output signal is clipping, indicating potential distortion. Reduce input gain if this light is consistently on.
- Fault Indicator: Red LED illuminates if the amplifier detects a fault condition.
- LCD Display: Shows various operational parameters, including channel levels (dB) and internal temperature (°F).
5. Rear Panel Connections

Figure 2: Rear Panel of the Crown XTI 4000 Amplifier
- Inputs (XLR/1/4" Combo Jacks): Accepts balanced XLR or 1/4" TRS input signals for Channel 1 and Channel 2.
- Link Out (XLR): Provides a pass-through of the input signal for connecting to additional amplifiers or other audio equipment.
- Outputs (Binding Post / Speakon): Connects to passive speakers. Binding posts accept bare wire or banana plugs. Speakon connectors provide secure connections for compatible speaker cables.
- Mode Switch: Selects between Stereo, Parallel, or Bridged operating modes.
- Crossover Switch: Configures the internal crossover for full-range, 160Hz sub, or 80Hz sub operation.
- Power Input: Standard AC power inlet for the power cord.
- Cooling Fan: Provides active cooling for the amplifier. Ensure it is not obstructed.
6. Setup
6.1 Rack Mounting
The Crown XTI 4000 is designed for 2U rack mounting. Use appropriate rack ears and screws to secure the amplifier in a standard equipment rack. Ensure sufficient space for ventilation around the unit.
Video 1: This video demonstrates the rack mounting process for similar power amplifiers, providing a visual guide for securing your unit.
6.2 Connecting Audio Sources
Connect your audio source (mixer, preamplifier, etc.) to the amplifier's input jacks using balanced XLR or 1/4" TRS cables. For stereo operation, connect the left channel of your source to Channel 1 input and the right channel to Channel 2 input. For mono or bridged operation, refer to the 'Operating Modes' section.
Video 2: This video illustrates various input connections and modes for a power amplifier, which can be applied to the Crown XTI 4000.
6.3 Connecting Speakers
Connect your passive speakers to the amplifier's output terminals. Use high-quality speaker cables. For binding post connections, ensure correct polarity (positive to positive, negative to negative). For Speakon connections, insert the connector and twist to lock. Ensure the impedance of your speakers matches the amplifier's capabilities (e.g., 4 ohms or 8 ohms per channel, or 4 ohms bridged).
7. Operating Modes
The Crown XTI 4000 offers flexible operating modes to suit different audio setups. Use the MODE switch on the rear panel to select the desired configuration.
Video 3: This video explains the different operating modes (Stereo, Parallel, Bridged) and crossover settings available on a power amplifier, applicable to the XTI 4000.
7.1 Stereo Mode
In Stereo mode, Channel 1 and Channel 2 operate independently, each amplifying a separate audio signal (e.g., left and right channels of a stereo mix). Each channel drives its own speaker(s).
7.2 Parallel Mode
In Parallel mode, a single input signal is sent to both Channel 1 and Channel 2, allowing both channels to drive separate speakers with the same mono signal. This is useful for driving multiple speakers with a single mono source.
7.3 Bridged Mode
In Bridged mode, the amplifier combines the power of both channels to drive a single, higher-power load, typically a subwoofer. This mode provides maximum output power but requires careful attention to speaker impedance to avoid damage.
7.4 Crossover Settings
The built-in crossover allows you to optimize the frequency response for your speakers. Select 'Bypass' for full-range output, 'Sub 160Hz' to send frequencies below 160Hz to the speakers, or 'Sub 80Hz' for frequencies below 80Hz. These settings are particularly useful when integrating subwoofers into your system.
8. Maintenance
- Regularly clean the amplifier's exterior with a soft, dry cloth. Avoid liquid cleaners.
- Ensure the cooling fan and ventilation grilles are free from dust and debris. Use compressed air if necessary.
- Check all cable connections periodically to ensure they are secure and free from damage.
- Store the amplifier in a cool, dry environment when not in use.
9. Troubleshooting
If you encounter issues with your Crown XTI 4000 amplifier, refer to the following common troubleshooting steps:
- No Power: Check the power cable connection, the power outlet, and the amplifier's fuse.
- No Sound: Verify all audio input and speaker output connections. Ensure the source device is playing and the amplifier's gain controls are set appropriately. Check the operating mode.
- Distorted Sound: Reduce the input gain from your source or the amplifier's channel gain controls if the 'Clip' indicator is active. Check speaker impedance.
- Overheating: Ensure adequate ventilation around the amplifier. Check if the cooling fan is operating correctly and not obstructed.
- Fault Indicator On: If the 'Fault' indicator illuminates, disconnect power and speakers, then reconnect after a few minutes. If the fault persists, contact customer support.
10. Specifications
| Specification | Value |
|---|---|
| Output Power (8 ohms) | 650 watts per channel |
| Output Power (4 ohms) | 1200 watts per channel |
| Output Power (4 ohms bridged) | 3200 watts per channel |
| Item dimensions L x W x H | 12.25 x 19 x 3.5 inches |
| Item Weight | 18.5 pounds |
| Number of Channels | 2 |
| Mounting Type | Surface Mount |
| Specification Met | CE, FCC, RoHS, WEEE |
| UPC | 871015001869 |
| Item model number | CRO XTI4000 |
| Date First Available | July 10, 2007 |
11. Warranty and Support
For warranty information and technical support, please refer to the official Crown website or contact your authorized dealer. Keep your purchase receipt as proof of purchase for any warranty claims.


